 "How do I make my Mac discoverable for AirDrop? I want to download videos from iPhone to Mac."
 "iPhone cannot detect AirDrop from Mac. How do I use AirDrop to transfer photos to Mac?"
AirDrop, is the handy feature since iOS 7 on iPhone and part of Mac computers. Apple creates it to send documents, photos, videos, websites password, map locations, and more wirelessly between AirDrop enabled devices.
However, still some users run into problems while using AirDrop to transfer files from iPhone to Mac.
Whether you are new to AirDrop, or meet obstacles while using AirDrop like AirDrop not working, not detected, etc., you could read and follow this comprehensive guide to smoothly AirDrop data from iPhone to Mac.

- Part 1. Preparations before Using AriDrop
- Part 2. Transfer Files from iPhone to Mac via AirDrop
- Part 3. AirDrop Not Working? Here Are Fixes
- Part 4. Best AirDrop Alternative – iPhone Transfer
Part 1. Preparations before Using AriDrop
Not all Apple products support AirDrop feature. For using AirDrop to transfer data from iPhone to Mac, you need to meet the following requirements.
1. Both Mac and iPhone support AirDrop feature.
- Mac from 2012 or later (excluding the mid-2012 Mac Pro) using OS X Yosemite or later.
- iPhone, iPad, or iPod touch using iOS 7 or later.
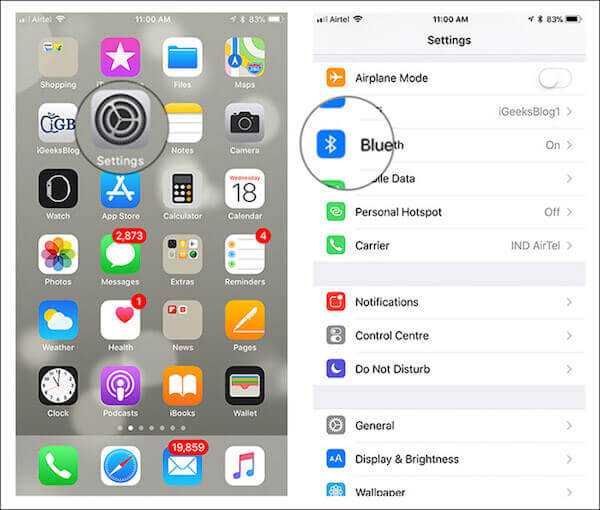
2. Make sure that Mac and iPhone are nearby (within 9 meters) and has turned on Wi-Fi and Bluetooth. If either of you have Personal Hotspot on, turn it off.
- Turn on Bluetooth on Mac: Click the Apple logo and select "System Preferences…" > "Bluetooth" > Turn on Bluetooth.
- Turn on Wi-Fi on Mac: Select "Wi-Fi" from the menu bar and turn it on.
- Turn on Bluetooth and Wi-Fi on iPhone: Scroll up from down to enable "Bluetooth" and "WiFi" on. (iPhone Bluetooth not working?)
If your device is ready, just follow us to move the next part to start to AirDrop from iPhone to Mac.
Part 2. Transfer Files from iPhone to Mac via AirDrop
For sending the files from iPhone to Mac, you need to enable AirDrop on Mac first, then let iPhone find your Mac AirDrop name, and finally send the files successfully.
Step 1Enable AirDrop on MacOn your Mac, choose "Go" > "AirDrop" from the menu. Or just click "Finder" and click "AirDrop" in the sidebar.
Then the AirDrop window will show the nearby AirDrop users. What you need to do is to select one of "Contacts Only", "Receiving Off" and "Everyone" from the drop-down arrow next to "Allow me to be discovered by:".
Here, if your Mac is not in your iPhone contact list, here you need to select "Everyone".
If your Mac is added into your iPhone contact list, here just select "Contacts Only" to avoid the data receiving from strangers nearby.
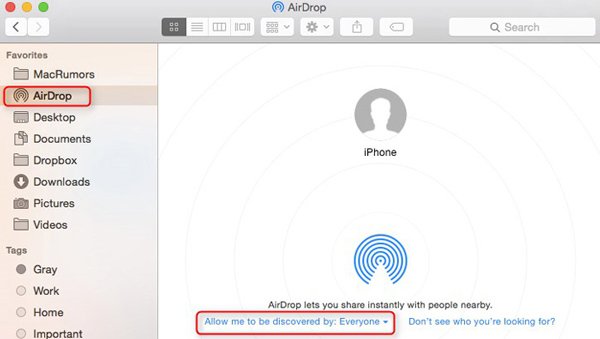 Step 2Turn on AirDrop on iPhone
Back to your iPhone, scroll up from down on your screen to open "Control Center" and tap "AirDrop" to turn it on. Again select the contacts whom you want your iPhone to be discovered by.
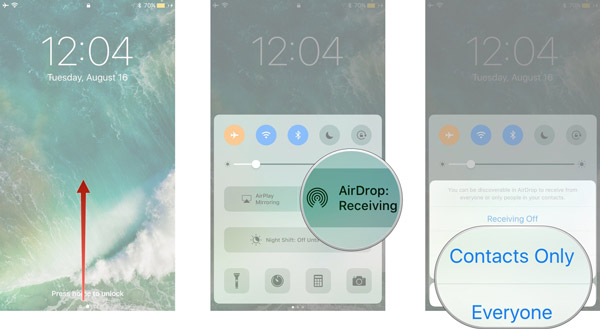
Cannot see AirDrop in Control Center? Just tap and hold the section that displays the airplane mode, wireless, cellular, and Bluetooth icons to expand the section, and you will see AirDrop there.
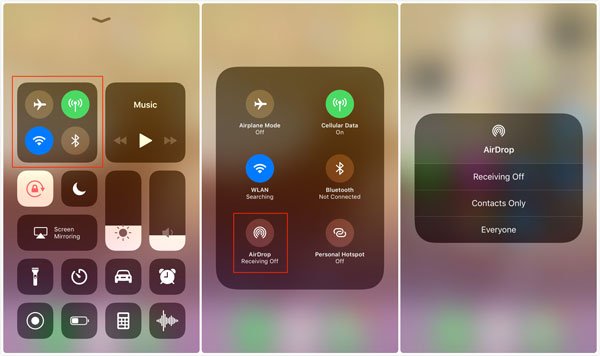 Step 3Send files from iPhone via AirDrop
Then just open the files that you want to transfer to Mac, and here we take photos as the example.
Go to "Photos" app on iPhone, open and view the photo you want to send to Mac > Find the share button at the bottom-left corner > Select "AirDrop" and you will see the contacts appear (Only the contact that can be discovered by your iPhone) > Select your Mac AirDrop name.
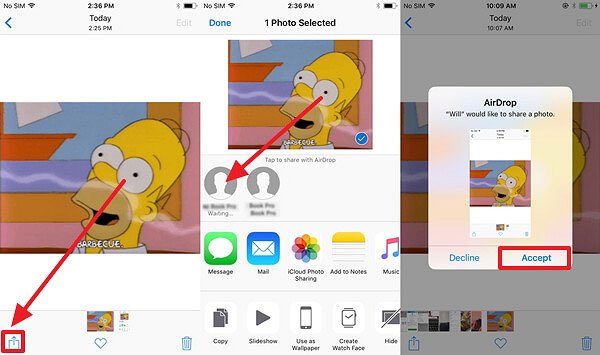
1. If you want to share multiple pictures from iPhone to Mac, just tap "Select" at the top-right corner and tick more than one pictures.
2. The AirDrop name is set by yourself. You can change the name by going to "System Preferences…" > "Sharing" > Input the AirDrop name in the "Computer Name" bar.
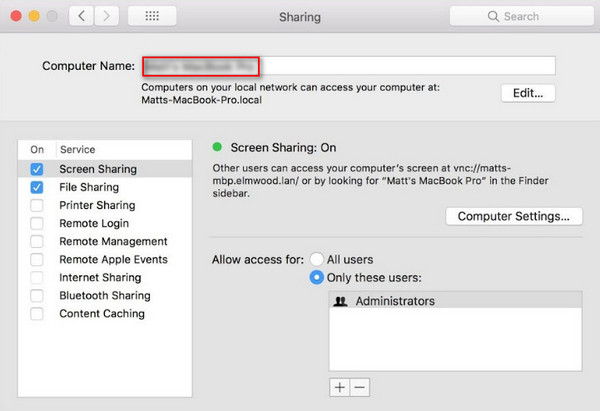 Step 4Receive files on Mac via AirDrop
Back to your Mac, there is a popup window that shows somebody is sharing a file. You need to click "Accept", and the files sent via AirDrop will be saved directly into your Downloads folder on Mac.
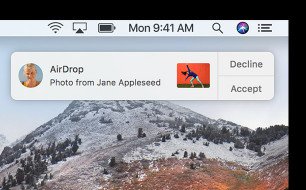
Apart from photos, you could also transfer videos, contacts, app data, iBooks, etc., from iPhone to Mac with AirDrop.
Part 3. AirDrop Not Working? Here Are Fixes
The whole process looks like very smoothly, however; still some users fail to use AirDrop to send files from iPhone to Mac, like AirDrop is not detected/recognized or not working, failed, etc. Below are the solutions.
1. While AirDrop is set to receive content from "Contacts Only", both iPhone and Mac must be signed in to iCloud, and the email address or phone number associated with the sender's Apple ID must be in the Contacts app of your Mac and iPhone.
2. For Mac from 2012 or earlier, you need to click "Don't see who you're looking for?" in the AirDrop window or sharing sheet of the sharing Mac. Then click "Search for an Older Mac."

3. Make sure "Firewall" is turned off under "Security & Privacy" to allow all incoming connections.
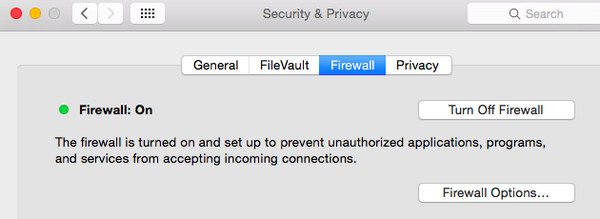
4. Make sure Personal Hotspot is turned off on iPhone (Go to "Settings" > Turn off "Cellular" and "Personal Hotspot".)
When it comes to other AirDrop not working issues, here are the details.
Part 4. Best AirDrop Alternative – iPhone Transfer
Though AirDrop is free tool to share files from iPhone to Mac wirelessly, it has some limitations you will have to face.
- 1. The transfer speed depends on the Wi-Fi speed.
- 2. You need to operate the transferring process one by one if you want to transfer photos from different albums, or transfer different types of data.
- 3. AirDrop is not compatible with all Apple devices, and has version limits.
Want to get rid of those limitations? Just get the best AirDrop alternative, iPhone Transfer.
iPhone Transfer is the iOS files transfer software, which lets you transfer data from iPhone to Mac/Windows and sync files between iOS devices.

4,000,000+ Downloads
Transfer photos, videos, contacts, SMS, music, etc. from iPhone to Mac.
Sync one or more items from iPhone to Mac at one time.
Move data from one album or playlist to another one within iPhone.
Work for iPhone 16/15/14/13/12/11/X, MacBook (Pro), iMac, etc.
Download this software on your computer, install and run it immediately. It has Windows and Mac version, and here we download the Mac version exactly. Whether you are using MacBook (Air/Pro), iMac (Pro), Mac Pro/mini, etc., or iPhone 16/15/14/13/12/11/X, etc., running in iOS 18/17/16/15/14/13/12/11, etc., you are capable of using this tool directly.
Then connect your iPhone to Mac with the USB cable, and this software will detect your Mac.
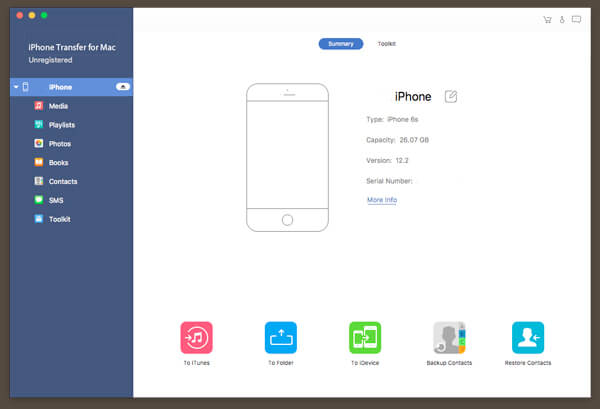 Step 2Transfer data from iPhone to Mac
In the main interface, you could see all the supported data types display in the left sidebar. Here, take Videos as the example.
Click "Videos" in the left sidebar, and checkmark the videos that you want to share with Mac. Click the "Export to Mac" button to start to send vides to Mac.
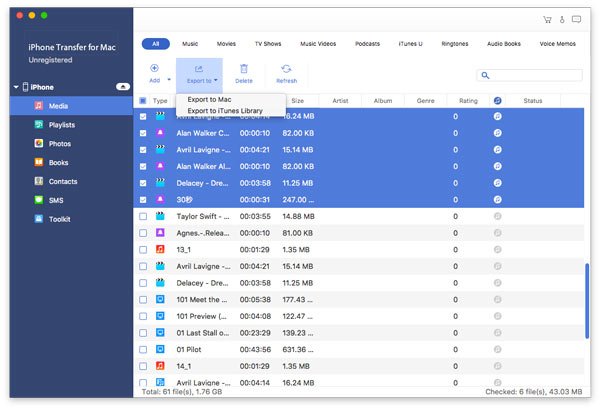
You could select the whole video playlist and send them to Mac.
Other data like photos (HEIF, GIF, PNG, JPEG, etc.), music, contacts, messages, etc., can also be copied to Mac in the way.
Moreover, it lets you delete music, move photos from one album to another one, find the duplicated contacts and merge them, share files from Mac to iPhone, and more.
Conclusion
Here, we gather the comprehensive guide of using AirDrop to send files from iPhone to Mac. AirDrop is the wireless feature to share data from iPhone to Mac. When you have minimal size of files, it will be a good solution. However, once you get massive files for moving, get the AirDrop alternative, Apeaksoft iPhone Transfer will be the ideal choice.
Any suggestion will not be hesitant to leave in the comments.

