[Easy & Fast] How to Transfer Ringtones from iPhone to iPhone
Have you been fed up with the default ringtone on your iPhone? If you have, you can customize your special ringtones using your favorite music. However, when you want to share your ringtones with your new iPhone or your friend's iPhone, you may find it difficult to do so. Suppose you want to know how to transfer ringtone from iPhone to iPhone, you can learn the finest ways to realize it.
PAGE CONTENT:
- Part 1. How to Transfer Ringtone from iPhone to iPhone Without iTunes
- Part 2: How to Transfer Ringtones from iPhone to iPhone via AirDrop
- Part 3. How to Send iPhone Ringtones to iPhone with iTunes (iTunes 12.6 and Earlier)
- Part 4. How to Copy Ringtones from iPhone to iPhone Using Cloud Services (3 Ways)
- Part 5. How to Share Ringtone iPhone to iPhone in Email
Part 1. How to Transfer Ringtone from iPhone to iPhone Without iTunes
While you think iTunes is mighty to help you sync everything on iPhone, you will find it rejects the transfer of ringtones on iPhone since iTunes 12.7 because Apple has removed the ability to manage ringtones. How do I transfer ringtones to my iPhone without iTunes? It's time for you to turn to Apeaksoft iPhone Transfer, an easy-to-use iPhone transferring software.
Transfer iPhone Ringtones to iPhone Without Restrictions
- Send ringtones from iPhone to iPhone in one click.
- Transfer ringtones from iPhone to PC and vice versa.
- Not wiping the existing ringtones on the target device.
- Compatible with all iOS devices, like iPhone 17/16/15/14/13/12/11, etc.
Secure Download
Secure Download

Please follow the detailed steps below to share ringtones from iPhone to iPhone:
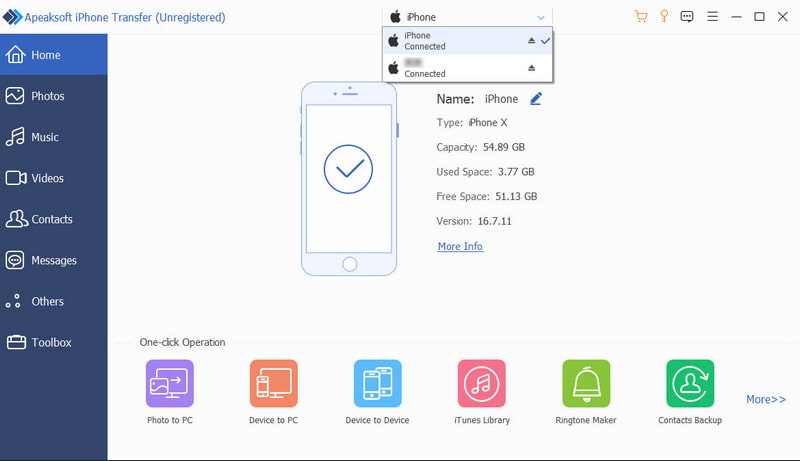
Step 1. Connect both iPhones to iPhone Transfer
Download the corresponding version of the best iPhone transferring application based on your operating system, and follow the onscreen instructions to install it on your computer. Connect both the iPhone devices to the computer with Lightning cables.
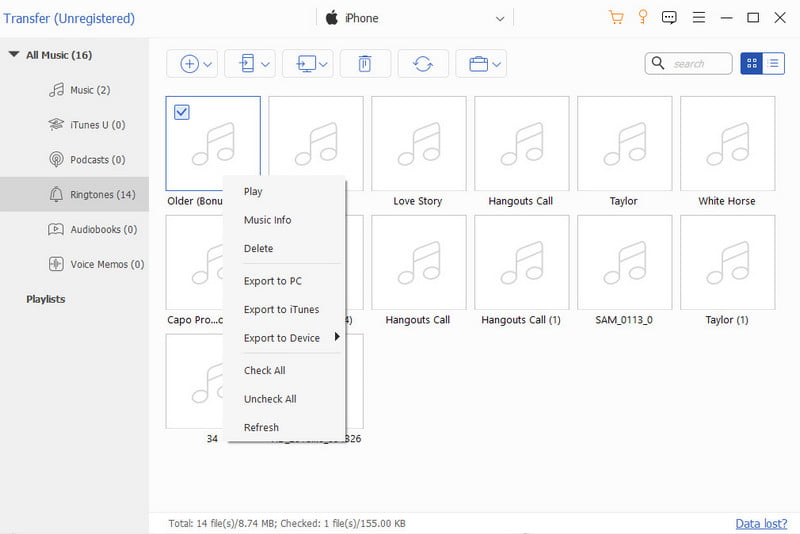
Step 2. Preview ringtones on iPhone
Click the old iPhone's name on the top drop-down menu and select the Music option under it. Choose the Ringtones tab on the right ribbon to only display ringtone files. Then all media files on your iPhone will show up. Now, you can click Play to preview, delete ringtones, or back up them to your computer. Tick the checkbox in front of each ringtone you want to send to a new iPhone.
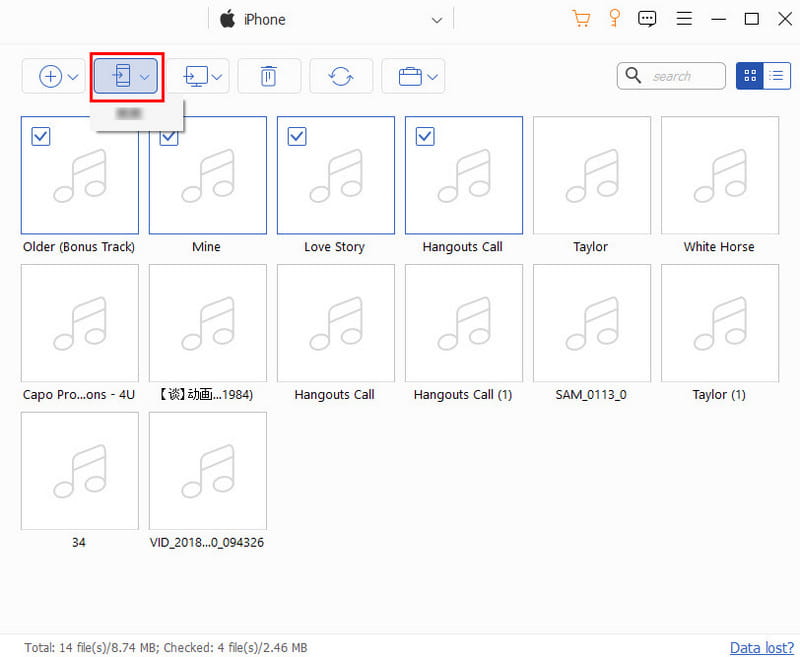
Step 3. Transfer ringtones from iPhone to iPhone
After selecting, locate the top ribbon, and select the iPhone button on the top. iPhone Transfer will start sending ringtones from iPhone to iPhone. A few seconds later when it is done, remove the iPhone devices from your computer, and you can change ringtones on your iPhone.
Tips: Besides transferring ringtones between iPhone and iPhone, you can use this powerful tool to transfer photos from iPhone to iPad, transfer contacts from iPhone to iPhone, etc.
Part 2: How to Transfer Ringtones from iPhone to iPhone via AirDrop
Can I use AirDrop to transfer ringtones from iPhone to iPhone?
The answer is Yes. If you don't have a computer, AirDrop must be your first choice to transfer ringtones to iPhone. You can use AirDrop to transfer ringtones from iPhone to iPhone easily by following the below steps:
Step 1. Open Bluetooth on both devices. Enable AirDrop on your target device and change the settings to Everyone for 10 Minutes.
Step 2. Locate the ringtone file on your old iPhone and tap the Share button. You can see the AirDrop option in the menu.
Step 3. Tap it and find your new iPhone device to transfer. Press accept on your target iPhone.
More Tips: Where Are Ringtones Stored on iPhone
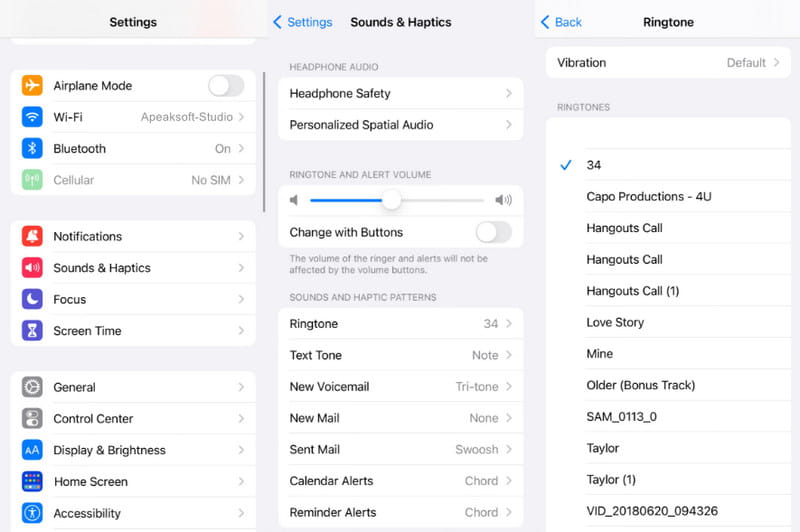
Where are ringtones stored on iPhone? How can I check my ringtones on my iPhone? Don't worry. To ensure you've successfully transferred ringtones to iPhone and set iPhone new ringtones, you can check the steps below:
Step 1. Go to the Settings app.
Step 2. Navigate to Sounds & Haptics.
Step 3. Choose Ringtone and tap one of them.
Part 3. How to Send iPhone Ringtones to iPhone with iTunes (iTunes 12.6 and Earlier)
Usually, the first option to send ringtones from iPhone to iPhone is the iTunes application. However, you may encounter the trouble that you cannot import ringtones (true .m4r files) into iTunes, let alone, your new iPhone. Why? You can uncover it with the following reasons:
• Apple eliminates the Ringtone or Tones tab from iTunes 12.7 and later.
• Only the ringtones from iTunes Store (purchased with money or not) can be sent to another iDevice. The ringtones downloaded from other sources or made by your own are not feasible.
So, you can only transfer ringtones from iPhone to iPhone with the above restrictions. If you meet the rules, you can follow the steps below to send ringtones from iPhone to iPhone using iTunes.
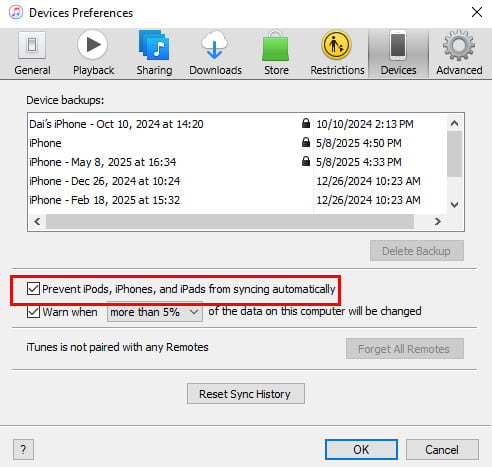
Step 1. Open the old version of iTunes on your computer, navigate to Edit > Preference > Devices, and make sure to check the option titled Prevent iPods, iPhones, and iPads from syncing automatically. This will stop the automatic sync feature and allow you to transfer ringtones selectively.
Step 2. Plug the source iPhone into your computer via a USB cable, and start the iTunes application. Unfold the File menu at the upper-left corner of the window and head to Device > Transfer Purchased. On the right panel, click the Apply button to start syncing the purchased items to the iTunes library, including purchased ringtones on your source device.

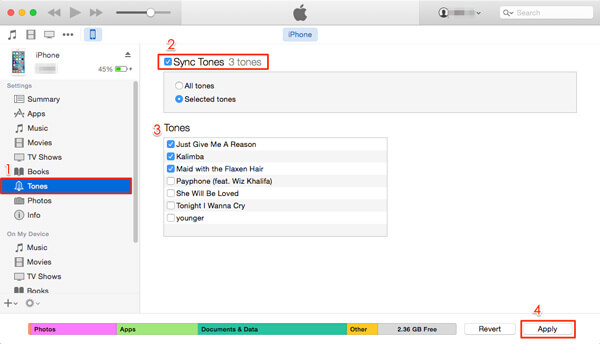
Step 3. Wait for the process to finish, and remove the source device from your computer. Use the Lightning cable to connect the target iPhone to iTunes. Click the iPhone button and click the Tones option to open the ringtones window. Make sure to tick the checkbox of Sync Tones. You will be presented with two options, All tones and Selected tones. If you want to send all ringtones from iPhone to iPhone, select the former one. The second one allows you to select certain ringtones for transferring. Select one based on your requirements.
Step 4. If you are ready, click the Apply or Sync button at the bottom right corner. It may take a while to transfer ringtones to iPhone from the iTunes library. After being sent, disconnect your iPhone from the computer and close iTunes. Now, you can customize ringtones on the new iPhone as you wish. You are able to transfer videos from iPhone to iPhone in this way as well.
Tips: After syncing iTunes to the target iPhone, you will find the existing ringtones replaced with the sync ones.
Part 4. How to Copy Ringtones from iPhone to iPhone Using Cloud Services (3 Ways)
For someone that is eager to transfer ringtone, but get no computer at hands, this part is ready for you.
The option to send ringtones to iPhone is cloud services. There are several popular cloud services on market, like Microsoft's OneDrive, Google Drive and Dropbox.
Tips: For using cloud service, please make sure you enable Internet connection on both devices. Moreover, enable cloud account on both your iPhone devices.
Way 1: How to send ringtones to iPhone with OneDrive
Step 1. Download and install OneDrive on both the previous and new iPhones. Microsoft gives 5GB free storage to each account, which is enough to transfer hundreds of ringtones from iPhone to iPhone.
Step 2. Open the OneDrive app on the previous iPhone, sign in your account, tap the + button on top of the screen to open the menu bar, which allows you to add local files to cloud server. Hit the Upload option and head to the ringtones you want to send to the target device.
Step 3. After upload the ringtones to OneDrive, turn on the target iPhone. Start the OneDrive app and log in the same account. This time, download the ringtones and save them on your new iPhone.
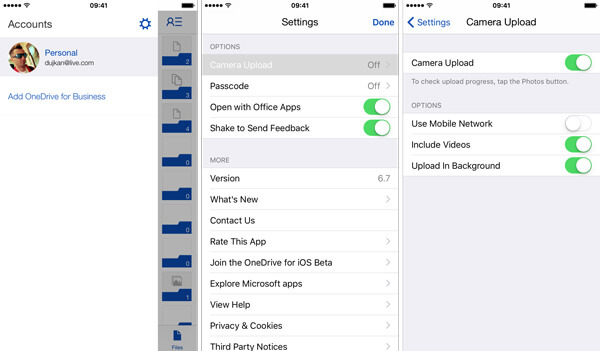
Tips: OneDrive is a cloud service. That means you need a Wi-Fi network during uploading ringtones to OneDrive and downloading them to the new iPhone. Moreover, you have to understand that Apple introduced complicated copy right regulation into iOS, so the new iPhone may not recognize the ringtones after transfer.
Way 2: How to send ringtones to iPhone with Google Drive
Google Drive is another popular cloud service and many people use it one their smartphone to do backup and transfer. Of course, it is a good option to send ringtones from iPhone to iPhone.
Step 1. Also, you need to install the Google Drive for iOS on both previous and new iPhones. And make sure both iPhone is connecting to the Wi-Fi network. It is not necessary to be the same Wi-Fi network.
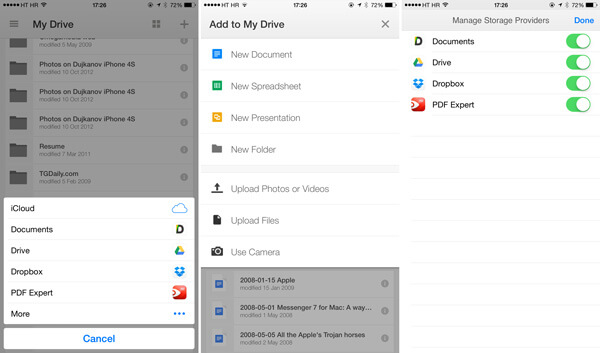
Step 2. Sign in your Google account on the previous iPhone, and locate to the ringtones you want to send to another device. Select all of them, tap the Share button and select Drive on the menu bar to upload them to your account.
Step 3. Next, unlock the target iPhone, open the Google Drive app and log in the account that you have signed in on the source device. Find the uploaded ringtones and tap the Download option to save them on your new iPhone.
Way 3: How to send ringtones to iPhone with Dropbox
Though Dropbox offers less free storage than Google Drive, many people use it to back up important files and information. Similar to other cloud services, you can use it to send ringtones from iPhone to iPhone without computer or extra devices.
Step 1. Dropbox has released the iOS app and you can install it from App Store to your devices. Now, put the source iPhone online, open the Dropbox app and sign in your account. Quit Dropbox and navigate to the app has the ringtones you want to use on the new iPhone.
Step 2. Select one desired ringtone, tap the Share button and select Save to Dropbox on the toolbox. When prompted, choose the destination folder in your Dropbox account. Then tap on Save or Upload to send the ringtone to Dropbox server. Repeat the operation to upload other ringtones.
Tips: If you do not see the Save to Dropbox button on toolbox, scroll to the right and tap on More to display it.
Step 3. Now, open Dropbox app on the target iPhone and find the ringtones. Tap the Menu button and download the ringtones to your new iPhone. Then you can set them on your new device.
Tips: Cloud services are convenient to transfer ringtones from iPhone to iPhone, but they have apparently shortcomings. The ringtones downloaded from cloud services are not always work on iPhone.
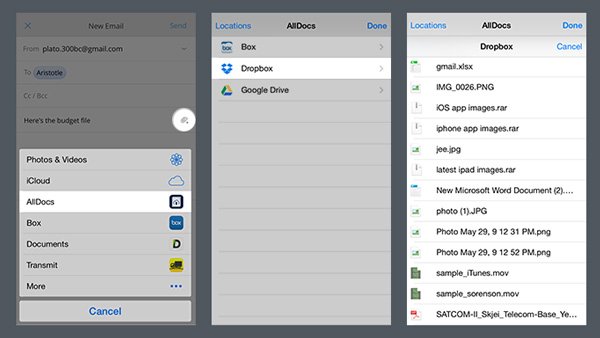
Part 5. How to Share Ringtone iPhone to iPhone in Email
Can I send ringtones from iPhone to iPhone using an email?
Of course! The steps on how to share ringtones on iPhone are as follows:
Step 1. Go to the Files app and locate the ringtone file.
Step 2. Tap the Share button and choose the Mail option to add your ringtone.
Step 3. Enter your own email account and tap the Send button.
Conclusion
In this tutorial, we have shared the 7 best and free ways to send ringtones from iPhone to iPhone. You can use iTunes, cloud service, and third-party software to move ringtones between iPhone and a new iPhone. Also, it is accessible to share a ringtone from one iPhone to another using AirDrop and Email. Pick the one that suits you best!
