If you have more than one Mac, it is important to know how to share all kinds of files from one Mac to another. As you know, file sharing has developed for a long time, however, there is still no perfect solution that can help you transfer files between Macs without any flaw.

That’s why you can never miss this passage. This tutorial is going to discuss 5 solutions to transfer files from Mac to Mac. You can learn the detailed steps about these 5 methods, but also know their merit and demerit as well. If you are interested in this topic, read on the article and learn more details.
- Part 1: How to Transfer Files from Mac to Mac via email
- Part 2: How to Transfer Files from Mac to Mac via AriDrop
- Part 3: How to Transfer Files between Macs via Dropbox and other Cloud Storages
- Part 4: How to Transfer Files between Macs via Physical Device
- Part 5: How to Transfer Files between Macs via Wire Transfer
Part 1: How to Transfer Files from Mac to Mac via email
If the size of files that you wish to transfer from Mac to Mac is quite small, it will be a good idea to share them to Mac as email attachments, especially when your Mac is not currently running. As long as your Macs are in a constant network environment, follow the next tips to learn how to use email to share files from one Mac to another:
Step 1: Send email to iOS device
After launching Email apps on your Mac, create a new address to yourself on your Mac, add the located files as an attachment to the email, and click on Send button.
Step 2: Transfer files between Macs
Turn to another Mac, start your email client, open the email sent just now, and then tap the attachment to download the files.
Step 3: Open the downloaded files
Once downloaded, you are able to access the transferred files by double clicking the file. Or you can find it in Download option from Finder.

Part 2: How to Transfer Files from Mac to Mac via AriDrop
For sharing files from one Mac to another, AirDrop should be the easiest way. AirDrop enables you to use only Wi-Fi and Bluetooth to connect and transfer files between Apple devices. It will be surprisingly fast to send small files, such as pictures, texts.
However, AirDrop is not always working well actually. It requires activation on both two Macs, and you need to wait for a long time when you use AirDrop to convert some large sized files between Macs.
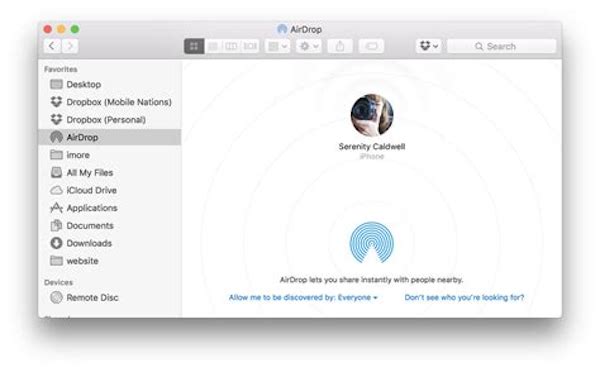
Step 1: Activate AirDrop on one Mac
Go to your Mac, launch Finder app, and you can see a list of options in the sidebar. Simply tap the AirDrop option to launch it on your Mac.
Step 2: Import files with AirDrop
And do not forget to activate AirDrop in another Mac. Once these 2 Macs are connected, select a file that you are going to transfer from Mac to Mac, drag it onto the Mac icon.
Step 3: Open files on another Mac
Turn to another Mac, and you can see a menu offering options to open the files as well as related apps to open the file type.
Part 3: How to Transfer Files between Macs via Dropbox and other Cloud Storages
Cloud Storage services is also a nice choice for you to transfer files from one Mac to another. It provides wonderful solutions to share files within multiple devices, backup and restore device and so on.
Most popular Cloud Storage services, like Dropbox, Google Drive, One Drive and etc, offer you a free storage space from 10 to 15 GB. In most cases, the free storage space is enough to share files between Macs. And you can also pay $3-4 per month to upgrade to paid version if you need more storage memory.
Step 1: Log in Dropbox
After downloading Dropbox app on App Store, launch it on your two Macs and sign into it. If you are the first time to use this app, create an account to log in this app.
Step 2: Share files with Dropbox
Select a file on one Mac that you are going to transfer to another Mac and then upload it to the Dropbox.
Step 3: Save files on another Mac
And get another Mac, find the imported files, and tap on the Download button to save it to the Mac.

Part 4: How to Transfer Files between Macs via Physical Device
If you need to access the transferred files anytime and anywhere, you can take physical storage devices like USB, SSDs, HDDs and so on into consideration. Compared with cloud service storages, physical storage device enables you to transfer huge files without an Internet connection.
The only disadvantage of using physical storage devices to share files from one Mac to another is that it is so susceptible to damage and data will be lost.
Step 1: Import file to physical storage device
Insert your physical storage device into one Mac, then find and locate a file that you are going to transfer to another Mac, drag it into the USB folders directly.
Step 2: Export file to another Mac
Then poll out the physical storage device and inset it into another Mac, open its folder, and move the converted file to the local place of your Mac.
Step 3: Open and view the file
To access the transferred file, you can easily tap on its icon. And you can also do some edits to the files later.
This method is also useful when you want to transfer files from PC to PC or from PC to Mac. But if there’s some problem with your Mac, you need to recover files from Mac first before you do the transfer.
Part 5: How to Transfer Files between Macs via Wire Transfer
You must know that your Macs are equipped with Thunderbolt ports offering insane bandwidth. However, do you know it can help you transfer files from one Mac to another? If you are looking for a solution to share huge amount of files like high-quality videos, wire transfer will be the only fast and convenient way.
One thing to illustrate, the length of the Thunderbolt wire connecting 2 Macs are quite limited, make sure your 2 Macs are close to each other physically. It will be frustrating to transfer files between Macs if these 2 machines are in two different places.
Step 1: Connect 2 Macs
Connect both of your Macs with Thunderbolt cable, which can be bought on Amazon for about $20.
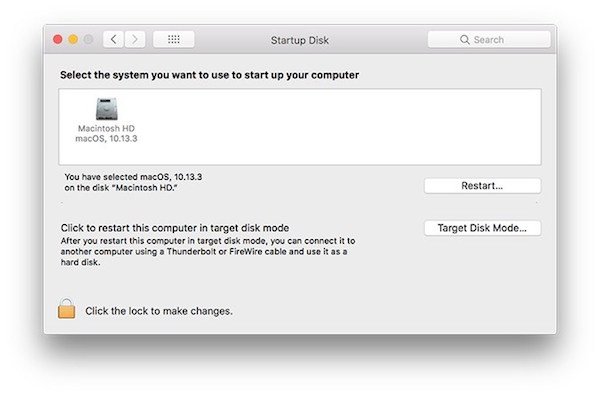
Step 2: Launch Target Disk Mode
Tap System Preferences on your Mac, choose Startup Disk, and then tap on Target Disk Mode to launch it.
Step 3: Transfer files between Macs
Next your Mac screen will get black, and a Thunderbolt icon will show up. And then you can see the hard disk of tour target Mac appears under Device option in Finder.
Conclusion
When you need to transfer files between Mac computers, you can find 5 ultimate solutions to transfer files with ease. If you have any query about these solutions, you can share more detailed information in the comments now.