A PowerPoint photo slideshow can be a valuable tool for teaching, sharing and learning. It helps a teacher teach a lesson, illustrate an event in history, display statistical and dynamic information. The possible uses of PowerPoint are countless. This article concentrates on how to make a loop slideshow in PowerPoint with photos and music. Plus, you can learn how to set up timing and other options for slideshow playback.

- Part 1. How to Make a Slideshow in PowerPoint
- Part 2. The Best Alternative to PowerPoint to Make a Slideshow
- Part 3. FAQs of PowerPoint Loop Slideshow
Part 1. How to Make a Slideshow in PowerPoint
A loop PowerPoint slideshow displays each slide automatically for a certain amount of time. Once it is done, the next slide continues automatically. When reaching the last slide, it repeats from the beginning. Before making, you should blueprint the length and outline of your slideshow and prepare the photos.
Step 1 Create a Slideshow in PowerPoint
Open PowerPoint from your desktop or Start menu. We use PowerPoint 2016 and the guide is available to PowerPoint 2010 and above. Select your favorite theme or make a blank slideshow by hitting Blank Presentation. Then you can design each slide, such as insert image, title, text, and more.
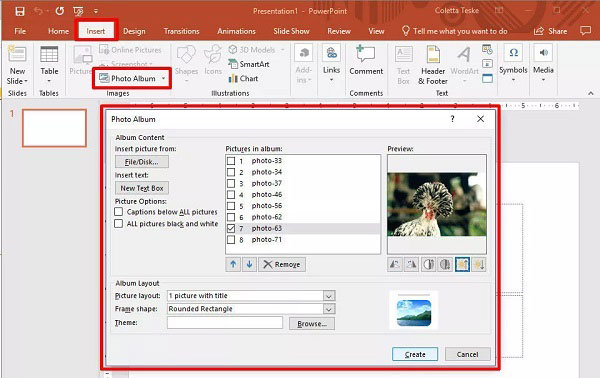
To make a photo slideshow in PowerPoint, go to the Insert tab on the top ribbon, click the Photo Album and select New Photo Album. Then click File/Disk to import photos from your hard drive, and rearrange them in the Pictures in album panel. Optimize each image with the tools under the Preview panel. If you want to add a slide for text, check the image and select New Text Box. Customize other options, including layout, frame shape and theme, and click Create button.
Note: If the photos are big in size, you had better compress the images in PowerPoint before making the slideshow.
Step 2 Add Music to PowerPoint Slideshow
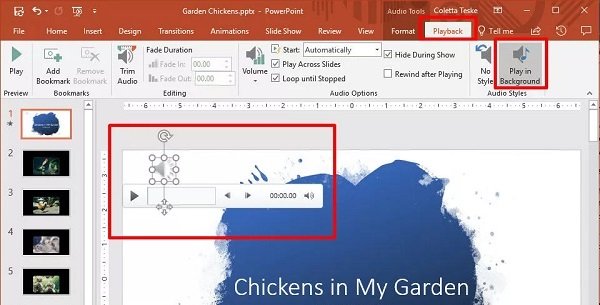
After making the basic slideshow, you may also want to add music in PowerPoint. Also go to the Insert tab on the top menu bar, click Audio and select Audio on My PC. On the pop-dialog, find the desired background music, and click Insert to add it.
Then the Playback tab is available on the menu bar. Select Play in Background and adjust the duration or volume based on your wish. You can pre-listen to the music by hitting Play.
Step 3 Set up Loop Slideshow in PowerPoint
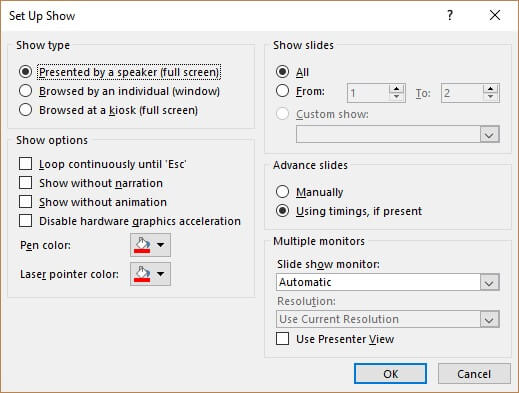
n order to set up PowerPoint slideshow loop, head to the Slide Show tab on the top, and click Set Up Slide Show in the Set Up group. Check the box next to Loop continuously until Esc. Hit OK to confirm it.
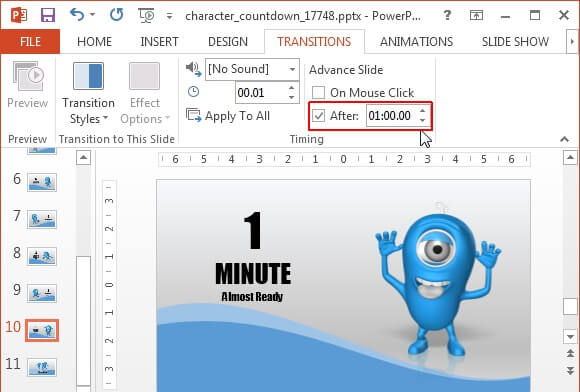
If you want to change timing of the PowerPoint slideshow, locate the left preview panel. Select all slides, go to the Transitions tab, uncheck On Mouse Click and check After in the Timing group. Adjust the time that each slide to display in the field next to After.
Step 4 Export PowerPoint Slideshow
After making a slideshow in PowerPoint, click the File menu, and select Save to export it as a presentation. To make a video PowerPoint slideshow, choose Export in File menu, and click Create a Video.
Step 5 Play PowerPoint Slideshow
Whenever you want to play a PowerPoint slideshow, open it. Then go to the Slide Show tab, and select From Beginning in the Start Slide Show group. Then the slideshow will start playing based on your settings.

Part 2. The Best Alternative to PowerPoint to Make a Slideshow
PowerPoint is not the only way to make slideshows. Many users complained that it is pretty difficult to use due to too many features. From this point, we recommend an easy-to-use alternative, Apeaksoft Slideshow Maker.
- Create a slideshow without PowerPoint within three steps.
- Support almost all image, video and audio formats.
- Set up loop slideshow in a single click.
- Add music, transition, filter, text, and more to slideshow.
- Optimize media files automatically.
In brief, it is the easiest way to make a slideshow no matter you are average people or advanced users.
Download for WinHow to Make a Slideshow with Music without PowerPoint
Step 1 Import media files
Launch the best alternative to PowerPoint once you install it on your PC. Then drag and drop the photos and video clips you want to use in the slideshow into the storyboard, and rearrange them according to your wish.

Step 2 Add music to slideshow
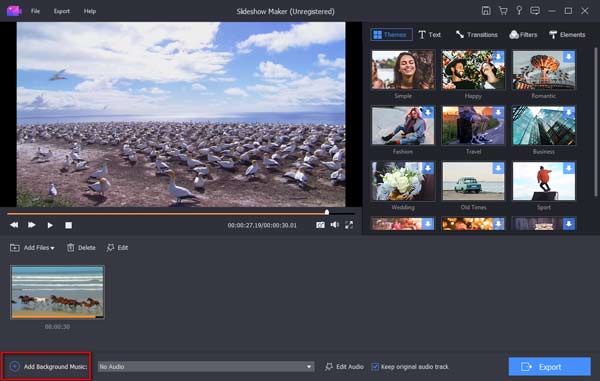
Apply theme, text, filter, transition and more to your slideshow with the tools on the right panel. Then locate the bottom area and click the Plus button next to Add Background Music to import your own music. Alternatively, you can select the built-in music from the drop-down list. Click Edit Audio and check Loop Playback and set the Duration.

Step 3 Export slideshow for any device
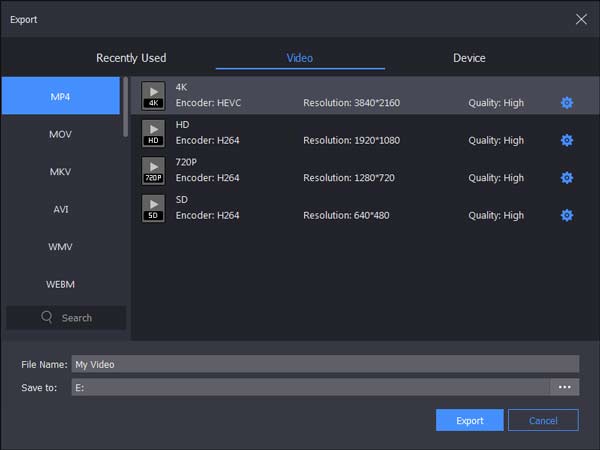
Finally, click the Export button to open the export dialog. Select a proper video format in Video tab or target device in Device tab. Type filename, set destination location, and click Export button.
Part 3: FAQs of PowerPoint Loop Slideshow
Question 1: How do you make a PowerPoint slideshow play automatically 2019?
Answer: Open your slideshow in PowerPoint, go to Slide Show menu, and click Set Up Slide Show. On the pop-up dialog, select Browsed at a kiosk under the Show type section or Loop continuously until Esc under Show options. Then your presentation will play automatically.
Question 2: How to loop a group of slides in PowerPoint?
Answer: If you just want to loop a group of slides, set up loop on the Set Up Show dialog, and choose From under Show slides area. Then set the slide range in the boxes.
Question 3: How to set PowerPoint slideshow timing?
Answer: In the Transitions tab on the top ribbon, you can get a Timing group. Once check After, you can set timing for PowerPoint slideshow.
Conclusion
This guide has discussed how to make a slideshow in PowerPoint and set up loop, timing and background music. It cannot be denied that MS PowerPoint is a good productivity tool. However, it is not the only option. That is why we shared Apeaksoft Slideshow Maker. It is easier to use than PowerPoint. If you have other questions, please write them down below this guide.

