Are you frustrated with Zoom video not working when you need it the most? In our digital age, Zoom is essential for virtual meetings and learning. Video issues, like frozen screens or black displays, hamper productivity. Fortunately, multiple causes exist for Zoom video malfunctions, each with effective solutions. If you want to restore the smooth Zoom experience, our comprehensive guide delves into common issues and offers practical fixes. Take advantage of this opportunity to reclaim the seamless Zoom experience you deserve. Explore the full post for insights into resolving the challenges hindering your video interactions.

- Part 1. Why My Zoom Video is Not Working?
- Part 2. The Best Ways to Fix Zoom Video Not Working
- Part 3. FAQs About Zoom Video
Part 1. Why My Zoom Video is Not Working?
Experiencing difficulties with your Zoom video during important meetings or virtual gatherings can be frustrating. Nevertheless, understanding the causes of these issues is the first step toward resolving them. Several factors can lead to Zoom video problems, and we've outlined four common ones below. By determining the root cause, you can take steps to ensure your Zoom video functions smoothly and reliably.
- • Network Connection Problems. Poor or unstable internet connectivity is a major culprit for Zoom video problems. If your internet connection is inconsistent or experiencing packet loss, it can result in frozen video, low-quality streams, or disconnections during Zoom meetings.
- • Outdated or Incompatible Drivers. Your webcam and graphics drivers are essential in ensuring Zoom video works seamlessly. Obsolete or incompatible drivers can lead to video issues.
- • Zoom Application Issues. Sometimes, problems with the Zoom application itself can disrupt video functionality. Outdated software, corrupted installation files, or incorrect settings may be the culprits.
- • Hardware Problems. Hardware issues can also impact Zoom video performance. If your camera or microphone is malfunctioning, Zoom won't be able to capture or transmit video or audio.
Part 2. The Best Ways to Fix Zoom Video Not Working
Now that you know the common causes of why Zoom video glitching occurs, it is time to discover the easy solutions to fix this issue. We outlined the most effective troubleshooting methods below that you can follow.
1. Utilize Advanced Tool – Apeaksoft Video Fixer
If you have recently recorded a Zoom meeting, but it is damaged, you can use Apeaksoft Video Fixer to restore it. This video repair software offers rich features, making it an ideal solution for restoring video files. It supports the repair of videos in formats like MP4, MOV, and 3GP, even accommodating the restoration of 4K and 8K videos. A remarkable capability of this tool is its ability to mend unplayable videos, whether they have issues like distortion or black screens. By providing a valid sample video for reference, Apeaksoft Video Fixer can bring your videos back to life, ensuring that the repaired video maintains the same quality as the reference.
 Key Features
- No matter the source of the problematic videos, be it lost files, shared downloads, or even those manipulated with video editing tools, this software covers it all.
- The built-in preview feature allows you to examine the fixed video's quality before saving it, ensuring satisfaction with the result.
- Apeaksoft Video Fixer is powerful and trustworthy. It is 100% clean and free of viruses and ads, guaranteeing your personal information's privacy and security.
Step 1 Install the Zoom Video Repair Software
Click the Free Download button below to obtain the software's installer. Later, execute the installer and pass over the prompts to complete the software installation. Then, open the software and familiarize yourself with its navigation and features.
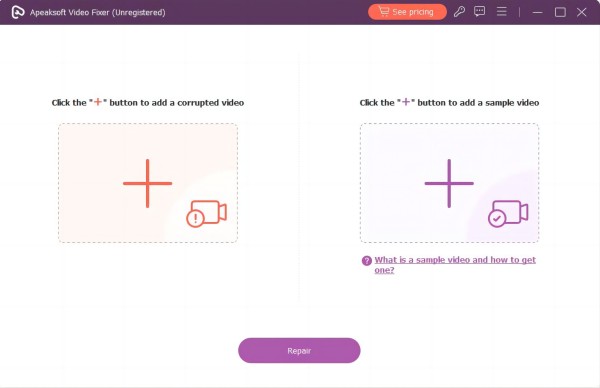
Step 2 Import Broken and Sample Videos
To commence video repair, select the + button on the left-hand side to upload your damaged video. Add a reference video by clicking the right + button for optimal results. This reference video will conduct the repair process.
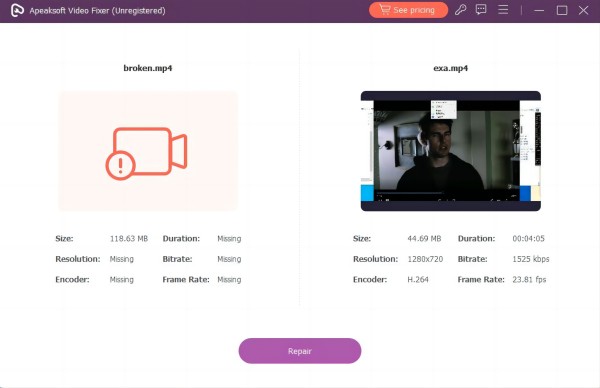
Step 3 Repair the Video
Confirm that the sample video's format matches that of the corrupted video. After verifying compatibility, initiate the repair process by clicking the Repair button. Do not turn off your computer during the process.
Step 4 Play the Repaired Video
Once the repair process successfully concludes, you'll have the opportunity to preview the video's quality improvement. This will help you check the outcome of the process and see the differences.
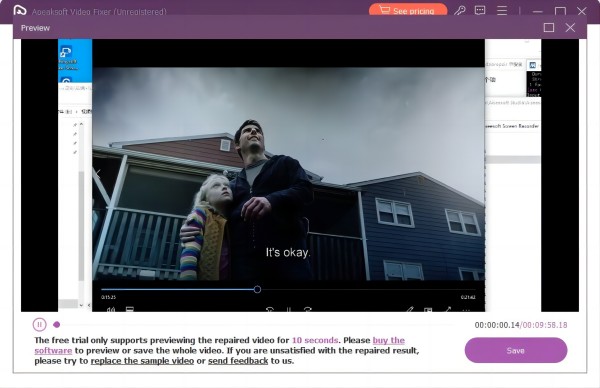
Step 5 Keep the Restored Zoom Video
Suppose the video in the preview window meets your expectations. In that case, you can save it to your computer by selecting the Save button. Furthermore, follow the same process if you have other damaged videos you want to repair.
2. Check and Update the Camera Driver
Checking and updating the camera driver is fundamental in addressing Zoom video issues. Outdated or incompatible camera drivers can result in video malfunction during Zoom meetings. In many cases, this straightforward process can significantly improve the video quality and reliability of your Zoom meetings. This is also effective if your Zoom microphone not working. See the tutorial below to learn how to check and update your camera driver.
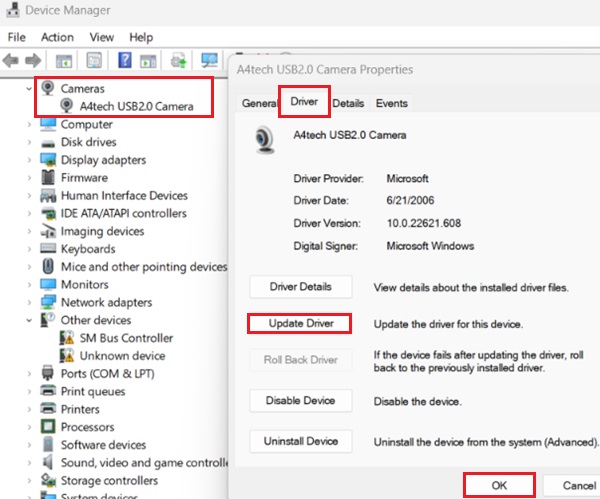
Step 1 Find the Device Manager on your computer's Start menu and click on it. Then, the Device Manager pop-out window will appear.
Step 2 Afterward, select Cameras from the list and click the connected camera you use for your Zoom app. Once done, the properties of the camera will show.
Step 3 Next, click the Driver button on the upper menu of the window and hit Update Driver. Then, click OK to confirm the update. When the new driver is installed, test the camera in the Zoom app to ensure it functions correctly.
3. Check the Camera Connection
Ensure your camera is securely connected to your computer, as a loosely attached camera can be a common culprit for camera and video-related problems in Zoom meetings. When your camera connection is not stable, it can lead to disruptions in video transmission and affect the overall performance of Zoom. To troubleshoot this, inspect the camera's physical connection to your computer, ensuring all cables and connections are snug and properly secured. Also, you can follow the guide below to learn how to solve Zoom camera not working.
Step 1 Activate your camera by powering it on and ensuring it's securely connected. If you have a built-in camera, ensure it's enabled in your computer's settings, granting Zoom access for seamless video conferencing.
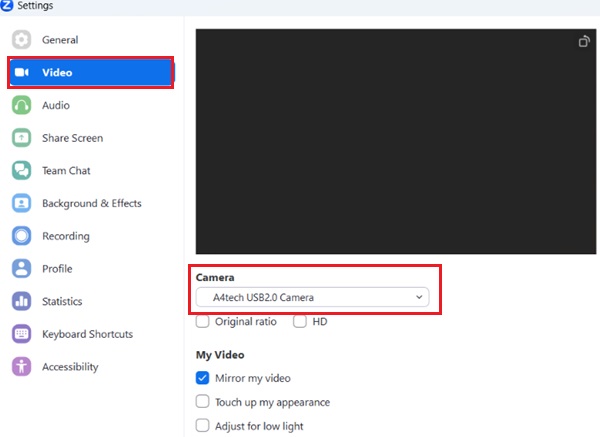
Step 2 Launch the Zoom application and locate the Settings icon at the top right corner to access the settings menu. This is where you can fine-tune your camera preferences for optimal performance.
Step 3 In the settings menu, navigate to the Video tab on the left-hand side. Look for a real-time preview of your camera's feed in the main window. Select an alternate camera source from the drop-down menu if it's not visible. This allows you to troubleshoot any issues with the chosen camera source.
4. Verify Windows Camera Access for Zoom
Confirming that Zoom has the necessary permissions to access your camera and microphone is essential for a glitch-free Zoom video conferencing experience. Amid security concerns, the Windows system disables camera and webcam access by default, deactivating these features. To help you with this, here are simple steps to unblock Zoom from Windows privacy settings, granting it the access it needs for smooth communication during virtual meetings.
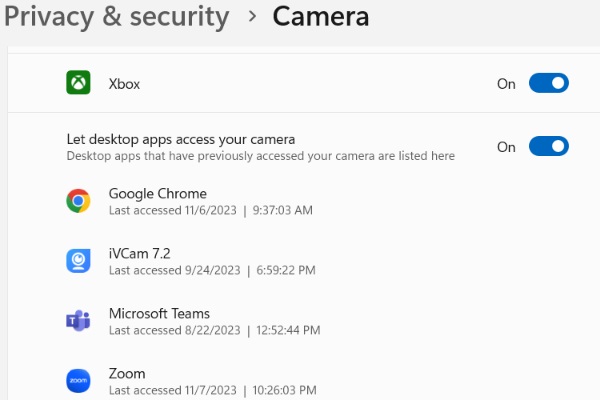
Step 1 Go to your computer's Settings by clicking the Windows logo in the bottom-left corner and selecting the Gear icon. Then, choose Privacy & security.
Step 2 Scroll down and click Camera from the options. Afterward, ensure that Camera access is switched on.
Step 3 Then, scroll down to the Let desktop apps access your camera section and make sure Zoom is turned on. Finally, check if the Zoom won't show my video issue is solved.
5. Restart Your Computer
Rebooting your computer can quickly and effectively address common issues, such as Zoom video not working or Zoom audio not working. Restarting helps clear temporary glitches, refresh system settings, and release system resources, which can often resolve problems related to camera or application functionality. When in doubt about the cause of the issue, a simple restart is an essential troubleshooting step that can conserve your time and frustration, allowing you to get back to your virtual meetings with a fully functional Zoom experience.
Part 3. FAQs About Zoom Video
Can you record a Zoom session as a participant?
Yes, participants in a Zoom meeting can record the session, but only if the host allows it. The host has the option to grant recording privileges to participants. The host has likely restricted this feature if you don't see the recording option.
Where to find Zoom recordings on the computer?
Zoom recordings are typically saved on your computer in the Zoom folder within your user directory. On Windows, this is usually in C:\Users\\Documents\Zoom. You can find them on Mac in the Documents folder inside the Zoom folder.
Why is my Zoom video just black?
A black video feed in Zoom can result from various issues. It might be due to a camera connectivity problem, a driver issue, or an application setting. To troubleshoot, ensure your camera is connected, drivers are up to date, and Zoom has permission to access your camera in your computer's privacy settings.
How can I schedule a Zoom meeting in advance?
To schedule a Zoom meeting, log in to your Zoom account and click the Schedule a Meeting option. Fill in the meeting details, set the date and time, and customize your meeting settings. After saving, you'll receive a meeting link to share with participants.
Can I join a Zoom meeting without a Zoom account?
Yes, you can join a Zoom meeting without a Zoom account. Conference participants do not need an account to attend a meeting. They can click on the meeting link provided by the host and enter their name when prompted. However, a Zoom account is required to host your meetings.
Conclusion
To sum it up, addressing Zoom video not working black screen issues is essential for a seamless virtual meeting experience. We've explored various potential causes, such as camera connectivity problems, outdated drivers, and application-related issues, and provided a range of troubleshooting methods to help you resolve these issues effectively. One of the notable solutions we discussed is using Apeaksoft Video Fixer, a powerful tool to repair damaged Zoom videos, ensuring that your recordings are preserved and accessible when needed. As technology continues to play a vital role in our lives, troubleshooting and resolving video problems in Zoom is a valuable skill. Combining our understanding of these issues with the right tools and techniques ensures that our virtual interactions remain smooth, clear, and trouble-free.