Concrete Tutorial on How to Save Voicemails from iPhone
Voicemail is one of the most popular features on iPhone. Unlike traditional text messages, Voicemail enables users to stay in touch with others by leaving voice messages. When the phone cannot be answered, it can ensure that communication is not interrupted.
We find that some people search for how to save voicemails from iPhone on forums and social media. It makes sense when you consider that voicemails take up more space than text messages. In order to free up iPhone internal storage, people have to download voicemails from the iPhone to a computer and delete them on the iOS device.
Plus, if you upgrade to a new iPhone or have two iDevices, it is necessary to grasp the skill of transferring voicemail from iPhone to iPhone. Fortunately, Apple has caught up to such demands and released several ways to move voicemails between devices using iCloud or AirDrop. In addition to Apple's services, you can learn about more options in this tutorial since we will tell you 6 ways to save voicemails from iPhone.
PAGE CONTENT:
- Part 1: Best Way to Save Voicemails from iPhone
- Part 2: How to Save Voicemails from iPhone via iCloud
- Part 3: How to Transfer Voicemails from iPhone to Other iDevices Using AirDrop
- Part 4: How to Send Voicemails from iPhone via Email
- Part 5: How to Save Voicemails from iPhone Without Visual Voicemail
- Part 6: Save voicemails from iPhone using iOS Data Backup & Restore
Part 1: Best Way to Save Voicemails from iPhone
Whether you want to free up your iPhone storage space, or want to back up your important voicemails, the most efficient way is to transfer them directly from your iPhone to your computer. Unlike iTunes or iCloud which can be time-consuming, we recommend you use Apeaksoft iPhone Transfer because it provides a faster and more flexible way to export voicemail files in just a few clicks.
Transfer Voicemails from iPhone to Computer
- Save iPhone voicemails to your computer losslessly.
- Manage your voicemails freely.
- Besides voicemails, you can also sync contacts, photos, music, etc.
- Compatible with all iOS devices and versions.
Secure Download
Secure Download

Step 1. Open the Phone app and click the Voicemail option at the bottom.
Step 2. Select your target items and press the Send button, and select Notes or Voice Memos.
Step 3. Download Apeaksoft iPhone Transfer on your computer for free and connect your iPhone to it.
Secure Download
Secure Download
Step 4. Click the Music tab in the left panel and choose the Voice Memos option. You will see the voicemails you’ve just saved.

Step 5. Check them and press the computer-like button at the top. Click Export to PC.
Part 2: How to Save Voicemails from iPhone via iCloud
Any time when we talk about transfer data from iPhone, iCloud is usually the first thing pops up in our mind. Apple released iCloud aiming to transfer various data from iPhone to another iOS device. Though it is not a perfect service, it is worth to try using iCloud to save voicemails from iPhone to another iPhone.
How to save voicemails from iPhone to iPhone
Step 1. Go to the Voicemails tab in the Phone app.
Step 2. Press the Send button.

Step 3. Click Add to iCloud Drive.
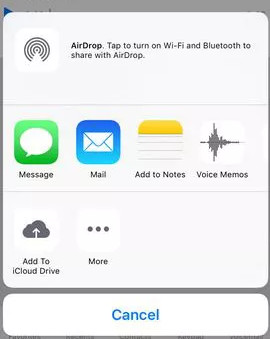
Then, you can view them on the Files app on your iOS Devices. Or, you can visit the iCloud website to access them.
Part 3: How to Transfer Voicemails from iPhone to Other iDevices Using AirDrop
To help users transfer files between iOS, Apple has released an ad-hoc service, called AirDrop, in 2011. The devices that AirDrop supports include: iPhone 17/16/15/14/13/12/11, iPad Mini, iPad Pro, iPod Touch, and the latest MacBook. And it is a good option when you want to save several voicemails from iPhone to another iOS device.
How to Save Voicemails from iPhone to iPhone via AirDrop
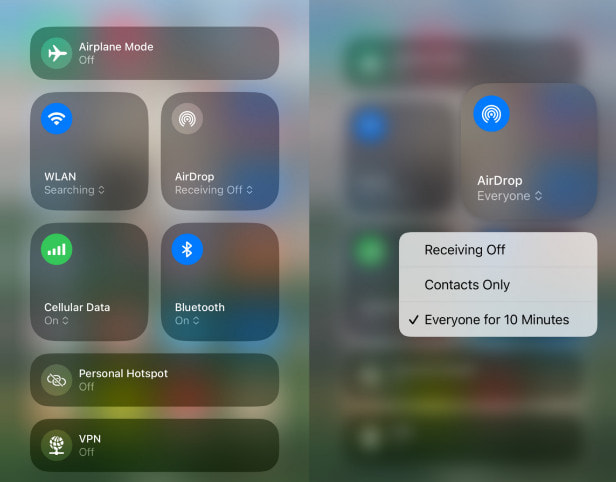
Step 1. First of all, you need to enable AirDrop on both iOS devices. You can slide down the iPhone screen from the top-right corner to turn on AirDrop.
Tips: AirDrop only needs you to enable the Wi-Fi and Bluetooth features, but not necessary to connect to another device or a Wi-Fi network.
Step 2. There are 3 ways to connect iPhone to another device via AirDrop, Off, Contacts Only and Everyone for 10 Minutes. The second option only allows iCloud contacts to discover your iPhone and transfer data. So, we suggest you to select Everyone for 10 Minutes on the source and target iOS devices.
Step 3. Visit the Phone app on the source iPhone and go to the Voicemail tab from the bottom. Here you can get all voicemails saved on your iPhone. Tap on a desired voicemail to open it and then hit Share at top of the screen to open the menu box. Tap on the AirDrop contact of the iPhone that you want to save voicemail to.
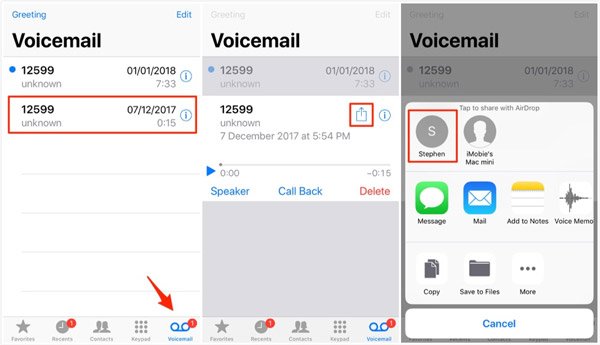
Step 4. On the target iPhone, you will get a popup message ask whether to accept the file. Tap Accept and trigger the process. Repeat the operations to transfer voicemails from iPhone to iPhone.
Tips: AirDrop is convenient to transfer a few voicemails; but if you have dozens of voicemails on the old device waiting for saving to the new device, AirDrop is a waste of time. Moreover, AirDrop is a Geo-based wireless connection. The two iOS devices must be as close as possible.
Part 4: How to Send Voicemails from iPhone via Email
AirDrop is a real-time transmission. Once you send the voicemail from the old iPhone, it will go to the target device immediately. Sometimes, AirDrop is not feasible, for example, the two iOS devices are far away from each other. Is there an alternative way to save voicemails from iPhone to iPhone? The answer is very simple - email. Today, more and more people check their emails on the smartphone. And it is also an easy way to transfer voicemails from iPhone. We use Gmail as an example in this part. For other email providers, you can just follow similar process.
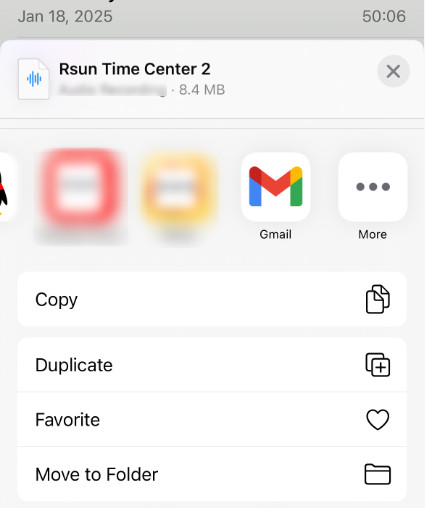
Step 1. Go to the Voicemail screen in your Phone app and touch the voicemail you want to transfer to another iPhone. Hit Share at upper right corner of the screen.
Step 2. Swipe left on the menu box and find the Gmail. Tap on it to start a new email with the voicemail. Input your Gmail account and send the email.
Step 3. On the target iPhone, go to the Gmail app and download the voicemail from the new mail.
Tips: Similar to AirDrop, email is able to save voicemail from iPhone to iPhone one by one. The difference is that email saves voicemails to servers and you can download them at any time. But this way is not suitable to transfer large amount of voicemails.
Part 5: How to Save Voicemails from iPhone Without Visual Voicemail
If your operator does not provide Visual Voicemail, you can also save Voicemails from iPhone by recording them. This method is also very easy. What you only need to do is be patient.
Step 1. Swipe down from the top-right corner of your iPhone to open the control center.
Step 2. Press the recording button.

Tips: If you can’t see the button, you can press the + button in the top-left corner to make adjustments.
Step 3. Play your voicemail on the Phone app.
Part 6: Save voicemails from iPhone using iOS Data Backup & Restore
No matter iCloud or AirDrop have inevitable disadvantages, when saving voicemails from iPhone to iPhone. iCloud does not support to transfer voicemails from iPhone to iPhone separately. And AirDrop cannot save all voicemails from iPhone to iPhone at one time. From this point, we recommend Apeaksoft IOS Data Backup & Restore. It is one of the best iPhone backup and transferring applications on the market.
Back up Voicemails from iPhone to Computer.
- Transfer voicemails from iPhone to iPhone by restoring the backup.
- Transfer multiple voicemails at once without damaging existing data on iPhone.
- It is compatible with iPhone 17/16/15/14/13/12/11, iPad Pro/Air/Mini and earlier generations, and iPod Touch.
Secure Download
Secure Download

In short, it is the easiest way to save voicemails from iPhone to iPhone. And to help you understand the procedure, we use iPhone 5 as the source device and iPhone 7 as the target device.
How to Save Voicemails from iPhone to Computer
Step 1. Install the best iPhone toolkit to your computer
Download the right version of iOS Data Backup & Restore according to the operating system, and install it on your computer. Plug the iPhone into the computer using the Lightning cable.
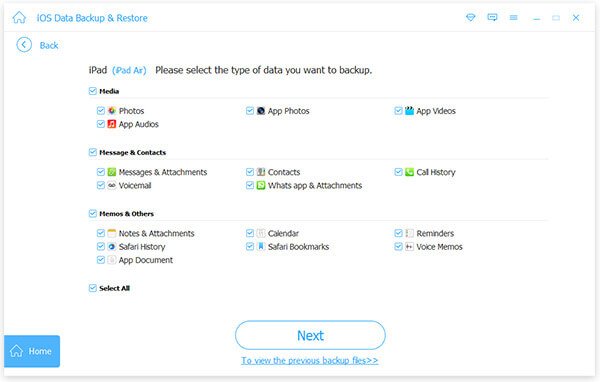
Step 2. Set data types for iPhone backup
On the home interface, choose the iOS Data Backup button to go to the next window. Next, you can decide to make a Standard backup or Encrypted backup. If you select the latter one, drop your password and click the Start button to move on. When going into the data type window, locate to the Message & Contacts section and check the box of Voicemail.
Step 3. Save voicemails from iPhone to computer
If you are ready, click the Next button at bottom of the window. On the popup dialog, pick a folder to save the voicemail backup and start saving it to your computer. When the process is complete, remove your iPhone.

Conclusion
Voicemail is a useful feature on the latest iPhone models. We have shared how to save iPhone voicemails in 6 best ways. iCloud is able to transfer voicemails and other files to the new iOS device using iCloud Drive. AirDrop is a simple way to save voicemails from iPhone to iPhone one by one. And email could help you transfer voicemails as attachments. And if you are searching for a better option to transfer voicemails, we will recommend Apeaksoft iPhone Transfer or Apeaksoft iOS Data Backup & Restore.
