You might use iMessage to chat with family, friends and colleagues frequently, which becomes an important form of communication in your daily lives. Those iMessages make a record of your lives and memories. However, what if those cherished and valuable iMessages got lost and you can never find them back? To avoid this frustrated condition, how to backup your iMessages in due course becomes an important topic. This article is going to introduce you several methods to backup iMessages. If you are interested in this content, please read on and learn.

- Part 1. How to Backup iMessages Directly from iPhone
- Part 2. How to Backup iMessages via iTunes and Extract iTunes iMessages
- Part 3. How to Backup iMessages via iCloud and Extract iCloud iMessages
Part 1. How to Backup iMessages Directly from iPhone
If you want to backup your iMessages directly, you need third-party software to help you to achieve it. And iOS Data Backup & Restore is a nice option for you to take into consideration. You can backup and search all your iMessages on iPhone, iPad and iPod touch to your PC or Mac.
Key Features:
- Save iMessages on iPhone to computer in PDF, txt, or html formats.
- Access and preview your iMessage backup at any time you want.
- Export the selected iMessage backup to your computer.
- It is totally harmless to your iOS device.
- Backup your iMessages with one-click.
Backup your iMessages Directly with iOS Data Backup & Restore
Step 1. Launch iOS Data Backup & Restore
Download iOS Data Backup & Restore on your PC or Mac, and launch it. Then use a USB cable to connect your iPhone or other iOS devices to the computer.
Here we will take Windows computer as the example to backup iMessages. If you are running a Mac, just this page to backup iMessages to Mac.
Free Download Free Download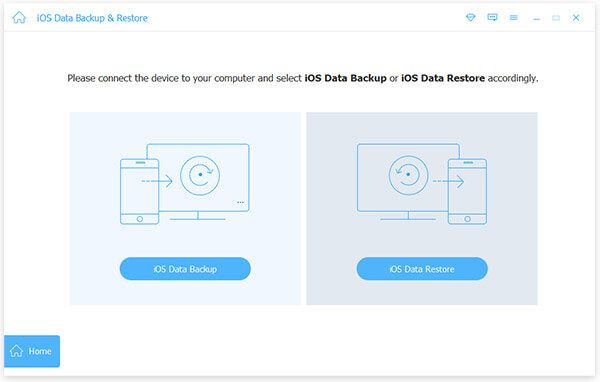
Step 2. Backup iMessages on iPhone
Choose the selected iMessages that you want to backup and click "Backup". Then these iMessage will be identified by this program. The backup process starts once the recognition is finished. Make sure that your iPhone is connected with computer during the backup process.

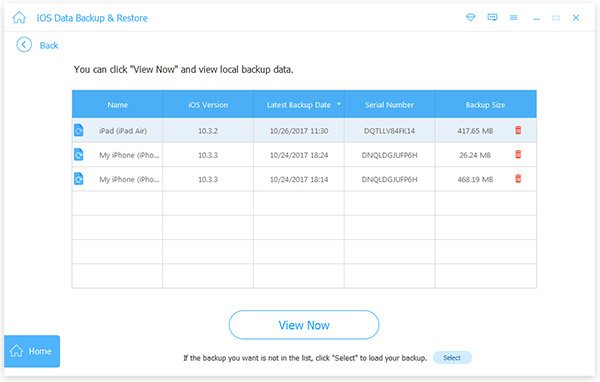
Step 3. Check iMessages in local backup
If you want to check those iMessages backup on your computer, just hit "View Now" to access them. Yes, that's it! Backing up your iMessages with iOS Data Backup & Restore is really easy!
After you back up iMessages, you are able to recover iMessages easily when you accidentally deleted or lost them.
Part 2. How to Backup iMessages via iTunes and Extract iTunes iMessages
Backup iMessages via iTunes
iTunes can back up your whole iPhone to your computer, certainly including your iMessage data. When you backup your iPhone to iTunes, your iMessages will be backed up automatically, too. To sum up, it is a great application.
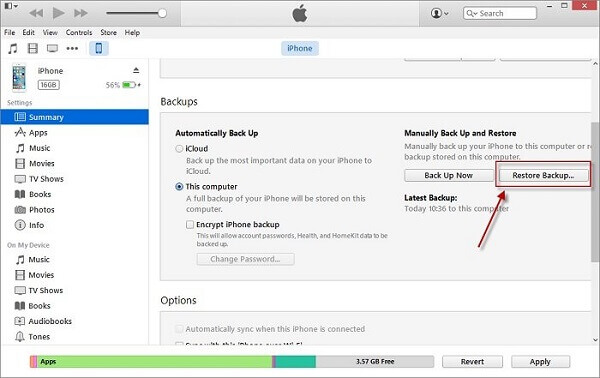
Step 1. Open the iTunes. Insert your iPhone, iPad or iPod into your computer and hit the device button.
Step 2. You can see your iPhone information in the next screen. Tap the "Back Up now" option to start the process of backing up your iPhone and iMessages.
Extract iTunes iMessages
When it comes to extract your iMessages from iTunes, you have to know that you are not allowed to access or view your iMessage backup on iTunes directly. What you need is the data backup extractor for iPhone, to access iPhone iMessages from iTunes.
Surely, if you use iOS Data Backup & Restore to backup iMessages, then here you are able to use it again to extract iMessages. Take iOS Data Backup & Restore for example.
Step 1. Download iOS Data Backup &Restore
Launch iOS Data Backup &Restore, choose the iMessage backup you want to export under the Backups section. Don't forget to keep the iPhone connected with your computer and iTunes open.
Step 2. Merge iMessages and attachments into backup
Tap the triangle near the iMessage backup you choose just now, and click the "User Information Manager". Tap the Messages Tab, and hit "Export". Click "OK" or "Yes" at the next interface, till you are informed that iMessages and attachments have been merged with the backup.
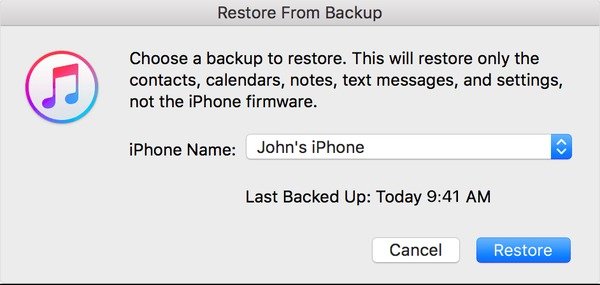
Step 3. Transfer the selected iMessages from iTunes
Go back to iTunes interface and click "Restore backup" option, choose the desired iMessage backup and hit "Restore". Now your iPhone will start to restore your iMessages from the backup.
You may also want to know: How to save Kik messages on iPhone or Android
Part 3. How to Backup iMessages via iCloud and Extract iCloud iMessages
Backup iMessages via iCloud
When you backup all the data of your iPhone to iCloud, your iMessages will be backed up at the same time, which can be done within your iOS device. Please follow us and learn how to backup iPhone messages with iCloud.
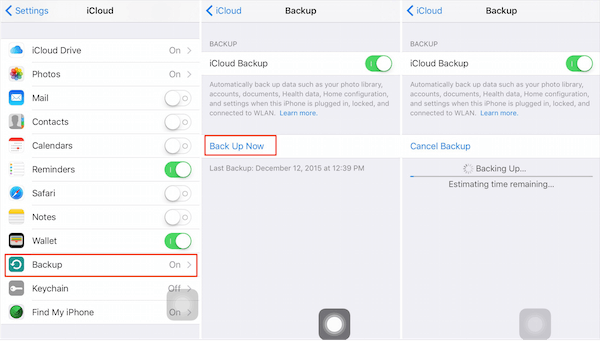
Step 1. Connect iPhone to Wi-Fi
Make sure your iPhone is connected to Wi-Fi network.
Step 2. Enter iCloud interface
Tap on the "Settings" on the main screen of your iPhone. Find the "iCloud" menu by scrolling down.
Step 3. Backup iMessages to iCloud
Berofe turning on iCloud Backup, click the option of "storage and backup". Then your iMessages will be backed up to your iCloud.
Click here to get more contacts backup apps to backup your iPhone.
Extract iCloud iMessages
Likewise, iCloud does not support you to see the detailed information of your iMessage backup. So this time we will use iOS Data Backup & Restore again. Now, read on and learn more!
Step 1. Download and install iOS Data Backup & Restore
Of course, the first way is to launch the iOS Data Backup & Restore program on your PC or Mac after you download it. And then tap on the "Recover from iCloud Backup" option.
Step 2. Choose message as the data type
Choose Message in the next interface when it asked you to select the data type you want to recover. Then click the "Next" button.
Step 3. Log in your iCloud account
You may need to log in your iCloud account and password. Only in this way can the program detect your iMessage backup in your iCloud. Select the iMessage backup you want to retrieve, and the program will begin scanning the backup files.
Step 4. Recover iMessages from iCloud
After the scan is done, you can view your iMessages in the preview window. Hit the "Recover" button and choose the location to save your iMessages.
Free 5 GB storage is limited on iCloud. After you extract the backup from iCloud, you can delete the unwanted backup from iCloud. Check it here: How to delete data from iCloud.
Conclusion
OK, that is it for how to backup your iMessages to computer and export them back to your iOS devices. Maybe it's not easy, even a little bit complicated to some extent. But, anyhow, it's a good way to preserve your iMessages and precious memories. This is exactly the beauty of sending iMessages. We hope this article can help you to back up your iMessages with ease. Here you may also want to know how to fix iMessage not delivered error on iPhone X/8/7/6/6s/5.