It is too late to back up your MacBook when you fail to access those files. Even though you are careful enough about the security of your Mac computer, it is hard to tell whether you can protect its inner data. In another word, your Mac can be attacked by many situations including malwares, system crashes, update failure, accidental deletion, etc. To avoid those embarrassing cases, you had better backup Mac to iCloud to make a copy.
If you want to backup Mac without external hard drive, then iCloud is one of your best Mac backup software. You do not need to prepare an external storage tool to backup Mac since iCloud offers 5GB free Cloud storage space and related plans. Therefore, this article aims to show you how to backup MacBook to iCloud quickly and easily.

- Part 1: Why do You Need to Back Up MacBook to iCloud
- Part 2: How to Backup MacBook to iCloud
- Bonus Tips: Backup & Restore Mac with Time Machine
Part 1: Why do You Need to Back Up MacBook to iCloud
Just as above has mentioned, nowadays digital devices are easily influenced by virus and malware attacks including your MacBook Pro or MacBook Air. If you cannot afford the data loss damage, then absolutely you need to backup MacBook Pro to external hard drive or cloud storage space. And these two methods are also widely-used by most Mac users to protect MacBook data.
Some people may still wonder is it better to backup Mac to external hard drive using Disk Utility or Time Machine. Well, you cannot deny the advantages of backing up MacBook to an external hard drive, but you can also benefit a lot from iCloud backup. For instance, you can access the backup information over the air. So it does not matter whether the condition of your external hard drive is good or not. And once you sign into your iCloud account, you can restore data on any Apple product directly. As a result, you could move Time Machine backup to iCloud for further usage. And these are reasons why the Mac needs iCloud backup.
Part 2: How to Backup MacBook to iCloud
Once you set up iCloud to back up files on your Mac, it can work automatically. Furthermore, you can restore all data from iCloud backup to a new Mac over the air. Even though there is only 5 GB free iCloud storage, you can still upgrade it with the flexible plan to manage. So using iCloud to backup Mac without Time Machine is quit.
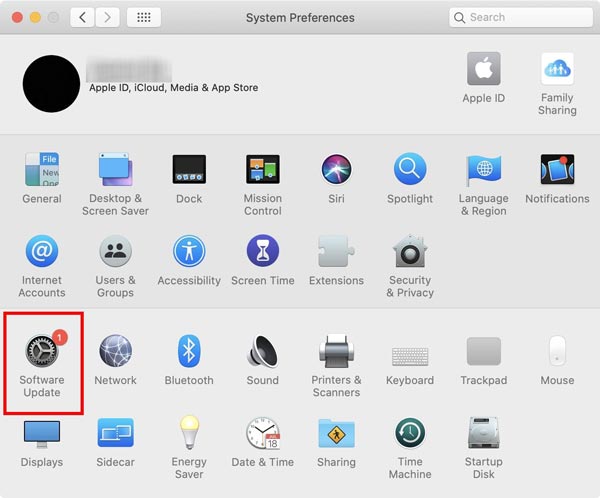
Step 1. Update your Mac
Open the Apple menu and choose "Software Update" to see whether there is an available update. You need to make sure your MacBook is running the latest OS X version before backing up MacBook to iCloud.
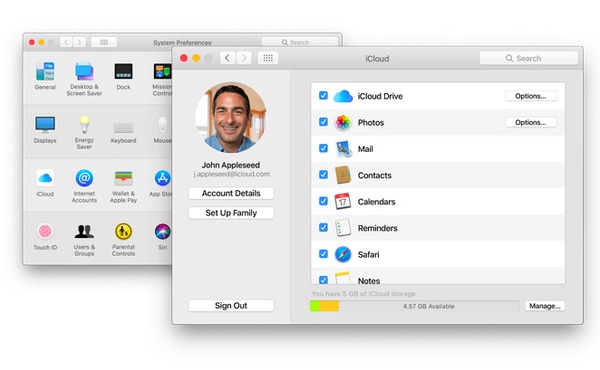
Step 2. Turn on iCloud to backup MacBook
Run "System Preferences" from the Apple menu as well. Then find "iCloud" and click it. Sign into iCloud account with your Apple ID and password. You can see all available file types to backup including photos, mail, contacts, calendars, reminders, etc. Thus, it is quite easy if you intend to backup documents to iCloud on Mac.
Step 3. Enable iCloud photos backup settings on Mac
Click "Options" next to "Photos", and then you can tick iCloud Photo Library, My Photo Stream and iCloud Photo Sharing according to your personal needs. After that, you can import recent photos and access videos among all Apple devices wirelessly. With all these have been done, it will start backing up MacBook to iCloud drive automatically.
More details about uploading photos from Mac to iCloud are here.

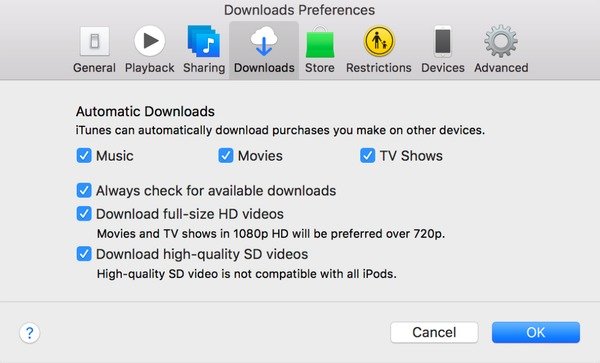
Step 4. Enable auto downloads in iTunes
You can also open iTunes and locate its Preferences to adjust iTunes auto backup on Mac. Choose "Downloads" and tick before Music, Movies and TV Shows to backup available files wirelessly. Tap "OK" to save your change.
If the left iCloud storage is not enough to store your entire Mac to iCloud backup, you can hit "Manage" button in the lower right corner to upgrade to a larger storage plan, which starts with 50GB for only $0.99 per month.
Don't Miss: Best methods to find iPhone backup on Mac
Bonus Tips: Backup & Restore Mac with Time Machine
For people who still want to backup MacBook Air and MacBook Pro using Time Machine, you can operate following steps to solve the problem.
Section 1: How to Backup MacBook to External Hard Drive
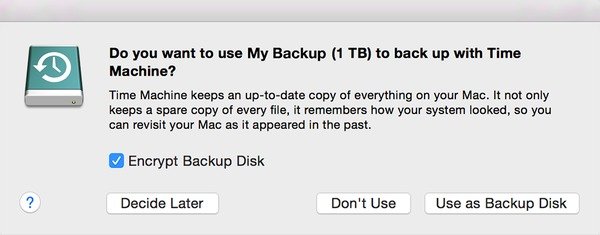
Step 1. Set up Time Machine
Connect your external hard drive to a Mac computer, and choose "Use as Backup Disk" when you are prompted to use it to backup Mac with Time Machine.
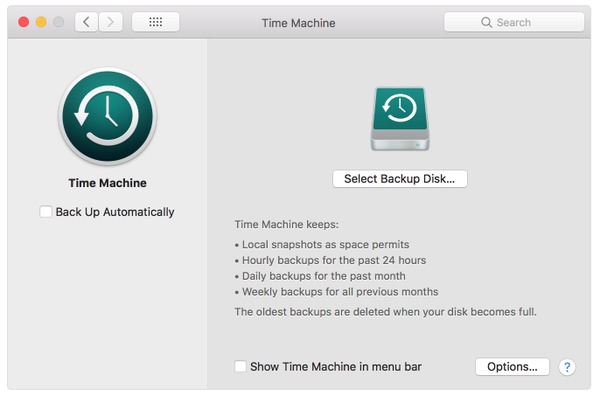
Step 2. Backup MacBook to external hard drive
Choose "Back Up Now" to backup Mac data to your external hard drive. Moreover, tick "Back Up Automatically" to make hourly/daily/weekly backups automatically if necessary. The first time you use Time Machine to back up your Mac computer, it will take longer time to complete the MacBook backup process.
Section 2: How to Restore Mac with Time Machine Backup
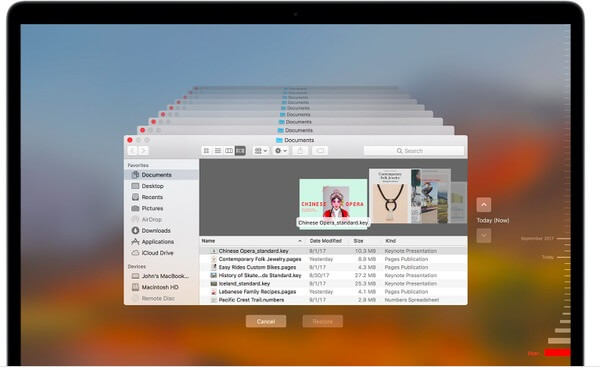
Step 1. Open the window you want to restore
For instance, you need to open the Documents folder if you want to restore a document that is deleted accidentally.
Step 2. Restore MacBook from Time Machine
Open Time Machine menu and choose "Enter Time Machine" to find the specific file from your previous backup file. Press Space Bar to preview in detail. Finally, hit "Restore" to restore Mac data from Time Machine selectively.
If you want to restore your Mac data entirely, you can choose "Restore from Time Machine" utility in macOS Recovery.
With above system backup and iCloud backup methods, you can handle key points of backing up Mac data in detail. If those files are really important, then you had better backup MacBook to iCloud and Time machine at the same time. That's all of how to backup MacBook to iCloud. Feel free to contact us if you have any problem during the Mac backup and restore process.