How to Back Up Music on iPhone Without Quality Loss
Music plays a huge role in how we use our iPhones. Whether you purchase songs from iTunes, subscribe to Apple Music, or store personal MP3 files, your playlists and tracks represent hours of listening and memories. But what happens if you lose your device, perform a factory reset, or upgrade to a new iPhone? Without a proper backup, you risk losing your favorite tunes.
The good news is that there are several ways to back up music on iPhone. In this article, we’ll explore different methods - using iCloud, iTunes/Finder, streaming services, and third-party tools to back up iPhone music and keep your music library safe and easily accessible.
PAGE CONTENT:
Part 1: The Best Way to Back Up Music on iPhone
What is the best way to back up music on your iPhone? It should be fast and stable. Apeaksoft iOS Data Backup & Restore should be your best choice. It can quickly scan all music and songs on your iPhone. Then, it will quickly back them up with great stability. You can easily access your iPhone music backup files without quality loss.
The Best Way to Back Up Music on iPhone
- Connect your iPhone to your computer to back up your iPhone music.
- Quickly scan your device to back up all music and iTunes songs.
- Keep your iPhone music backup in good quality and security.
- Support the latest iOS version and iPhone models.
Secure Download
Secure Download

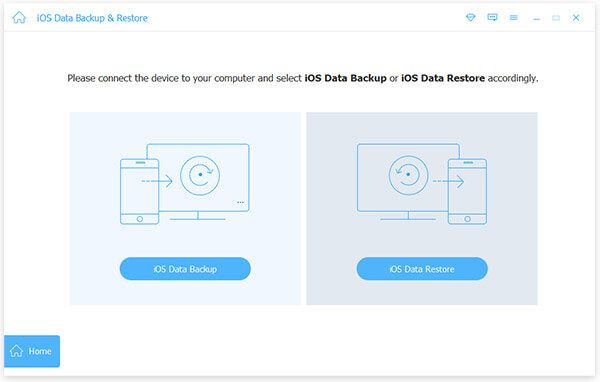
Step 1. Download, install, and launch Apeaksoft iOS Data Backup & Restore. Connect your iPhone to your computer. Then, select the iOS Data Backup tool.
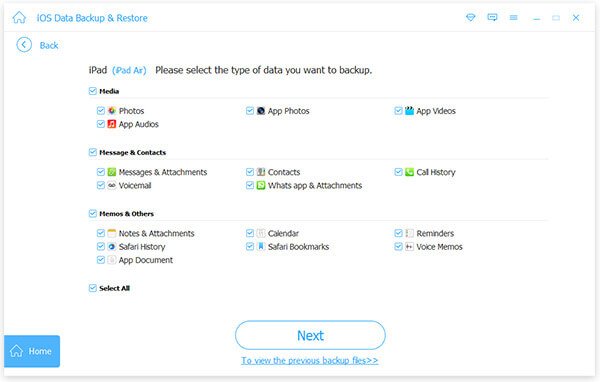
Step 2. Since you want to back up music on iPhone, you should select App Audios. Then, click the Next button to go on.
Step 3. This program will back up your music on iPhone automatically. You only need to wait for the process to finish. It will quickly be over, and you can check your iPhone music backup easily.

Part 2: Back Up Music on iPhone with iCloud
One of the simplest methods to back up music on your iPhone is to use iCloud Music Library, also known as iCloud Sync with Apple Music. If you subscribe to Apple Music or iTunes Match, you can also back up your entire music library in the cloud. Check how you can back up music on iPhone with iCloud.
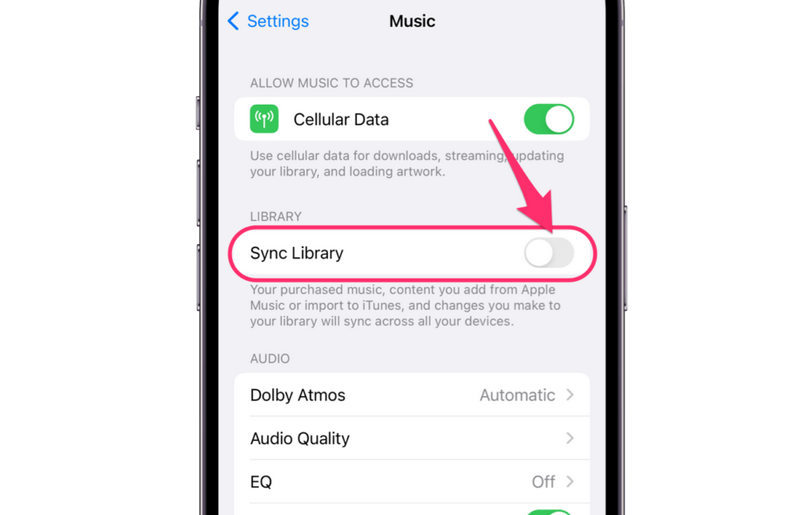
Step 1. Open the Settings app on your iPhone. Scroll down and tap Music.
Step 2. Here, you should ensure that Sync Library (or iCloud Music Library on older versions) is turned on.
Once activated, iCloud will back up music on your iPhone, and all your songs and playlists sync across devices signed in with the same Apple ID. This means you can access your music library on your iPhone, iPad, Mac, or even through iTunes on Windows.
Part 3: Back Up Music on iPhone with iTunes or Finder
iTunes or Finder is always a reliable method to back up your iPhone. Check how you can back up music on iPhone with iTunes on Windows or Finder on Mac.
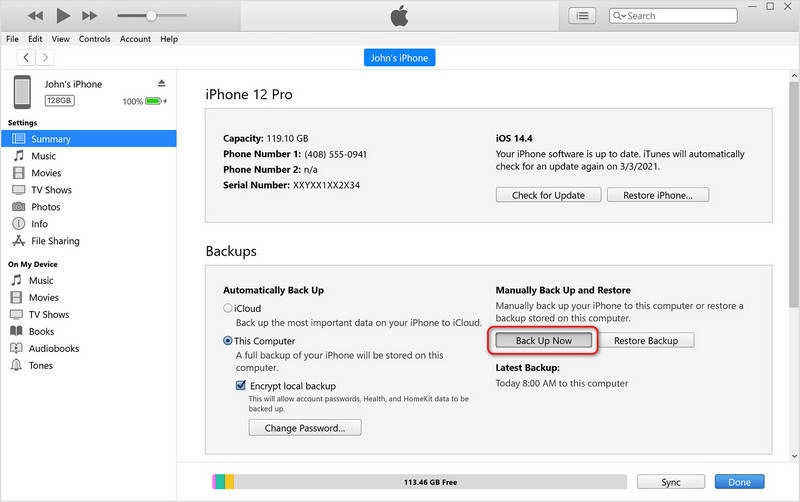
Step 1. Connect your iPhone to your computer with a USB cable. Open Finder (Mac) or iTunes (Windows) on your computer.
Step 2. Select your iPhone from the top left sidebar. Then, on the Backups section, you should click the Back Up Now button to back up music on your iPhone.
Note: You can also set an iTunes Backup password for your iPhone music backup. However, iTunes or Finder will back up the entire iPhone, so it's kind of time-wasting. If you want to back up music without iTunes or iCloud, you can still use Apeaksoft iOS Data Backup & Restore.
Part 4: Back Up Purchased Music from iTunes Store
If you've purchased songs from iTunes Store, you don't need to worry about how to back up the music on your iPhone. You can directly access or download them on any device that can access iTunes Store with your Apple ID.
Step 1. Open iTunes Store on your device. Tap the More button, and then Purchased, and then the Music button.
Step 2. Select Not on This iPhone. Then, you can tap the Download button to download your purchased music.
Conclusion
How can I back up my music on my iPhone? You can use iCloud or iTunes to back up music files on your iOS devices. If you have purchased songs from iTunes Store, you can directly download them again. If you have network issue when using iCloud or don't want to back up the entire iPhone with iTunes, you should use Apeaksoft iOS Data Backup & Restore. With it, you can select your desired file types to back up on your iOS devices without needing an internet connection.
Related Articles
With important information in your iPhone notes, you'd better backup. This post will teach you how to backup iPhone notes, choose the one that suits you best!
To back up iPhone photos, you can use iCloud Photos, iTunes, Windows Photos, and other method following our concrete tutorial.
You can learn effective approaches to back up text messages on your iPhone to iCloud or a computer to protect your information.
To start a backup to iCloud, you can learn how to back up your iPhone to iCloud automatically or manually from this single article.
