Photos are really precious memories, and you definitely do not want to lose them. And now, powerful Internet technology makes it much easier than ever to save these photos on a Mac. To keep the photos safe, you can even do photo backup on your Mac. Here are a couple of methods to back up photos on Mac, so that those cherished memories will never be lost.

- Part 1. How to Back up Photos on Mac to iCloud
- Part 2. How to Back up Photos on Mac to External Hard Drive
- Part 3. How to Back up Photos on Mac to CDs or DVDs
- Part 4. FAQs of Backing up Photos on Mac
Part 1. How to Back up Photos on Mac to iCloud
One of the options is to backup your photos on Mac to iCloud. iCloud comes with 5 GB of free storage, so you can backup photos, videos and music in it. It is really easy to operate; all you need to do is just sign in to your iCloud account and then upload your photos. An advantage of backing up photos from Mac to iCloud is that the photo backup is safer from destruction cause they are now in an online database that cannot be physically broken.
Key Features:
- Export text messages, contacts, apps, photos, call logs, music, movie, books, etc.
- Selectively back up Android data, like text messages, to your PC/Mac within one click.
- Restore the text messages to Android Smartphone from the backup at any time.
- Apply to all Android mobile devices, no matter they have root access or not.
- Support a variety of data type for the users.
- Provide a simple and convenient operation
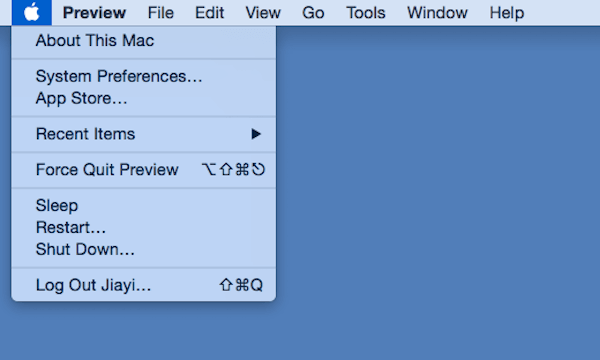
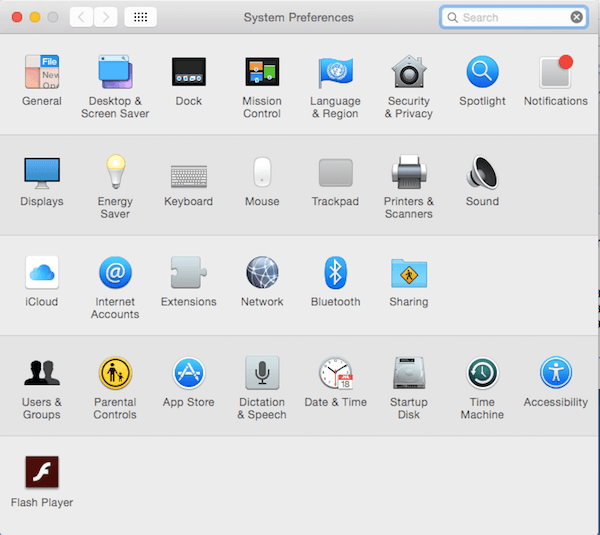
Firstly, make sure you have downloaded the latest version of macOS 15. Then tap the System Preferences in the second part of the drop-down menu, find iCloud on the left side of the screen and click it.
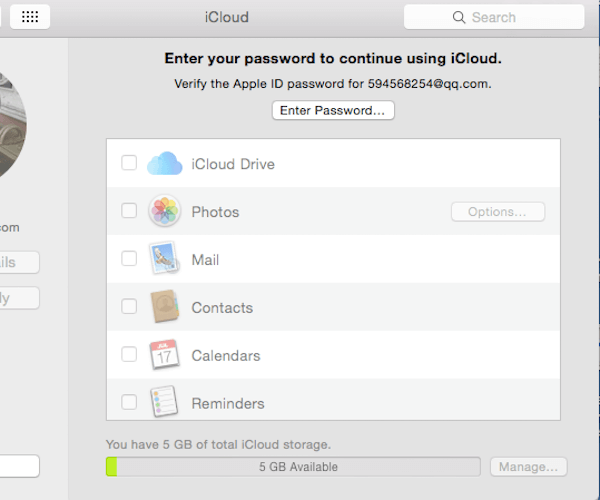
 Step 2Sign in your iCloud account
Then log in your iCloud account with your Apple ID and password. You can check the rest storage space you have in your plan by clicking on Manage in the lower right corner of the dialog box.
 Step 3Drag photos into iCloud
Click the button near the iCloud Drive, which is at the top of the right pane. Then drag the selected photos to iCloud in the left pane of the main window. Now, you can back up your photos on Mac and other files from Mac to iCloud.
For your another data, like messages, contacts, etc. the steps work slightly different. but you can still find it easy to sync messages to Mac.
Step 4Select the type of photo backupClick the button below iCloud Drive to choose the file types of your photo backup on iCloud. If you want to access and view your photos backed up from Mac to iCloud, click the Photos button to achieve the photo backup. You can also transfer iPhone photos to Mac through iCloud.
Part 2. How to Back up Photos on Mac to External Hard Drive
The simplest option is to backup photos on Mac to an external storage drive. With an external storage drive, you can duplicate specific photos and videos to it at any time you want to back them up. It can be a USB drive or an external hard drive; both of them can be purchased at many retail stores.
With external hard drives, you can keep these photos not only in a safe place, but also a place where there are large storage. The benefit of using an external storage drive is that you can handle the operations without too much effort, just by simply choosing your photos, and dragging them into the external storage drive, your photos on Mac are saved as photo backup.
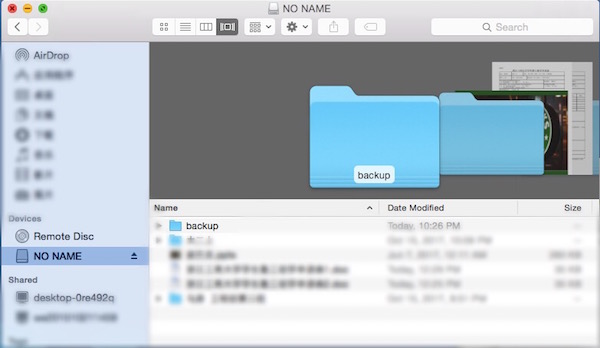
Step 1Set a new folderClick on Finder, and press the Command, the Shift and N keys at the same time to create a new folder. Entitle this new folder a suitable name, like ”backup“.
 Step 2Choose the desired photos
Open iPhoto and click the Export button from the File at the top menu bar to select the photos you want to backup from your Mac to external storage. Don't forget to choose JPEG as your photo format from the drop-down menu.
iPhone photos are not showing up on computer?
Step 3Export photos from iPhotoTap on the Export button and select the new folder—"backup", created at Step 1, as the destination. Then click the OK button to export the photo from your photo library.
 Step 4Move the folder to USB drive
Plug in your external storage like a USB flash drive into your Mac. Drag the folder named "backup" into the USB flash drive device icon at the main desktop.
Step 5Eject the USB drive safelyRemove the USB drive safely by clicking the Eject button. Then your photos on Mac have been backed up to an external storage completely.
Note: However, if your photos get deleted by accident, it's easier to recover photos with iCloud.
Part 3. How to Back up Photos on Mac to CDs or DVDs
There is also a method to backup your photos on Mac. You can copy your pictures to compact discs (CDs) or DVDs, if your Mac is equipped with a built-in or external DVD drive. A CD can usually contain around 600 MB and a DVD can hold much more storage, which means they can save hundreds of photos.
And Mac iPhone Data Recovery is a nice program for you to backup photos on Mac to CDs or DVDs. With this professional software, you can make the photo backup to DVD process much easier and more convenient.
Step 1Download the Mac iPhone Data RecoveryDownload and install Mac iPhone Data Recovery from App Store, and launch it on the desktop of Mac. One thing to illustrate, Mac iPhone Data Recovery is a rechargeable app.
Step 2Create a new backupEntitle a new backup folder and choose a location to save the photo backup on your Mac. Then choose Local DVD disc to store the backup folder.
Step 3Edit the selected photosClick the folder button to select the photo files you want to backup, and click the Next button. Then, you need to adjust the photo settings by clicking on the Setting button.
Step 4Backup photos to DVD filesClick the Save and Execute the Backup Now buttons, then the photo backup on Mac will be saved in local DVD disc.
Part 4. FAQs of Backing up Photos on Mac
How can I back up iPhone photos on a Mac?
That's easy; you can connect your iPhone to your Mac, and you can view the photos on your iPhone. You can copy the photos to your computer to save the photo backup.
Will it compress the photos when I back up photos on Mac?
It depends. If you copy the photos to an external hard drive, it won't decrease the image quality. If you transfer the photos to a program or app on your phone, it may compress the photos automatically.
Will the photos get lost after I back them up on my Mac to an external hard drive?
That's possible. A hard drive may have a short duration, and your photo backup could be lost when it gets broken.
Conclusion
Above is our introduction about 3 ways to back up photos on Mac to external hard drive, iCloud, and DVDs. You can take them into consideration and choose your preferred one. Just follow those steps, we believe you can achieve it effortlessly. Now that you have already learned how to back up photos on Mac, just go and try it!