How to Delete Photos from iPad, iPad Pro, or iPad mini
Saving a large collection of pictures on an iPad can be overwhelming, especially when you attempt to free up space. Deleting all photos from an iPad can be a daunting task, but it is easier than you think if you learn the right method. This article walks through the details of erasing photos from your device in various situations including deleting one photo, multiple pictures, a whole album, or all of them.
PAGE CONTENT:
Part 1: How to Delete Photos from iPad
All photos that you take on your iPad are saved in the built-in Photos app. Of course, you can manage and remove photos from your iPad within a single app. Here are the steps to get the job done.
Step 1. Run the Photos app from your home screen.
Step 2. If you want to delete one photo, go to the Library tab, find and tap it. Then press the Trash button at the upper right side.
If you want to delete multiple photos, tap Select in the Library screen. Touch all unwanted pictures, press the Trash button, and tap Delete [number] Photos to confirm it.
If you intend to delete an album, head to the Albums tab, long-press the unwanted album and tap Delete Album.

Step 3. Deleted photos will go to the Recently Deleted album and are stored here for 30 days. You need to erase them manually. Go to the Recently Deleted album under the Utilities heading.
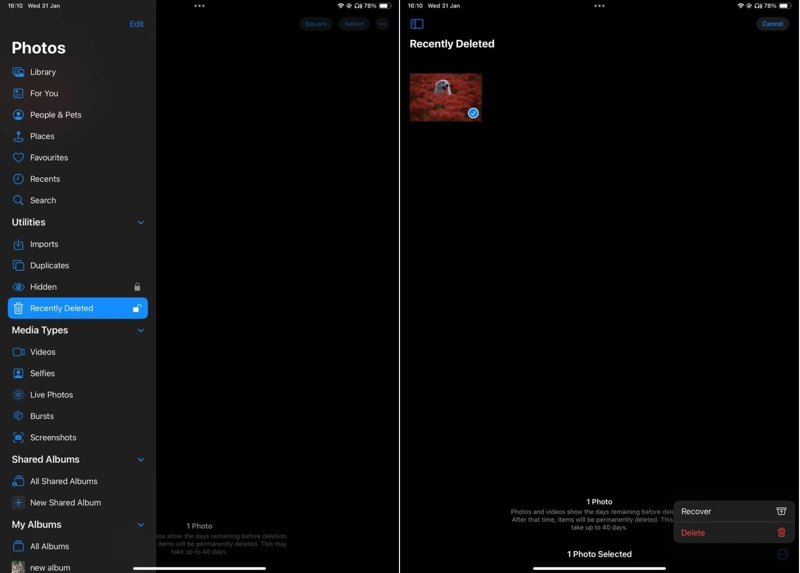
Step 4. Tap Select, press all photos one by one, hit the More button, and choose Delete to permanently remove photos from your iPad.
Part 2: How to Delete iPad Photos from iCloud
When deleting photos on your iPad, you may find that some photos cannot be erased. That may be because they are synced to your iCloud account. These photos are only the thumbnails on your iOS device. If you hope to get rid of them, you have to do the job on iCloud.

Step 1. Access www.icloud.com in your web browser, and sign in to iCloud with your Apple ID and password. If 2FA is enabled, you need to enter the verification code that appears on your screen.
Step 2. You don't need to delete iCloud Backup. Just choose Photos on the home page to view all photos synced to iCloud.
Step 3. Select the photos that you want to delete, and click or tap the Delete button with a trash-bin icon. When prompted, choose Delete to confirm the action.
Part 3: How to Delete Photos from iPad Without Recovery
The common way to delete all photos on iPad is a bit complicated. Moreover, the deleted photos can be recovered with a powerful data recovery tool. To protect your privacy, you need an excellent cleaner for iPad, such as Apeaksoft iPhone Eraser. It enables you to permanently remove photos on your iPad.
Ultimate Way to Delete Photos on iPad Easily
- Clean up all photos on your iPad with one click.
- Preview iPad photos before deleting them.
- Back up photos before deleting them to avoid data loss.
- Sort iPad photos by date.
- Support a wide range of iPad models.
Secure Download
Secure Download

How to Delete All Photos from iPad
Step 1. Connect to your iPad
Launch the best iPad photo cleaner software after you install it on your computer. It is compatible with Windows 11/10/8/7/Vista/XP and Mac OS X 10.7 or above. Then link your iPad to your computer with a Lightning cable. Your device will be recognized immediately.

Step 2. Select all photos
Click and expand the Free up Space heading on the left sidebar, and choose Clean up Photos. Then the software will begin scanning all photos on your iPad. It may take a while if you have lots of large photos on your device. When it finishes, click the Export & Delete button to view all photos on your iPad.

Step 3. Delete all iPad photos
Next, tick the checkbox next to each photo that you want to remove from your iPad. You can locate specific photos according to date. To delete all photos from the iPad, check Select All at the top of the screen. Before deleting them, click the Export button, select an output folder, and back up them to your hard disk. At last, click on the Delete button. If you cannot erase iPhone, just resort to this program.

Note: During the process, keep your iPad connected to your computer.
Conclusion
This guide demonstrated three ways to delete all photos from your iPad Pro/mini or other models. You can manage and remove your pictures from the Photos app directly. Remember to delete them again from the Recently Deleted album. Plus, you can delete iPad photos from iCloud. Apeaksoft iPhone Eraser, on the other hand, is able to erase your iPad photos with a single click. If you have other questions about this topic, please feel free to leave your message below this post.
Related Articles
If you forget your Apple ID password, you can follow our concrete guide to erase your iPhone without a password and set it as a new device.
If you see an iCloud notification that says This iPhone was lost and erased, don't worry. You can quickly solve this issue with this piece of troubleshooting.
Why is iPhone stuck on erase all content and settings? How to get rid of the stuck Apple logo after I erase iPhone? Learn 3 ways to fix the iPhone stuck issue.
How to erase all personal data from lost/stolen iOS device via Find My iPhone? This post shows detailed steps to erase iPhone from Find My iPhone app.
