Many iPhone users connect iPhone into Wi-Fi network and then surf the Internet or do other things. When your Wi-Fi not working on iPhone, it may leave you clueless and have no idea about how to this Wi-Fi network problem on iOS device. Fortunately, today, we list some best methods for you to fix iPhone Wi-Fi not working. Keep reading and get right solution to fix this problem by yourself.

- Part 1: Wi-Fi Not Working on iPhone and How to Fix
- Part 2: Fix iPhone Wi-Fi Not Working with iOS System Recovery
Part 1: Wi-Fi Not Working on iPhone and How to Fix
Method 1: Fix iPhone Wi-Fi Not Working by Restarting iPhone
Make sure you have turned your Wi-Fi on. If your iPhone Wi-Fi not working because you forget to turn on the Wi-Fi, just turn it on and then try it again. If your Wi-Fi is turned on but it still can't work, you can try to restart your iPhone to fix this issue. To force restart your iPhone, just press and hold both the Home button and the Power button at the same time. When iPhone screen goes black and the Apple logo appears on the screen, you are allowed to release these buttons. After your device is turned on, try reconnecting the Wi-Fi again. 
Method 2: Fix Wi-Fi Not Working on iPhone by Resetting Network Settings
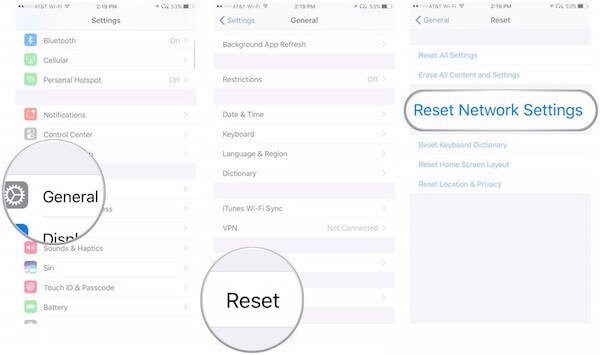
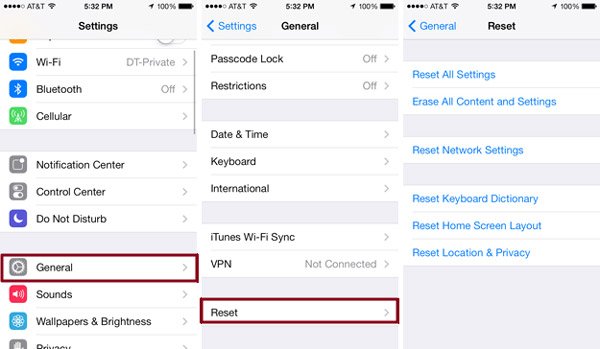
If the Wi-Fi issue is caused by the network settings, you can try fixing Wi-Fi not working on iPhone by resetting network settings. To do this job, you need to run Settings app firstly. Then tap on General and when you are in General page, scroll down to find Reset button and tap on it. Then you can tap Reset Network Settings which is the third option. After you enter your password and confirm the action, your iOS device will begin to reset network settings. After that, you need to type the password if you want to connect the Wi-Fi you connected before.
Method 3: Fix iPhone Wi-Fi Not Working by Updating iOS Version
When the two ways we recommend to you can't help you fix your iPhone Wi-Fi not working, you need to check whether your device is updated to the latest iOS version or not. The new iOS version can fix some bugs which are in old versions. If you haven't update your iOS software, it can lead your iPhone Wi-Fi not working. To fix it, just go to "Settings" and then tap "General". Next tap "Software Update" and download the latest iOS version. After that you can test your Wi-Fi network and see if Wi-Fi is back to normal condition now.
This solution also works when you cannot share Wi-Fi password on iPhone.

Method 4: Fix iPhone Wi-Fi Not Working by Restoring iPhone to Factory Settings
You can also restore your iPhone to factory settings to fix your Wi-Fi not working on iPhone. The way to restore your device to factory settings is very easy. Open your iPhone and then launch "Settings". Then tap "General" and "Reset". When you are in "Reset" page, tap "Erase All Content and Settings". After you confirm your action, your device will be restored to factory settings.
But you should know, all the data and files will be cleared when you choose to restore your iPhone to factory settings. Therefore, if you don't want to lose these data, back up your iPhone before you do this action. Moreover, the settings on your iPhone will also go, including the Wi-Fi password. So, you should share the iPhone Wi-Fi password firstly and let others help you remember it, if you are a forgettable person.
Part 2: Fix iPhone Wi-Fi Not Working with iOS System Recovery
If all the methods we recommended above can't help you fix iPhone Wi-Fi not working, you can use iOS System Recovery to fix this problem. It is one of the most professional software you can use to fix all kinds of iOS system problems, including stuck in recovery mode, black screen, Apple logo and other problems caused by iOS system issues.
- The program works for all iOS devices, like iPhone 17/16/15/14/13/12/11, iPad Pro/Air/mini, and other older model of iPhone/iPad/iPod.
- It is simple and safe way to fix all the problems you are unable to fix, including iPhone Wi-Fi not working.
- Fix iPhone from DFU mode, recovery mode, Apple logo, headphone mode, etc. to normal state.
- Keep the original data of iPhone when fixing iPhone problems, you do not have to worry about any data loss.
Step 1. Download iOS System Recovery
The first step to fix this problem is going to the official website to download iOS System Recovery on your computer. Then you need to install this software follow the installation guide.
Step 2. Launch iOS System Recovery
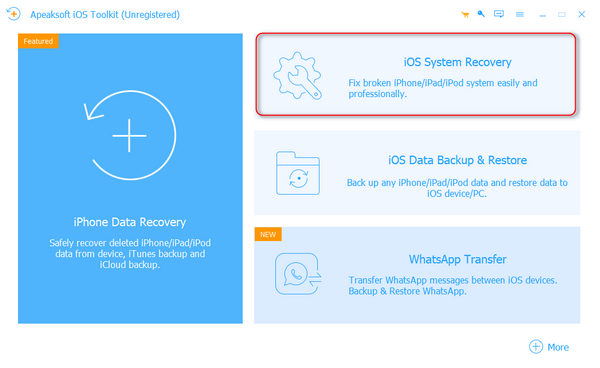
When you successfully download this software, you are allowed to launch iOS System Recovery on your computer. Then click More Tools and then choose iOS System Recovery to enter the main window.
Step 3. Start iOS system recovery
Now connect your iPhone to the computer via a USB cable. And then click Start button to start iOS system recovery. Next this professional software will detect your iPhone system problem automatically.

Step 4. Select the proper model
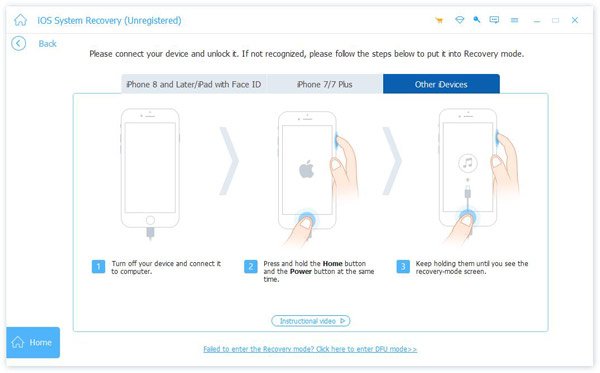
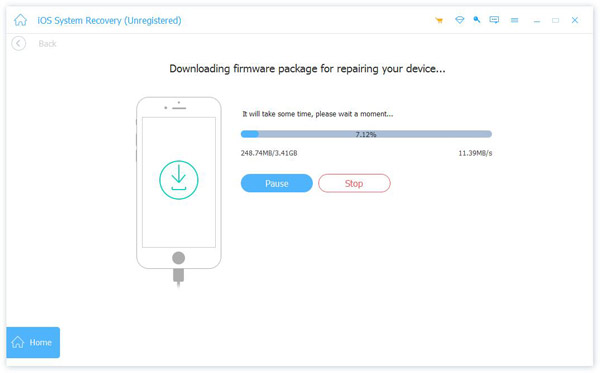
Click Question and follow the guide this software gives you to put your iPhone into recovery mode. Next you need to select the proper iOS model of your iPhone and then click Download to download the firmware.
Step 5. Fix iPhone Wi-Fi not working
It may take you some time to download this plug-in. Once it is downloaded, this software will automatically fix the Wi-Fi not working on iPhone. After that, the Wi-Fi connection on your iPhone will work normally. Here you can also use it to fix FaceTime not connecting on iOS.
Conclusion
While reading this article, you can use the most suitable method to fix the Wi-Fi not working on iPhone. And if you have the same question next time, you can solve this problem easily. Hope you guys enjoy this article.