The Photos app is the default place for storing all pictures and videos on iPhone and iPad. Pictures from different sources will be saved into different folders by default, like Camera Roll, My Photo Stream, Selfies, Portrait, Panoramas, Videos, Screenshots and more. Well, why not create an album on iPhone manually based on your need?

You can put favorite photos together into an album. Moreover, you can manage and edit albums created by yourself as other default albums on iPhone too. Whatever, you can get the complete tutorial to create a new album on iPhone.
- Part 1: How to Create an Album on iPhone
- Part 2: How to Create a Private Album on iPhone
- Part 3: How to Create a Shared Album on iPhone
- Part 4: Easy Way to Manage and Transfer Photo Albums from iPhone
Part 1: How to Create an Album on iPhone
It is the basic way to create a photo album on iPhone. You can move the downloaded photos, photographs and other important pictures into this iPhone album. To some degree, an album is a digital container that you can collect and organize photos on iPhone.
Step 1Run "Photos" app. Tap "Albums" on the lower right corner of your iPhone.
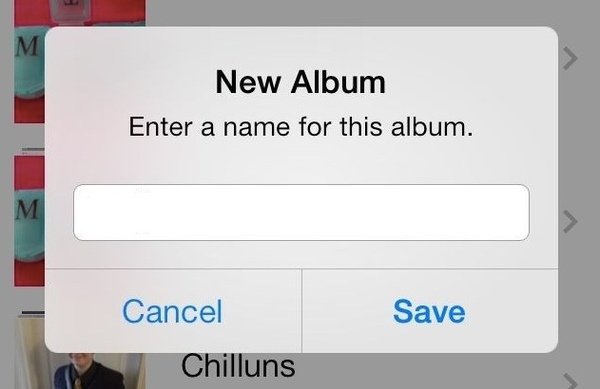
Step 2Tap "+" and select "New Album" from the drop-down list.
Step 3Name the iPhone new album. Then tap "Save" to move on.
Step 4Browse and select the photos and videos you want to move into the new photo album.
Step 5Tap "Done" to create an album on iPhone with iOS 12 and later. Your new album can be found in "Albums". iOS 13/14/15/16/17/18/26 users can create photo albums with the same steps too.
Part 2: How to Create a Private Album on iPhone
Is it possible to delete photos from iPhone Camera Roll without deleting from album? Well, you can hide the photo to make it disappear in the Camera Roll. Consequently, you can make a private album on iPhone to protect secret photos.
Step 1Open "Photos" app. Tap "Albums" to find the album that contains the photo you want to hide.
Step 2Tap "Select" and choose the private photo.
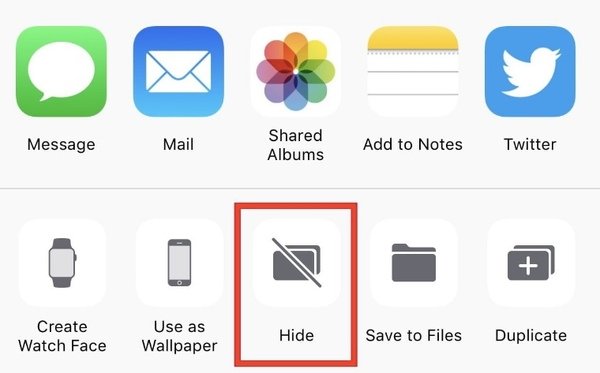
Step 3Tap "Share" on the lower left corner. Select "Hide" from other options.
Step 4You will be prompted with "Hide ** Photos". Confirm to hide photos in the "Hidden" album. You can find the Hidden album under "Other Albums" at the bottom.
Part 3: How to Create a Shared Album on iPhone
Just as above mentioned, you can make a private photo album on iPhone to lock hidden photos. It is also supported to make the album public with the certain group of people. As a result, the invitees can add new photos and post comments with the shared photo album.
Step 1Open "Photos" app. Tap "Shared" at the bottom of your iPhone.
Step 2Tap "+" to add a new album.
Step 3Set the name of your photo album. Tap "Next" to continue the process.
Step 4Tap "+" to add the iCloud contacts of your friends and families. Then tap "Create" to create a shared album on iPhone.
Step 5Choose "+" in the newly-created shared album. You can select which photos you want to share with others. Tap "Done" to move on.
Step 6Add a comment to the shared photo album. Later, tap "Post" to add photos to the iCloud shared album on iPhone.

Part 4: Easy Way to Manage and Transfer Photo Albums from iPhone
By using Apeaksoft iPhone Transfer, you can manage iPhone photos on computer in bulk easily. It is easy to rearrange photo in iPhone album. You can make iPhone album sort by date, size and more. Moreover, you can create, rename and delete an album on iPhone in clicks. The built-in Photo Manager allows users to manage any photo and album before transferring.
After organizing iPhone albums and photos, you can transfer files between iPhone/iPad/iPod and Windows/Mac freely. For instance, you can share albums from iPhone to PC/Mac/another iOS device in a short time. All photo details can be preserved while transferring iPhone albums. The image quality will not be reduced. Meanwhile, the other files stored on your iPhone will be in the original place safely.
- Transfer albums, pictures, videos, contacts, messages, ringtones, podcasts and other files for iPhone, iPad and iPod.
- Create/rename/delete albums, preview images and photo details within the Photo Manager.
- Get the Media Servicer to manage, edit and transfer video and audio files from iPhone.
- Work with the latest iOS 26, including iPhone 17/16/15/14/13/12/11, etc.
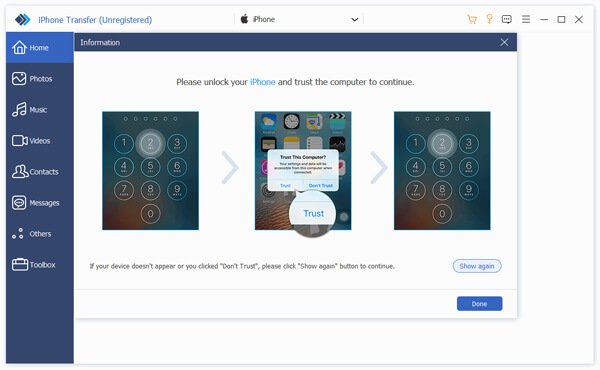
Step 1Free download, install and launch iPhone Transfer. Plug iPhone into the computer via a USB cable. Unlock your iPhone and tap "Trust".
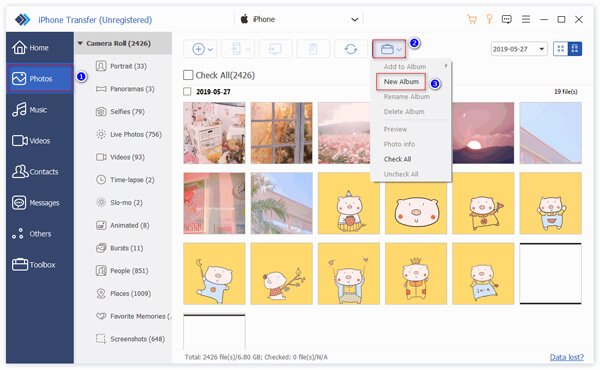
Step 2After scanning your iPhone, click "Photos" in the left pane. Choose "New Album" from "Other Tools" to create an album on iPhone. Moreover, you can choose "Add to Album", "Rename Album", "Delete Album" and other options from the drop-down list too.
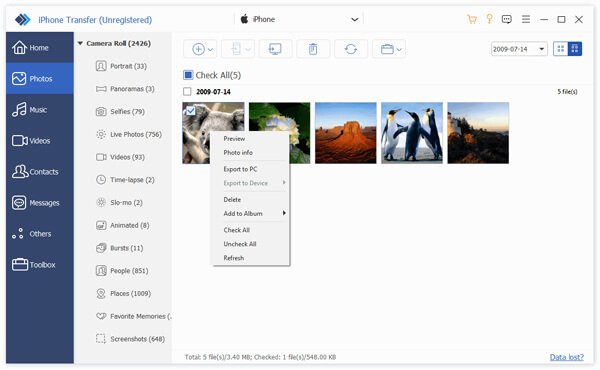
Step 3Right-click on any pictures and choose "Preview" to preview details if necessary. At last, click "Export" to export albums and photos from iPhone to computer or iDevice quickly.
That's all for how to create an album on iPhone in different situations. You can put all pictures in categories with ease. What's more, you can transfer photos from iPhone to Mac with iPhone Transfer via the above steps. If you want to transfer photos from iPhone to iPad, you need to plug iPad into the same computer too. For people who store thousands of pictures on iPhone, Apeaksoft iPhone Transfer is a reliable photo manager and transfer you should not miss.