Finder and iTunes Locations on Windows and Mac – 2026 Guide
When you back up your iPhone using iTunes or Finder, your computer quietly stores a complete copy of your device, including messages, contacts, photos, videos, app data, and more. But when you want to manage, delete, extract, or move those backups, the first question most people ask is: Where are iPhone backups stored on Mac or PC?
This guide explains everything you need to know about the iTunes backup location, how to find it, how to change it, and how to manage old iPhone backups safely. Whether you're using macOS, Windows 10, or Windows 11, this article covers all platforms.
PAGE CONTENT:
Part 1: Where Are iPhone Backups Stored on Mac?
If you're wondering where are iPhone backups stored on Mac, you can first figure out whether you use iTunes (macOS Mojave or earlier) or Finder (macOS Catalina or later). iTunes has changed its name on macOS Catalina or later; therefore, the backup and restore method has also changed from iTunes to Finder.
But, whether you are using iTunes or Finder, the default iPhone backup location on Mac are stored in your user library folder:
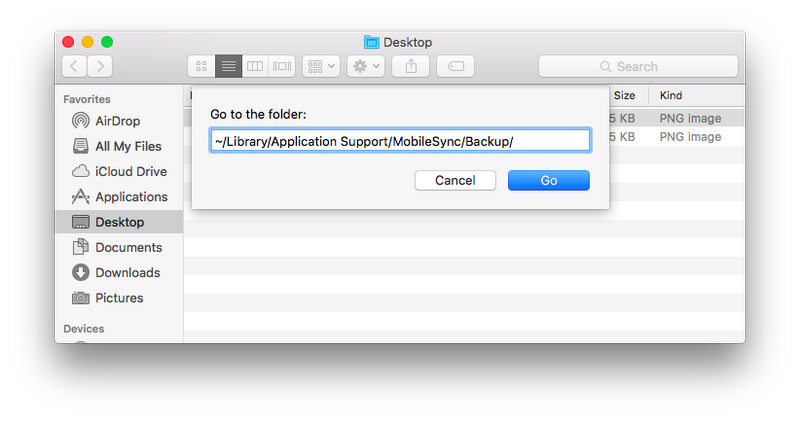
~/Library/Application Support/MobileSync/Backup/
You can click the Go button on the top ribbon of your macOS home screen, and then click the Go to Folder button. Then, type or copy and paste ~/Library/Application Support/MobileSync/Backup/ to go to the Finder or iTunes backup directory.

How to Find iTunes Backup Location Easily on Mac
If you want a simpler method, you can actually find the iTunes backup directory in Finder.
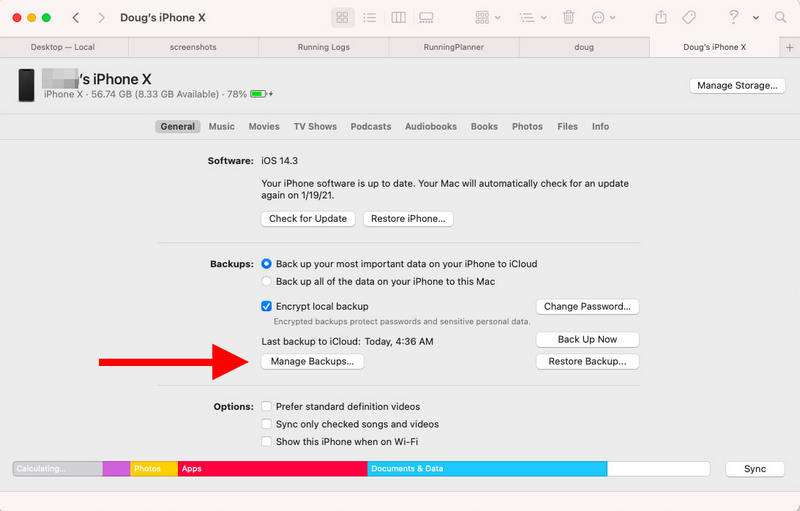
Step 1. Connect your iPhone to your Mac. Then, launch Finder.
Step 2. Select your iPhone device on the left side. Then, click the Manage Backups button.
Step 3. Select a backup and right-click on it. Select Show in Folder. Then, you can easily go to the iiPhone backup location on Mac.

This is the easiest way to access the iPhone backup location Mac without navigating hidden system folders.
Part 2: Where Are iPhone Backups Saved on PC?
Many Windows users often ask, "Where are iPhone backups saved on PC?" It's indeed more difficult to find iTunes backup location on Windows 10 and 11 than on Mac because you cannot directly open the iPhone backup directory on iTunes. The folder path is unavailable on any iTunes version on Windows.
You can only manually go to the iTunes backup location in the File Explorer. The paths differ depending on whether you are using iTunes from Microsoft Store or from the official webpage.
1. iTunes (Microsoft Store): Press the Windows and R key. Then, type or copy and paste:
%USERPROFILE%AppleMobileSyncBackup
Press the Enter key. Then, you will in the iTunes backup location.
2. iTunes (downloaded from the official webpage): Press the Windows and R key. Then, type or copy and paste:
%AppData%AppleMobileSyncBackup
Press the Enter key to locate the iTunes backup location easily.
Why Is it Difficult to Find iTunes Backup Location on Windows?
There are a few reasons why the iTunes backup location is notoriously hard to find on Windows 10 and 11. Apple designed it this way on purpose. Generally, the reasons are:
1. Apple hides the folder to protect your data
Your iPhone backup's location on Windows can't even be located in the interface of iTunes, for Apple wants to well protect your data. iTunes backups contain extremely sensitive information, including messages, contacts, key chains, app data, your private photos and videos, etc. If you can easily find where iPhone backups are stored, maybe other people can also find them easily.
2. The backup can't be edited manually
Even if you know the iTunes backup location, you cannot edit the backup files. Your backup data is all encrypted or hashed files with random names. Sometimes, you may add an iTunes backup password to protect your data. In that case, you can only restore backup using iTunes or Finder. You can't copy a picture or delete a file in the iPhone backup directory.
Part 3: How to Change iTunes Backup Location (Mac & Windows)
Apple does not let users directly choose a new backup location as the default path. That's why so many people search for methods to change iTunes backup location, but only to find command methods to do that.
If you really need to change the iPhone backup location due to insufficient disk storage, you can follow the guides below to do that.
How to Change iTunes Backup Location on Windows

Step 1. Manually move your iTunes backup folder to another place, like E:iTunesBackup.
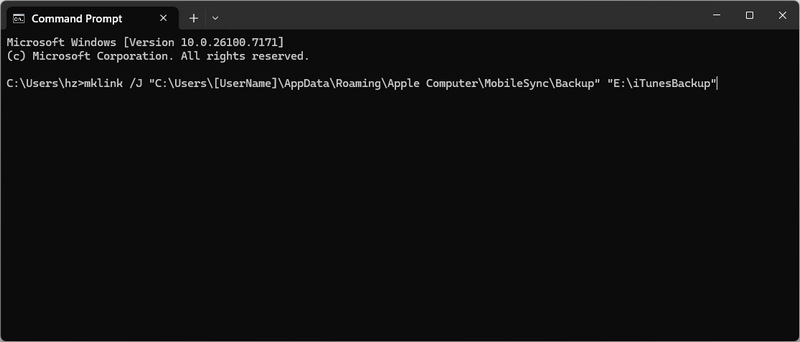
Step 2. Open Command Prompt as an administrator, and run the command line below:
mklink /J "C:Users[UserName]AppDataRoamingApple ComputerMobileSyncBackup" "E:iTunesBackup"
Step 3. Press the Enter key. Now, iTunes will use E:iTunesBackup as the default iTunes backup location automatically.
How to Change iPhone Backup Location on Mac

Step 1. Move your current backup folder to the new location, like /Volumes/ExternalDrive/iTunesBackup.
Step 2. Open Terminal and run the following command:
ln -s /Volumes/ExternalDrive/iTunesBackup ~/Library/Application Support/MobileSync/Backup
Step 3. Press the Enter key. Then, Finder will use this new folder as the default iPhone backup location.
Part 4: How to Browse iTunes or Finder Backup
Apple strictly protectsi your iPhone backup data, and you can't modify or browse the back. Is there a way to access iTunes backup? Apeaksoft iPhone Data Recovery can help you do that easily. It can quickly find your iPhone backup location and analyze the files and info in it. You can browse photos, videos, messages, contacts, and other types of data. You can also easily transfer or recover your desired ones to your iPhone or computer.
The Best iPhone Backup Viewer and Recover Tool
- Quickly detect and analyze iTunes backups on your PC or Mac.
- Extract videos, photos, contacts, messages, and many other files in iPhone backups.
- Select your desired files in iTunes backups to transfer or recover.
- Allow you to recover deleted files on your iPhone even if they're permanently deleted.
Secure Download
Secure Download

Conclusion
This article tells you the iTunes backup location on Windows and Mac. If you want to change the default iTunes backup directory, you need to use the command line to do that. iTunes backup data is all encrypted. If you want to browse the iPhone backup files, you need to use Apeaksoft iPhone Data Recovery. This program can detect and analyze iTunes backups on your Windows and Mac, you can view them or transfer files from them.
Related Articles
This article tells you how to unlock a disabled iPhone or iPad without iTunes by erasing, Find My, and iOS unlocking software.
Unable to log in to iTunes? Check out this detailed password reset guide to quickly reset your iTunes password and regain access to your account.
There are many causes of iTunes Could Not Restore the iPhone. This article will tell you how to solve this problem deeply.
Using iTunes to back up iPhone is an important method for protecting data security. It helps restore data quickly. This article will detail the whole process.

