Want to erase Mac hard drive? Do you really know whether you have a HDD (hard drive) or SSD (Solid State drive)? Well, you had better have a check before you erase a disk for Mac.
Choose “About this Mac” from the “Apple” drop-down menu on the top right corner. Head to its “Storage” section. Later, you can see the drive type you are using. You may see “SATA Disk (HDD)”, “Solid State SATA Drive (SSD)”, “SuperDrive” and “Flash Storage”. Now you can reset a Mac to factory settings and reinstall OS manually.

- Part 1: Why You Need to Erase a Hard Drive on Mac
- Part 2: Back Up Your Mac before Erasing
- Part 3: How to Factory Reset Your Mac with Disk Utility
- Part 4: [Recommended] How to Wipe a Mac Flexibly without Losing Data
- Part 5: Something You Need to Do before Selling Your Old Mac
Part 1. Why You Need to Erase a Hard Drive on Mac
These are common scenarios that you want to factory reset MacBook Pro and other Apple computers. Well, if you encounter any situation mentioned below, you need wipe your Mac and reset it to factory settings.
- Sell, give away or trade in your Mac computer.
- Change from a PC format (FAT, ExFAT, NTFS) to a Mac format (APFS, Mac OS Extended). (Learn here to write to NTFS on Mac.)
- Your Mac hard drive is reported as unreadable.
- Troubleshoot disk issues.
- The macOS installer cannot see or install your disk on Mac.
Part 2. Back Up Your Mac before Erasing
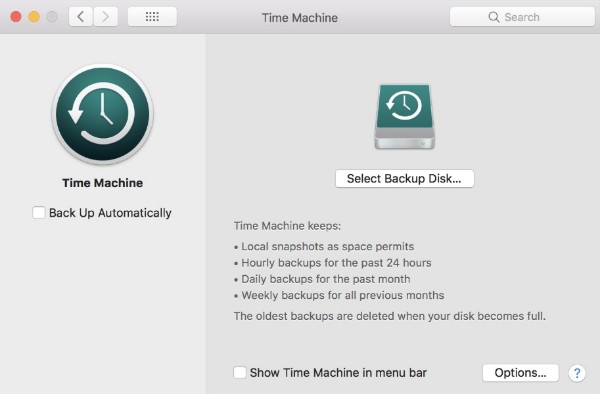
To start with, you need to create an up-to-date backup before you erase Mac hard drive. Otherwise, you may lose important files after erasing hard drive on Mac. During this time, you can Back up with Time Machine for free. In another word, you need to clone your Mac hard drive as a copy and keep it for a while.
What if you delete or lose Mac data due to hard drive formatted, system crash and other data lost issues? Fortunately, you can run Mac Data Recovery to recover files from hard drive, flash drive and other removable drives safely and easily.
Part 3. How to Factory Reset Your Mac with Disk Utility
Apple releases the default tool to repair and erase a disk on Mac named Disk Utility. Just make sure you do not erase the disk your Mac started up from.
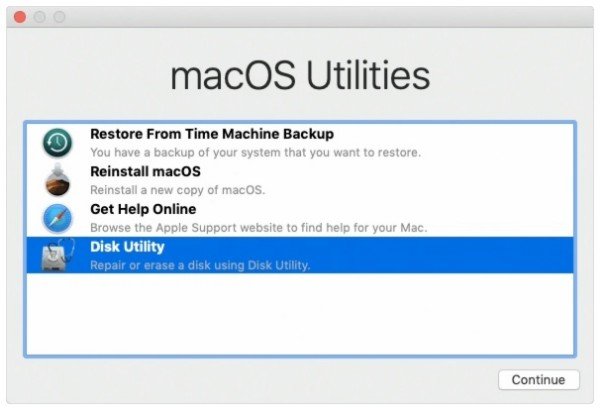
Step 1. Run Mac Disk Utility
Turn on your Mac and charge it into a power source. Open “Applications” and find “Utilities”. You can see the popping-up “macOS Utilities” window. Click the “Disk Utility” option. Then choose “Continue” to move on.
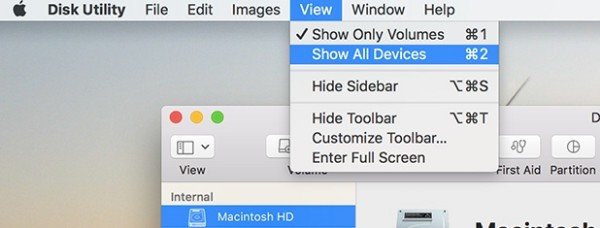
Step 2. Choose the hard drive
Select “View” followed by “Show All Devices” on the top. You can see all internal and external hard drives in the left panel of the “Disk Utility” window. Choose the hard drive partition you want to erase on Mac. Be aware that all volumes will be erased on that disk completely.
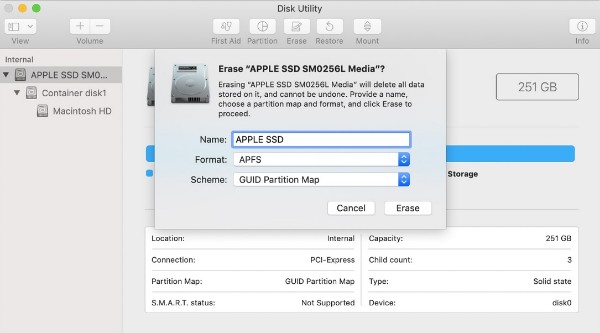
Step 3. Erase Mac hard drive with Disk Utility
Click the “Erase” option. You will be required to enter the hard drive name, select either APFS or Mac OS Extended and choose GUID Partition Map as schedule. After finishing those fields, choose “Erase” to start erasing your hard drive on Mac. Wait for a while to complete the Mac erasing process. Quit Disk Utility. Now you need to install macOS on your erased hard drive. Check here to learn more about how to reset MacBook Pro.
Part 4. [Recommended] How to Wipe a Mac Flexibly without Losing Data
Disk Recovery is a good tool to erase everything on a Mac. But if you do not want to erase everything on a Mac, you had better choose Apeaksoft Mac Cleaner. The program can clean, optimize and monitor your Mac performance smartly. Well, Mac Cleaner can be your best “house-keeper”.
You can check the Mac system status and figure out the real-time Mac hard drive usage in one click. Later, Mac Cleaner can help you preview and delete any unnecessary file with 100% security. Well, if you want to free up storage space, you can turn to Mac Cleaner for help. There is no need to restore your Mac to factory settings.
Main Features of Mac Cleaner
- 1. Erase junk files, unneeded files, large & old files (photos, messages, music, videos, etc.), duplicate files, uninstalled apps and private data on Mac selectively.
- 2. Monitor and keep disk utilization, memory usage, battery status and CPU usage in good running state.
- 3. Search and preview junk files, caches, logs and other files before Mac cleanup.
- 4. Work with macOS Big Sur and later.
Steps to Free Up More Space on Mac Hard Drive Quickly and Safely
Step 1. Launch Mac Cleaner
Free download, install and run Mac Cleaner. You can see the basic information of CPU, memory and disk in the main interface directly.

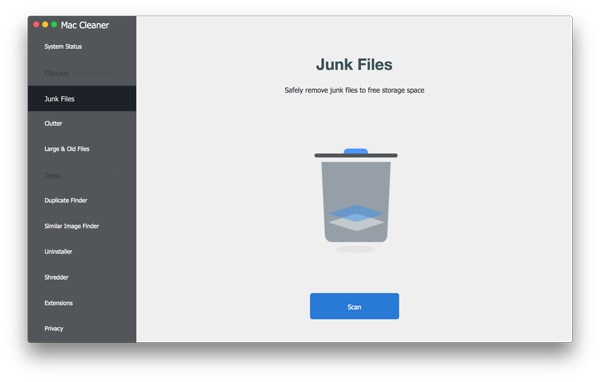
Step 2. Scan Mac files
Choose the service you need under “Cleanup” and “Tools” categories in the left panel. For instance, when you locate the “Junk Files” section, click “Scan” at the bottom. Sooner, you can see all scanned files in different folders. Of course, you can scan other files on Mac too.
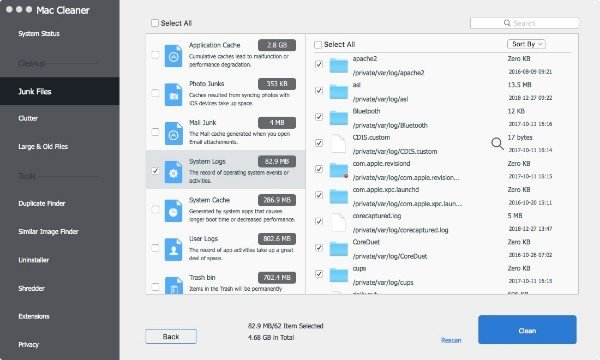
Step 3. Select files to delete
Hover your mouse above scanned files. You can get a “Search” icon that looks like a magnifier. So open any folder or file to get the detailed information. Mark before the file you want to delete. At last, click the “Clean” option on the lower right corner.
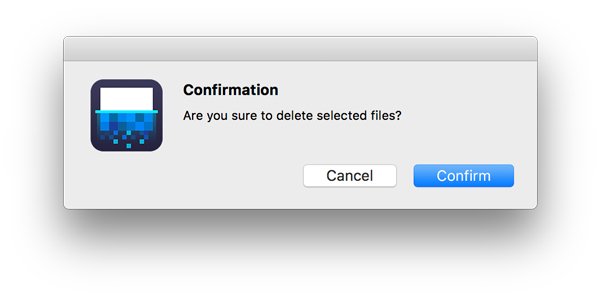
Step 4. Erase selected files on Mac hard drive
You will receive a popping-up message called “Confirmation”. Choose “Confirm” to delete the selected files quickly. Thus, you can erase Mac hard drive without losing data.
Part 5. Something You Need to Do before Selling Your Old Mac
Different from common products, your computer stores many private information. If you do not want to get involved into data criminals, you should wipe a MacBook Air or Pro and reinstall macOS. What’s more, do not forget to disable some features and services. Otherwise, others can still track your personal information secretly.
1. Sign out of iTunes
Run iTunes. Click “Account” > “Authorizations” > “Deauthorize This Computer”. Enter into your Apple ID and password. Finally, choose “Deauthorize” to confirm.
2. Log out of iCloud
Choose “Apple” > “System Preferences” > “iCloud” > “Sign Out”. Keep a copy of your iCloud data. As a result, you can sign into iCloud account on other devices.
3. Disable iMessage on Mac
For OS X Mountain Lion or later users, you need to sign out of iMessage manually too. Run Messages app. Select “Messages” > “Preferences” > “Accounts” > your iMessage account > Sign Out.
4. Unpair Bluetooth devices
You should also separate your keyboards, mice, trackpads and other Bluetooth devices from the old Mac computer. Choose “System Preferences” from the “Apple” drop-down menu. Later, you can remove your digital device from the list.
By following above solutions, you can erase Mac hard drive completely or selectively with ease. No matter you want to resell or speed up your Mac computer, you can always get the detailed steps here. If you want to get rid of old and duplicate files on Mac, you should not miss Mac Cleaner. Just free download and have a try right now!