How to uninstall TeamViewer on your Mac as well as its components? If you need to remove the TeamViewer app and optimize your MacBook operation system, you cannot simply drag-n-drop the TeamViewer to the Trash. Why? What are the differences between TeamViewer and other Mac apps?
When you installed TeamViewer on your Mac, the program will create related files in several locations with additional files, such as preference files and application support files. In order to uninstall TeamViewer 13/14 on Mac, you can learn more about the 2 professional methods from the article.

- Part 1: The Easy Method to Uninstall TeamViewer on Mac
- Part 2: How to Uninstall TeamViewer 13/14 on Mac Manually
- Part 3: Tips about Uninstall Teamveiwer on Mac
Part 1: The Easy Method to Uninstall TeamViewer on Mac
Apeaksoft Mac Cleaner is the desired Mac TeamViewer uninstaller to remove the desired applications as well as the cache files. When you have any difficult to locate the cache files, you can scan and clean up the TeamViewer related files within clicks. Moreover, it will monitor and optimize the system performance with ease.
- Uninstall and remove the TeamViewer app and cache files within clicks.
- Monitor and manage the system performance and keep Mac in good state.
- Remove the junk files, large and old files, clutter, shred files and more.
- Ensure 100% security to speed up Mac system.
- Uninstall other apps from Mac, like Office, Safari, Avast Antivirus, McAfee, Malwarebytes, Adobe, etc.
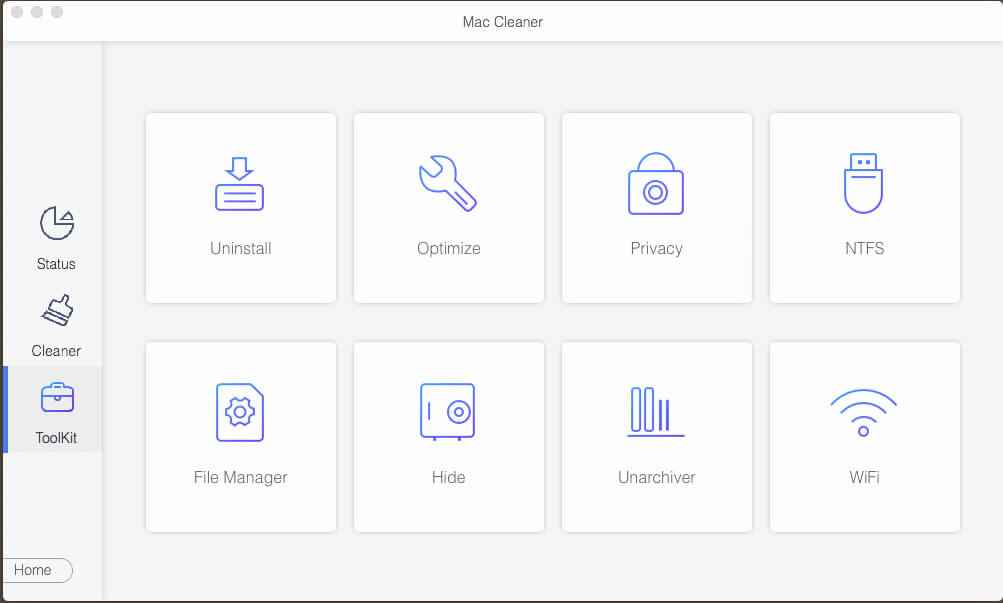
Once you have installed Mac TeamViewer uninstaller, you can launch the program on your Mac. Choose the “Toolkit” menu and select the “Uninstall” option. It enables you to remove and uninstall TeamViewer app as well as the cache files.
Click the “Scan” button to scan the entire TeamViewer files, along with all associated files. If you cannot locate the desired files, you can click the “Rescan” button. After that, you can click the “View” option to search for the TeamViewer related files.
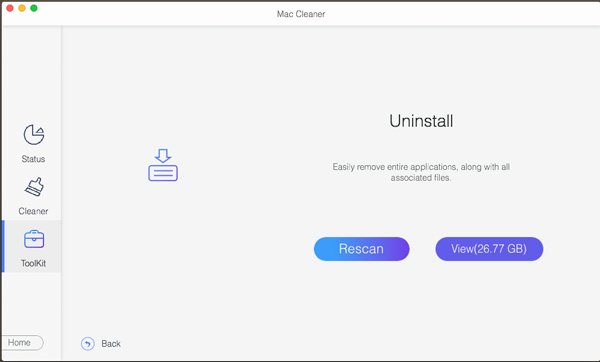
After that, you can select the scanned TeamViewer, or even the cache files. Of course, when you need to select all the files, you only need to check out all the files, you can simply select the “Select All” option to uninstall TeamViewer completely on Mac.
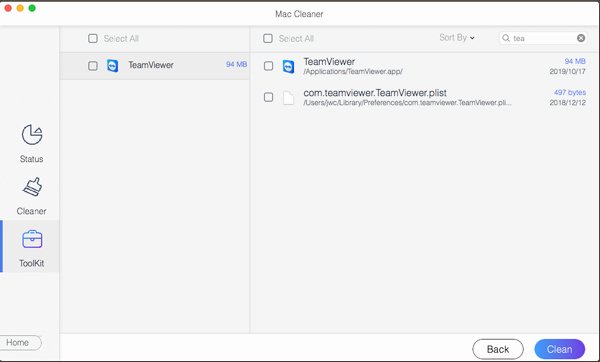
Click the “Clean” button to remove the Teamviewer app as well as the other cache files. You can also take advantage of the program to clear up the system junk, email junk, similar photos, iTunes junk, Trash bin and other files with ease.
More details here about Mac uninstallers, you can check it here.
Part 2: How to Uninstall TeamViewer 13/14 on Mac Manually
It is easy to uninstall TeamViewer 13/14 on Mac. But when you need to clean up the cache files, you need to search for the TeamViewer components, such as the login items, startup agents, kernel extensions and more others. Just learn more details as below.
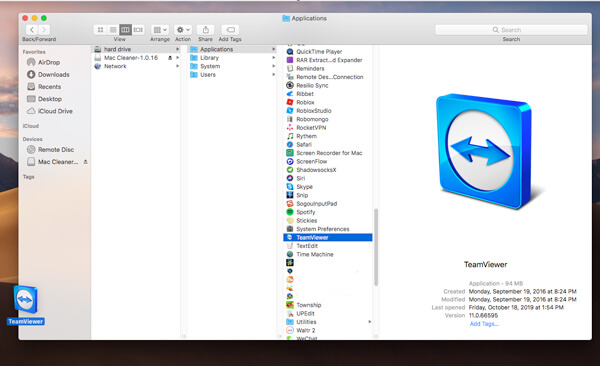
How to Remove TeamViewer 13 on Mac via Trash
Go to the “Applications” in the Finder on Mac.
Click “TeamViewer” and drag-n-drop it to the Trash.
Press CMD + delete keys to remove TeamViewer 13 on Mac.
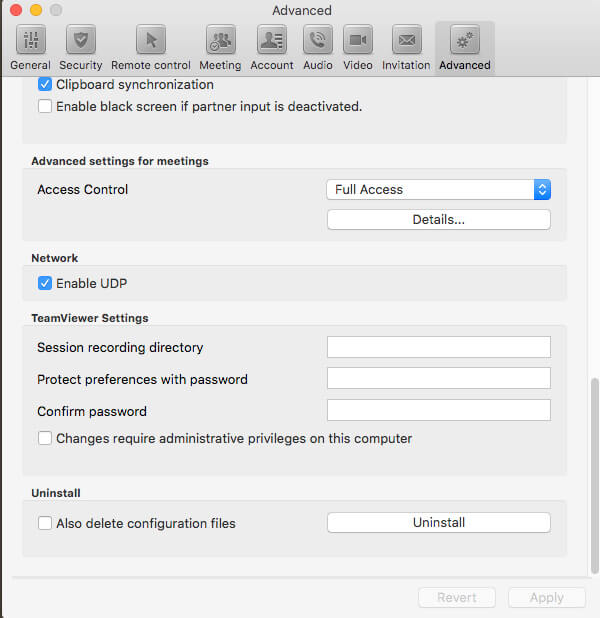
How to Clean TeamViewer 14 on Mac from Built-in Uninstaller
When you launch TeamViewer 9 or above, such as TeamViewer 14, go to “TeamViewer” > “Preferences…” > “Advanced”.
Scroll down to the bottom of the Mac TeamViewer Uninstaller, you can find the “Uninstall” menu.
Check the “Also delete configuration files” option and click the “Uninstall” option.
How to Remove TeamViewer Caches & Preferences
Open the Finder and click on the “Go” from the menu bar, choose the “Go to Folder…” to locate the cache files of TeamViewer.
Type the following command line to the path of the application support folder: ~/Library before click the “Go” button.
Search for the files and folders with the following files. Right click the files and click the “Move to Trash” to uninstall TeamViewer on Mac completely.
~/Library/Application Support/TeamViewer
~/Library/Caches/ com.teamviewer.TeamViewer
~/Library/Preferences/com.teamviewer10.plist
~/Library/Preferences/com.teamviewer.TeamViewer.plist
~/Library/Logs/TeamViewer
Navigate into the “Library”, and then choose the “Preferences” option. Once again search for any “.plist” files that begin with "com.teamviewer" and delete them.
After that, you can empty the Trash to completely uninstall TeamViewer on Mac. When you manually delete the TeamViewer leftovers, you should special pay attention not to delete the wrong files.
Part 3: Tips about Uninstall Teamveiwer on Mac
If you need to uninstall TeamViewer on your Mac, you should delete the TeamViewer account beforehand, which includes your entire profile, such as the all the groups you possess, and the personal computers and contacts. Just learn more about the process as below.
Register with your email and security password of TeamViewer under https://login.teamviewer.com.
Click on the “Web Login” link and go to the “Edit Profile” link to open the “Settings” menu.
You can click the "Delete account" link next to your account name. Click the “OK” to delete the TeamViewer account.

Conclution
When you need to remove the TeamViewer completely from your Mac, you should pay special attention to the TeamViewer components. Just uninstall the TeamViewer app via Trash on Mac or the built-in uninstaller is not enough, you should also clean up the TeamViewer cache files and preferences. Of course, you can use the all-in-one Mac TeamViewer uninstaller to remove the application completely with ease. If you have any query about how to uninstall TeamViewer on Mac completely, you can share more details in the article.