Everyone hopes their pictures to be clear and sharp, especially when you do photography for social media. The great photography techniques and hardware are irreplaceable; however, you can do something during the processing of your photos to make sure that they are top-notch. If you wish to improve photo clarity, you should read this guide carefully and follow it to get the desired effect on your own.
 Improve Photo Clarity
- Part 1: How to Improve Photo Clarity Online
- Part 2: How to Improve Photo Clarity in Photoshop
- Part 3: FAQs about Improving Photo Clarity
Part 1: How to Improve Photo Clarity Online
Clarity is a photography technique to adjust the brightness, contrast, and color of your photos in order to generate amazing results. In most cases, photo clarity enhancement is the same as sharpening or image upscaling. Apeaksoft Free Image Upscaler is one of the best photo clarity makers online.
 Apeaksoft Free Image Upscaler – Best Photo Clarity App
- Enhance photo clarity using AI technology.
- Work online and completely free of charge.
- Remove noise and blur while improving clarity.
- Support popular image formats, like JPG, PNG, etc.
Here are the steps to use the best photo clarity increaser online.
Step 1 Open your browser, copy and paste https://www.apeaksoft.com/image-upscaler/ into the address bar, and hit the Enter key on your keyboard to open the photo clarity app.
Step 2 Hit the Upload your photo button, and open a photo that you intend to enhance. After uploading, you will see the main window.

Step 3 Select a proper preset on the top of the window, and look at the effect in the Output pane. As long as you get the desired photo clarity, click the Save button at the bottom to download the image.
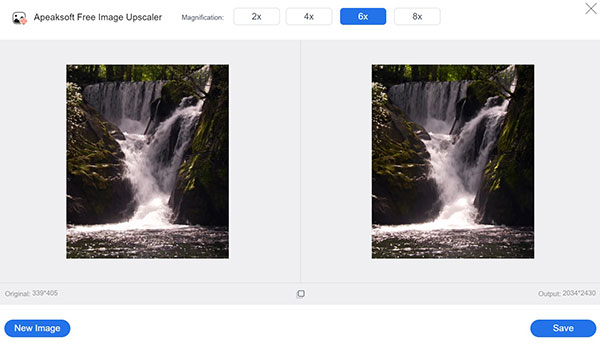
Note: The better the photo clarity, the larger the file size. Therefore, you need to pick the appropriate clarity but not the highest.
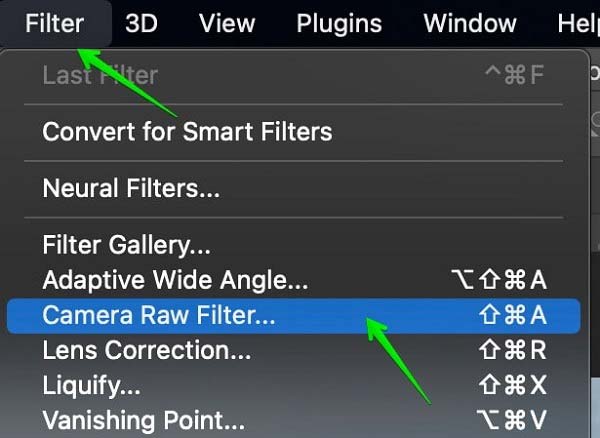
Part 2: How to Improve Photo Clarity in Photoshop
It is well-known that the Clarity slider in Adobe Lightroom allows you to improve photo clarity intuitively. Photoshop does not include the such feature, although it is an all-in-one photo editor. Alternatively, you can find the Texture and Clarity options in the Camera Raw filter in Photoshop. That sounds a bit complicated. Therefore, we share the basic process to increase the clarity of photos in Adobe Photoshop below.
Step 1 Run your Photoshop from the desktop, open a file explorer and find the target photo, and drag and drop it onto the photo editor. That is an easy way to open your image in Photoshop on either Windows or Mac.
Step 2 Locate the Layers panel, which is usually on the right side of the window. Right-click on the image layer, and select Convert to Smart Object on the context menu. That helps you to edit photo clarity non-destructively.
Step 3 Next, go to the Filter menu from the top menu bar, and choose Camera Raw Filter. Or press Ctrl + Shift + A on a PC or Cmd + Shift + A on a Mac to open the filter quickly.
Step 4 Then you will see the Camera Raw dialog. Locate the right pane, scroll down and you will find the Texture and Clarity options. The former controls how much edge contrast surrounds small details. The latter controls the mid-tones exposure range contrast. It means that you can enhance photo clarity without sacrificing your highlights or shadows by adjusting the Clarity option.
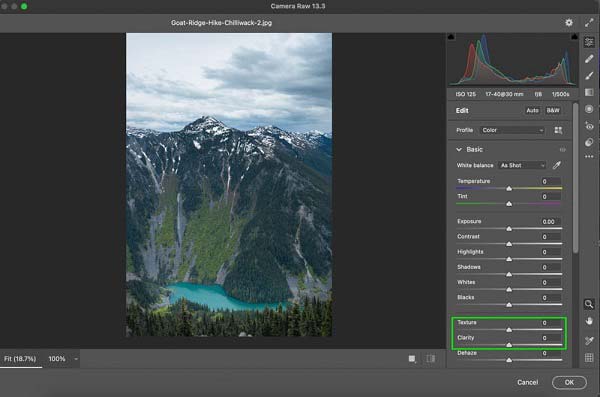
Step 5 Click the OK button on the dialog until you get the desired result. Now, you can do other photo editing or export the image as a new file.
Further Reading:Part 3: FAQs about Improving Photo Clarity
How to get the best clarity when taking photos?
Firstly, use the best device, like digital cameras or smartphones. Moreover, learn photography techniques before taking photos. Another tip is adding photo clarity with a proper photo editor.
What is the difference between photo clarity and texture?
Clarity and texture are complementary tools in photo processing. Clarity is a lot blunter and affects the overall color and saturation, but the texture is more subtle. They produce the same result in different ways.
What makes sharpness and clarity different?
Clarity is the sharpness applied with a very large radius, a relatively low amount, and mostly to the mid-tones. It means that you have to use very much clarity to get the same sharpening effect as sharpness.
Conclusion
This guide has discussed photo clarity improvement. To be honest, clarity adjustment is commonly found in just a part of photo editing software, such as Photoshop, Lightroom, etc. If you already have a professional photo editor on your desktop, follow our steps to get the desired clarity. For beginners, we suggest you try Apeaksoft Free Image Upscaler. It is not only easy to use but also works online for free. If you have other questions about this topic, please feel free to leave your message below this post.