Many users have the demand to record their Windows screen.
When you have a similar demand, you may need the help of some screen recorders. There are so many different kinds of screen recorders in the application market you can choose. If you don’t know how to choose the suitable one, you can try to Microsoft Expression Encoder, which is a traditional Microsoft screen recorder.
If you are looking for how to use a Microsoft screen recorder or an alternative way to record a screen, then you have come to the right place.
Just begin to read this article and know more about this Microsoft screen capture now!

- Part 1: Introduce Microsoft Screen Recorder Microsoft Expression Screen Capture
- Part 2: How to Use Microsoft Screen Recorder with Microsoft Expression Screen Capture
- Part 3: Alternative Method to Capture Screen of Microsoft Screen Recorder
- Part 4: FAQs of Microsoft Screen Recorder
Part 1: Introduce Microsoft Screen Recorder Microsoft Expression Screen Capture
Microsoft screen recorder is also called Microsoft Expression Encoder 4, is a traditional screen recorder which can be used in Windows platform.
It is a famous screen recorder used by many users, and a large amount of them set it as their default screen capture software. This Microsoft screen capture provides enough customized space for video recording. So users can record both screen and audio into one screenshot video simultaneously. What’s more, this Microsoft screen capture is also popular for its clear recording functions and interface.
But this Microsoft screen recorder also has some shortages.
1. The first disadvantage of this traditional Microsoft screen capture is that it isn’t free to download and use. You can download the free version to try, but you only have ten minutes to experience this Microsoft screen recorder, unless you pay $199.95 to have it permanently.
2. Moreover, the format of the output file is XESC. It is not familiar by many users, let alone being supported by most media players.
If you are in such a situation, you need to convert the XESC file to other usual formats.
Part 2: How to Use Microsoft Screen Recorder with Microsoft Expression Screen Capture
Step 1: Download Microsoft Screen Recorder
Firstly, you need to install and run Microsoft Expression Encoder 4 from official Microsoft website. Before you start to capture your screen, you have to enable the camera and microphone options and other options.
This software can run in Windows 7/Vista/XP. Make sure your Windows system supports this Microsoft screen capture. You also should make sure your computer has over 2 GB available hard disk space and 1 GB of RAM, and the desktop resolution needs to be 1024×768 with 24-bit color or higher.
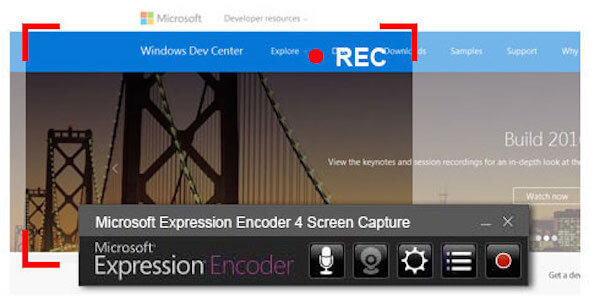
Step 2: Adjust recording area
Once you have set all things, you are ready to begin this process by clicking on Record button, which is the red button in Microsoft Expression Screen Capture’s main interface. Then select region by your mouse or fill the Width and Height blanks.
You can also drag the anchor in the middle of that area if you wish to move the whole region.
Step 3: Stop when finished
Once you have done all things, you can click on Record button. At this point, you need to perform all the on-screen actions that you want. Once it is finished, just click on Stop button to stop the recording process.
If you can’t find Stop button, you may hide the recording toolbar. You can click the Expression Screen Recorder menu, and find Stop button in taskbar.
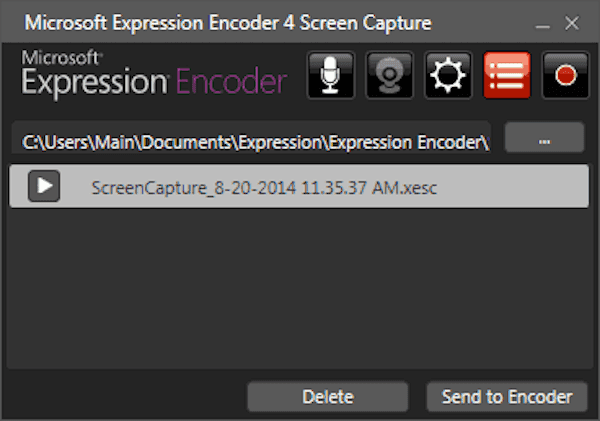
Step 4: Preview your recordings
The Capture Manager window will appear once the capture has loaded completely. Here you can see all your recordings you record with Microsoft screen recorder. The first recording in the list is the file you record just now. You can open it to preview.
Part 3: Alternative Method to Capture Screen of Microsoft Screen Recorder
The best alternative to Microsoft screen recorder is Apeaksoft Screen Recorder.
As a powerful tool, Microsoft Screen Recorder is trusted by many people around the world. Although it excels in screen recording, it offers limited editing features compared to some professional screen recording software. Before you output the recorded video, you have limited control over the resolution, frame rate, and other elements. At that time, Apeak will be the best alternative. It offers a full set of customization options and also gives you a lot of freedom in adjusting your video parameters.
It is the most professional way to record streaming audio and video, so it is strongly recommended to users who have the demands of recording or capturing screens. Apeaksoft Screen Recorder is a wonderful recorder that can record smoothly and never interrupt your other desktop tasks. What’s more, it also promises the quality of the file you record.
4,000,000+ Downloads
Record any video or audio easily and take snapshots with the original quality.
Capture audio from system audio and microphone and save them in popular formats.
Select either opening window to record without interrupting other operations.
Customize the size of the screen, settings, and other preferences before recording.
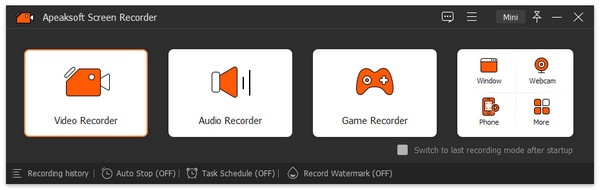
To use Apeaksoft Screen Recorder, you need to download it from Apeaksoft official website first. After you install this desktop recorder on your computer, you are allowed to launch it. You will see the main interface below. In what follows, we will introduce how to record screen and capture screens with this alternative to a Microsoft screen recorder.
To Record Screen
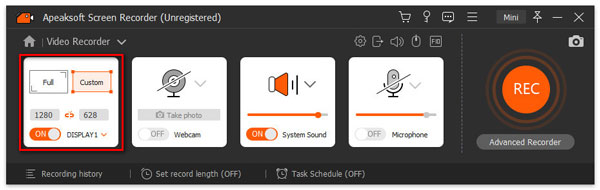
Step 1: Choose Video Recorder
Here, you can see the Video Recorder option. Just click on it. Then, you need to select the recording area first. You can record on-screen activities with full screen or adjust the size according to your needs.
Step 2: Adjust audio settings
You can also set the audio settings based on your needs. This software provides you with two options, including system sound and microphone. You can choose one of them or select both of them.
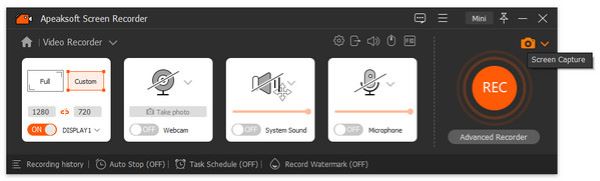
Step 3: Start recording screen
Now, you are able to click on the REC button, which is on the right side of this video screen recorder, to begin your screen recording. When it is finished, you can preview the project before saving it. You can also share it on all kinds of social platforms.
To Capture Screen
Step 1: Choose screen capture
In the main interface, you need to choose Snapshot, which is the third option you can click.
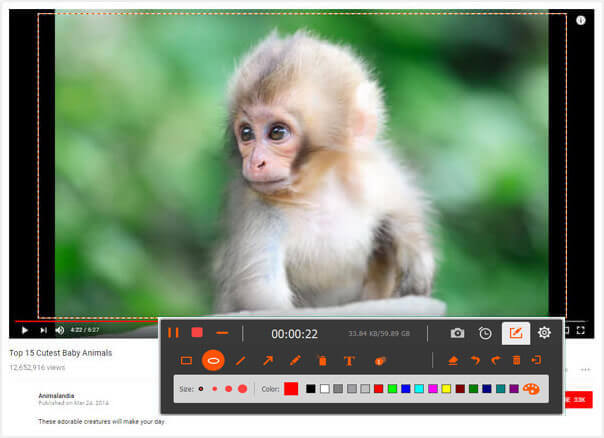
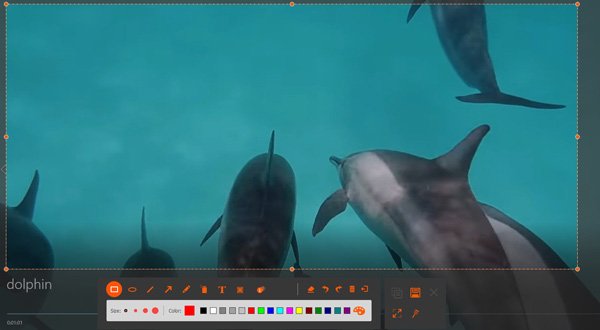
Step 2: Capture screen and edit
Now, you can select the part of your screen and capture it with this software. Currently, you can draw and annotate the capture with the lines, arrows, step tools, and more.
Part 4. FAQs of Microsoft Screen Recorder
Can I edit my screen recordings with Microsoft Screen Recorder?
The built-in Microsoft Screen Recorder typically offers limited editing capabilities. While you can trim or crop your screen recordings using Microsoft screen recording tools, they may not provide more advanced editing features such as adding overlays, transitions, or effects. For a more extensive edition, you may need to use dedicated video editing software or third-party applications.
Are there any limitations to Microsoft Screen Recorder?
It has fewer features compared to dedicated screen recording software. You may have limited control over video settings, editing capabilities, or audio options. Some features are limited to specific versions of Windows or within certain Microsoft applications. If you are an iOS user, you may need specific screen recorders for Mac sometimes. Also, it may not provide extensive customization options. You may have limited control over video resolution, frame rate, audio sources, or recording area.
Do you lose quality when screen recording?
Most screen recording software uses compression algorithms to reduce the size of the recorded video file. The frame rate and resolution settings of the screen recording can also affect the quality. If your computer or device is not powerful enough to handle the screen recording process, it could result in dropped frames or lower-quality output.
Why is my recording blurry?
If you have set a low resolution for your recording, it can result in a blurry appearance. Blurriness can also occur if the camera is not focused correctly. Adjust the focus settings on your camera or webcam to improve the clarity of your recording. Insufficient lighting or uneven lighting can contribute to blurry recordings.
Is it better to record at 720p or 1080p?
1080p offers higher resolution and more detail compared to 720p. However, it tends to result in larger file sizes compared to 720p due to the increased pixel count. The decision depends on your specific needs and preferences. If you prioritize higher resolution and have the necessary storage and device capabilities, recording at 1080p can offer better visual quality.
Conclusion
After reading this article, you must know more about Microsoft screen recorder, including the way of how to use it to capture screen. Besides, we also recommend the best alternative to this Microsoft screen capture to you. Apeaksoft Screen Recorder is similar to Microsoft Expression Encoder 4 in some respects. Both of them are developed in order to help users to record their screen. Hope these software can help you.