Whether you are a beginner or an experienced video creator, the OBS Studio screen recorder may be your first choice or intention. However, when you've checked its dark and complicated interface, you may be perplexed or annoyed about how to screen record with OBS. OBS is a professional screen recorder, so you need to learn this product in detail, or you'd better choose a more straightforward recorder. Check the detailed review of the OBS screen recorder and learn how to use it.

- Part 1. A Brief Review on OBS Studio Screen Recorder
- Part 2. How to Record Your Screen with OBS Studio
- Part 3. The Best OBS Alternative to Record Your Screen
- Part 4. FAQs about OBS Screen Recorder
Part 1. A Brief Review on OBS Studio Screen Recorder
On Apeaksoft, we promise to offer verified content for you. Here is our effort to do so:
- When it comes to all the selected products in our reviews, their popularity and your needs are our focus.
- Our Apeaksoft Content Team has tested all the products mentioned below.
- In the testing process, our team focuses on its outstanding features, pros and cons, device compatibility, price, usage, and other conspicuous features.
- In terms of the resources of those reviews, we have made use of trusted review platforms and websites.
- We gather suggestions from our users and analyze their feedback on Apeaksoft software as well as other brands’ programs.

To command the OBS Studio screen recorder, familiarize yourself with this product's interface, key features, performance, etc.
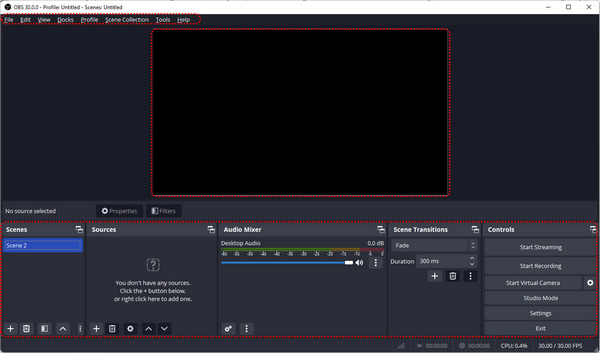
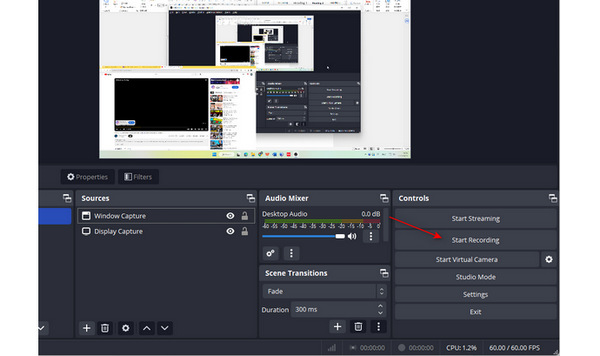
Interface
The OBS Studio's interface is confusing for beginners. It doesn't put its key features in eye-catching places or magnify them to make them stand out. Therefore, the OBS screen recorder's interface is not attractive enough. The layouts pay much attention to versatility.
However, if you view the interface patiently, you can find 5 sections on the bottom: Scenes, Sources, Audio Mixer, Scene Transitions, and Control. These are the main features you need when using the OBS Studio screen recorder.
On the top side, you can see a menu bar containing standard features you can find in many other post-production programs, which are seldom used when you do OBS screen recording.
The medium part is a monitor, which displays the screen recorded by the OBS Studio.
Features
The main features of OBS Studio are screen recording and live streaming. What about other special functions helping you do a better recording? Scenes and Sources display what you are recording currently. The Audio Mixer can adjust the audio's volume, add filters, balance the tunnels, etc. The Scene Transitions let you add transition effects to different recordings. The Controls let you control the OBS screen recording or streaming process and adjust the settings of your recordings.
What’s worth mentioning is that this tool enables you to record iPhone video in MP4.
Performance
So, what's the performance of the OBS Studio screen recorder? According to our test, the OBS Studio performs well at recording overlayed windows – the entire screen, your webcam, a single window, and images all overlayed together. And you can easily change their orders like in Photoshop.
However, it isn't clear for beginners to find where the recordings are saved. Also, there is no timer when you are recording.
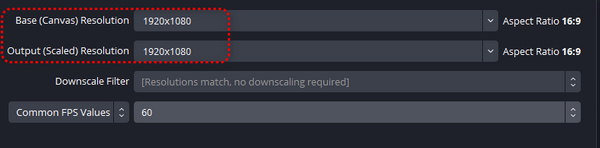
As for quality, the OBS screen recorder can export your recordings with at most 1080P resolution, which is not so perfect against today's video quality demand.
Others
Some other features can make it better when you do the OBS screen recording. The Virtual Camera lets you share your recording scene with other programs like Zoom, Skype, Discord, etc. Also, the Live Stream feature can be directly associated with many live stream platforms, which is also the primary purpose of this program. Then, you can check a chart with a brief review of it.
| Interface | Main Features | Performance | |
|---|---|---|---|
| Advantages | Use the top, medium, and bottom parts to display all features. | Offer necessary recording features; Balance audio's tunnels. | Record overlayed screens easily; Adjust and record multiple screens without lagging. |
| Disadvantages | Can't highlight the various features; Confusing for beginners. | No editing features. | Can only export videos with at most 1080P resolution. |
Part 2. How to Record Your Screen with OBS Studio
Are you puzzled by its interface and features? Don't worry; not many features will be used when you do the OBS Studio screen recording. Just check the steps below.
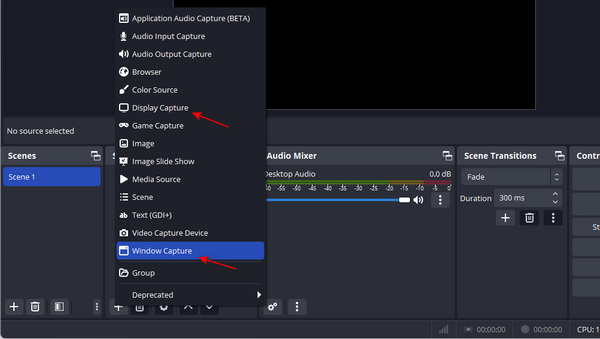
Step 1 Open OBS Studio. You'll see a scene is created by default, and then you need to click the Add button in the Source section to add what you want to record. You can click the Window Capture button to add windows opened on your PC and the Display Capture button to record the whole screen with OBS Studio.
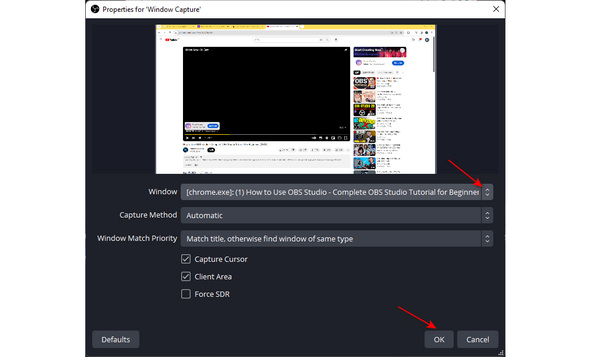
Step 2 If you choose Window Capture, click the Window dropdown button to choose your desired window. Then, click the OK button.
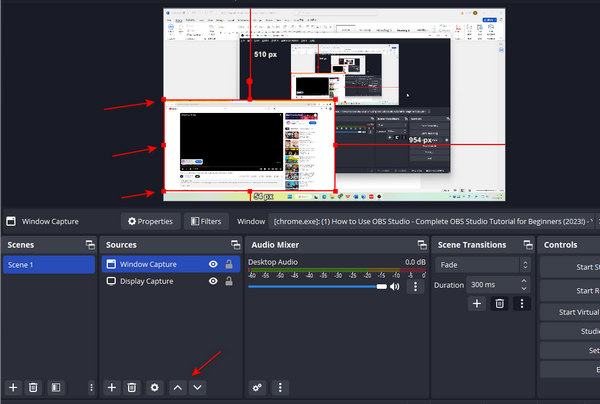
Step 3 To record multiple screens on the OBS Studio, add other windows in the Sources section. Then, click the Up or Down buttons to adjust the two windows' order. You can also click on the controllers on a window to adjust their size and click on and drag the window to change its position.
Step 4 You can also add a microphone and webcam in the Sources section. Finally, click the Start Recording button to start screen recording with the OBS. Then, click the Stop Recording button to stop.
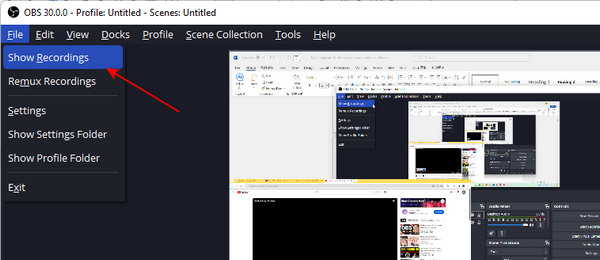
Step 5 To find your recordings, you only need to click the File button in the top left corner and then the Show Recordings button to open the folder of the OBS screen recordings.
Part 3. The Best OBS Alternative to Record Your Screen
If the OBS Studio screen recorder is not your intention, you can use its best alternative to record your screen with ease – Apeaksoft Screen Recorder. It displays all recording features neatly on the interface and shows prompts when you record to help you quickly start recording.
4,000,000+ Downloads
Display a straightforward and neater interface than OBS Studio.
Easily customize the recording area on your screen.
Allow you to trim your recordings to create a flawless video.
Export your recorded videos with at most 4K resolution.
Step 1 Free download Apeaksoft Screen Recorder and launch it. If you want to record a single window, click the Window button to select your desired window. If you want to record the full or customized screen, just click the Video Recorder button.
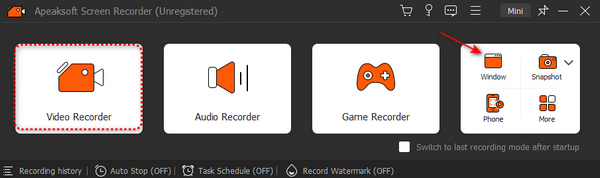
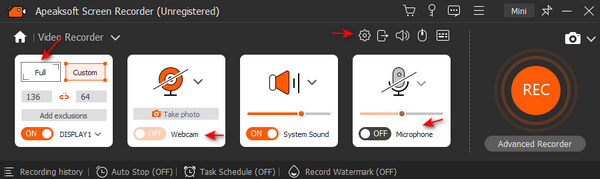
Step 2 Click the Full button to capture the whole screen. Or you can click the Custom button to customize a screen manually. You can also click the Webcam, System Sound, and Microphone buttons to turn them on or off. You can also click the Settings button to adjust more settings.
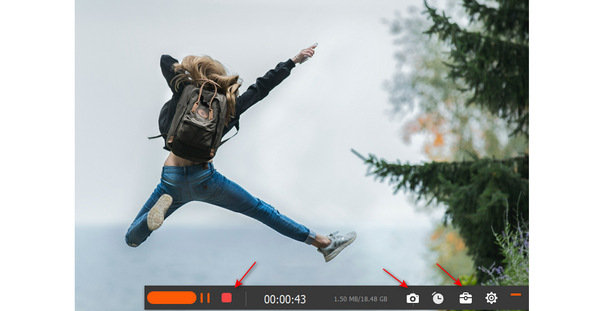
Step 3 Click the REC button to start recording your screen. You can click the Screenshot button to screenshots on the recording screen. The Edit button allows you to add annotations or draw on the screen. Then, click the Stop button to finish recording.
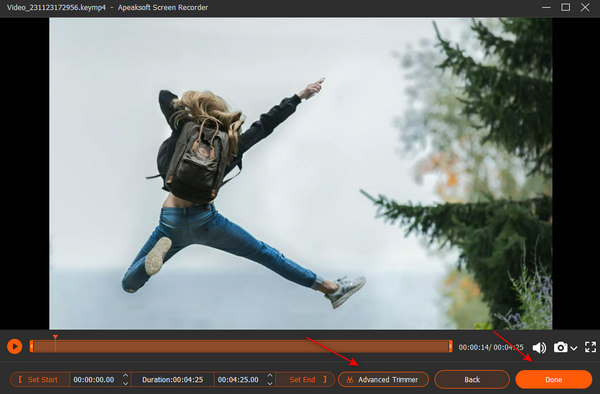
Step 4 Unlike on the OBS screen recorder, you can edit your recordings on this program. Drag the controllers of each end of the timeline to trim your recorded video. You can also click the Advanced Trimer button to do it preciously. Finally, click the Done button to save your recording.
Part 4. FAQs about OBS Screen Recorder
Why do I fail to add an audio source on OBS Studio?
OBS Studio can record up to 2 audio sources. When you do screen recording on OBS, each screen has already contained an audio source, so you can’t add more audio sources.
Why doesn't the OBS Studio screen recorder support video editing?
The main feature and purpose of OBS Studio is to record a screen and then share the screen online to do a live stream, while it can also save your recordings. Therefore, the developer doesn't need to add an editing feature to this program.
How can I add my PS3 to the OBS Studio's Sources section?
You need a capture card to connect to your PS3 and then connect your PS3 to your PC. On OBS Studio, you need to click the Game Capture button in the Sources section. Then, you can record your PS3 gameplay.
Conclusion
This article introduces a brief review of OBS Studio. Maybe you've also learned how to use OBS to record a screen on your PC. If you think this program is too difficult to use or lacks basic editing features, you can use Apeaksoft Screen Recorder to record the entire screen or each window easily. You can also trim your recordings to make It flawless.