– "I used the screenshot button on Facetime. But my screenshots are nowhere to be found. Where do Facetime screenshots go?"
– "I found my Facetime screenshot not saving…"
Suppose your screenshot feature in FaceTime is somehow wrong, or you don't know how to record FaceTime video on different devices. In that case, you can find the satisfactory answer in this intuitive tutorial.

- Part 1: How to Record FaceTime on Mac/Windows
- Part 2: How to Record FaceTime on iPhone
- Part 3: FAQs on Recording FaceTime
Part 1: How to Record FaceTime on Mac/Windows
1. Record FaceTime on Mac
For people who run Facetime on Mac operating systems, QuickTime can be a good screen recorder. It is totally free to record Facetime with audio on Mac computer. Moreover, QuickTime can serve as a Facetime screenshot maker too.
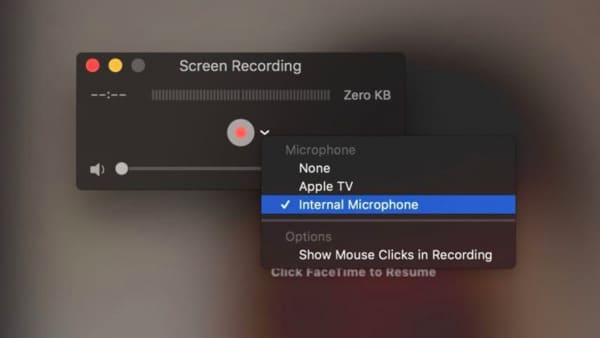
Step 1Set QuickTime screen recording preferencesOpen QuickTime from your dock or application folder on Mac. Choose "File" option on the top toolbar. Select "New Screen Recording" from its drop-down list.
Step 2 Record Facetime with QuickTimeClick the down-side arrow besides the red "Record" button. You can select "Internal Microphone" to record Facetime call with audio. Choose "Record" option. Set the screen capture area with your mouse. The moment you release the mouse, QuickTime will start recording Facetime call video on Mac quickly. Launch Facetime app and start your video or audio call as usual.
Step 3 Stop recording Facetime on MacWhen you want to stop Facetime screen recording, you can click "Stop Recording" on the top menu bar. Well, this button looks like a circle inserted with a white rectangle. Then choose "Save…" from the top "File" list. Set a new name and destination folder. At last, choose "Save" to export the recorded Facetime video call.
2. Record FaceTime on Windows
As a Windows user, you can easily record FaceTime and take FaceTime screenshot with Apeaksoft Screen Recorder.
Its well-designed interface and powerful features are friendly to beginners. Thus, even though you have no experience of screen recording, you can record Facetime on Windows effortlessly.

4,000,000+ Downloads
Record Viber call, Facetime, Skype, GoToMeeting, and any online communicating services with audio on Windows and Mac.
Export the FaceTime video or screenshot to various formats.
A user-friendly interface and intuitive features guarantee convenient usage.
The software allows you to record both system audio and microphone sound with no lag.
Steps to Record FaceTime Call and Take Screenshot with Ease
Step 1 Launch Screen RecorderFree download and install Apeaksoft Screen Recorder on your computer. Launch the Facetime recorder software. Then choose "Video Recorder" on its main interface.
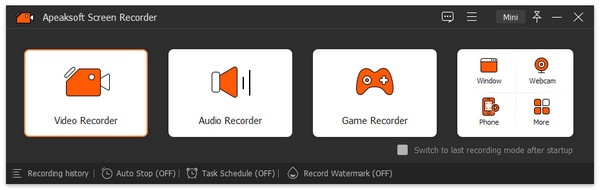
Actually, if you only want to screenshot Facetime instead of recording screen video, you can choose “Snapshot” instead.
Of course, it is able to take Facetime screenshot during recording.
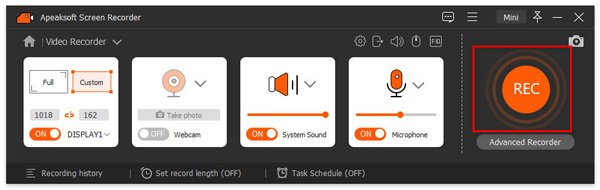
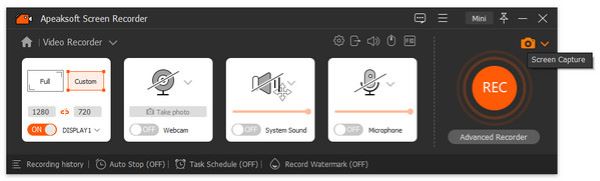 Step 2 Customize the screen area
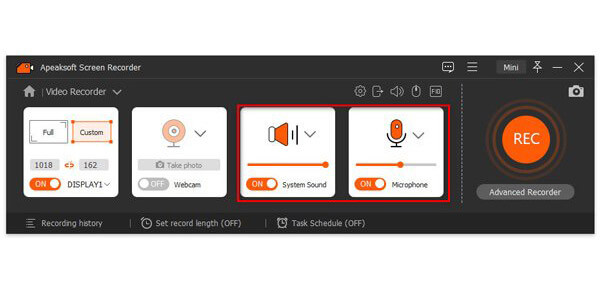
You can record Facetime full screen video call, and it’s OK if you want to draw the certain area to record instead. To record Facetime video with audio, you need to turn on "System Sound".
Furthermore, trigger "Microphone" to the "On" state if you want to record your voice together. Move the volume slider as you like.
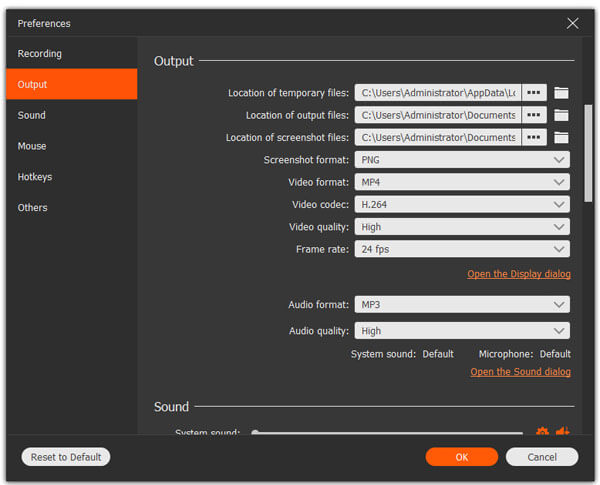
 Step 3 Manage the output settings (optional)
If you want to change the output video format, you can click "More settings" on the top. A new window pops up with the name of "Preferences". You can head to “Output” and other sections to manage the output settings. Then choose "OK" on the lower right corner to save your change.
 Step 4 Record Facetime call and take Facetime screenshot
Click "REC" button to start recording Facetime call with audio. Well, you can pause, restart and stop recording with no time limitation.
Moreover, Screen Recorder allows users to screenshot Facetime video call freely. Just use your mouse to make drawing or add annotations during recording.
After that, you can preview the video and screenshot.
Step 5 Export or share your Facetime recordingWhen the recording process ends, choose "Save" in the "Preview" window. Then click "Next" to move on. Sooner, you can get the recorded video in the left panel. Share it to YouTube or other sites via the best screen recorder if necessary.

Part 2: How to Record FaceTime on iPhone
As an iPhone user, you can record FaceTime on iOS 11 and later with the built-in screen recording feature. However, if you are running the version before iOS 11, you can use some iPhone screen recorders like Apeaksoft Screen Recorder to record FaceTime.
Here is a detailed guide on how to turn on this screen recording feature on your iPhone and its simple usage.
Step 1 Enable iOS screen recording featureOpen "Settings" app. Choose "Control Center" under "Settings". Find "Customize Controls", and then click the green add button before "Screen Recording".
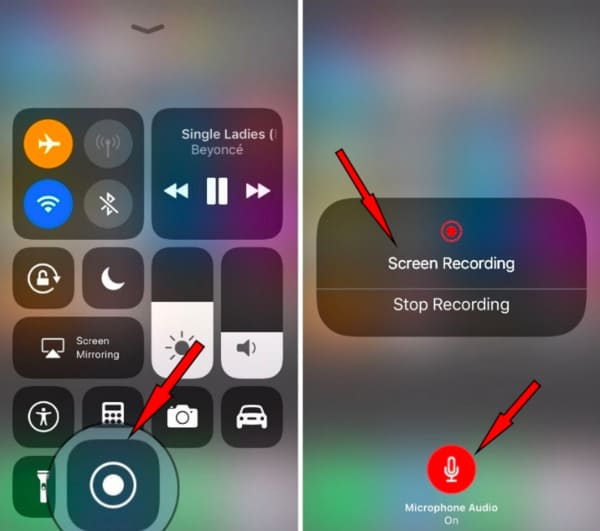
Step 2 Record Facetime with audio on iPhoneSwipe up from the bottom of your iPhone screen. Deeply press "Record" button in the "Control Center". Then choose "Microphone Audio". Now, click "Record" to start Facetime call recording after the three-second countdown.
Step 3 Stop recording Facetime call on iPhoneWhen you want to stop Recording Facetime, you can swipe down the "Control Center". Choose "Stop Recording". What’s more, you can tap the red status bar on the top of your iPhone screen, and then choose "Stop" to finish Facetime call recording too. Well, you can find the recorded Facetime call video in Photos app.
Even if you are launching a group FaceTime chatting, it can also record the screen. (Group FaceTime not working?)
Part 3. FAQs on Recording FaceTime
Can I use FaceTime on my Android?
Although you cannot download FaceTime on your Android, you can still use the FaceTime feature by joining the link shared by someone with an Apple device.
Does FaceTime inform you that someone records the screen?
No, FaceTime doesn't have this feature. So, when you accept a FaceTime invitation, make sure it's someone you know. Don't pick up random calls from strangers to avoid facial identity theft.
How to make a FaceTime call?
You can open the FaceTime app on your Apple device. Tap "New FaceTime" to create a new FaceTime call with your contacts. Otherwise, you can tap "Create Link" to make people on any device, especially on Android or Windows, join the FaceTime call.
Conclusion
All in all, you can record Facetime call and take Facetime screenshot freely from above methods. Still have problem about Facetime like FaceTime not connecting on iOS? Just feel free to contact us.