A Beginner-Friendly Guide to Restore Mac from Time Machine
Many users might have wondered how to restore a Mac from Time Machine, as unexpected data loss or system errors can happen at any time. But you don't have to worry, thanks to a built-in backup feature called Time Machine, which allows users to recover deleted files or even restore the entire system to a previous state. This guide will walk through how to restore your Mac from Time Machine efficiently, and introduce a professional alternative for better data management.
PAGE CONTENT:
Part 1: Basic Knowledge About Restoring Mac from Time Machine
Before getting started with the process of how to restore a Mac from Time Machine, it's essential to understand the details about the application and how it works. Simply put, Time Machine automatically backs up your Mac's system files, apps, and personal data. Apple's built-in backup feature creates hourly, daily, and weekly backups, allowing you to easily restore specific files or the entire system to a previous state.

When issues like data loss, crashes, or software issues happen, restoring your Mac from Time Machine can bring your files and system back to normal without complex procedures. However, it's essential to ensure that the backup has been created successfully.
Part 2: How to Restore Deleted Files of Mac from Time Machine
Suppose you've deleted important files by accident. In that case, Time Machine can help retrieve them quickly. By entering Time Machine from Finder, you can browse previous versions of folders and restore selected files to their original locations. This simple feature makes file recovery intuitive and ensures you can get your documents, photos, or videos back without relying on external software.
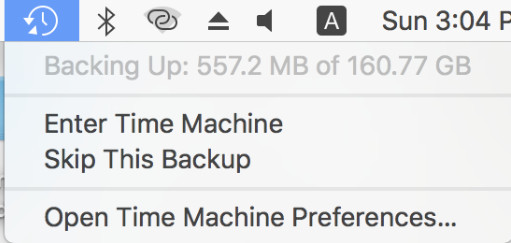
Step 1. Click Enter Time Machine from the Mac Menu to open Time Machine for recovering deleted files on your Mac.
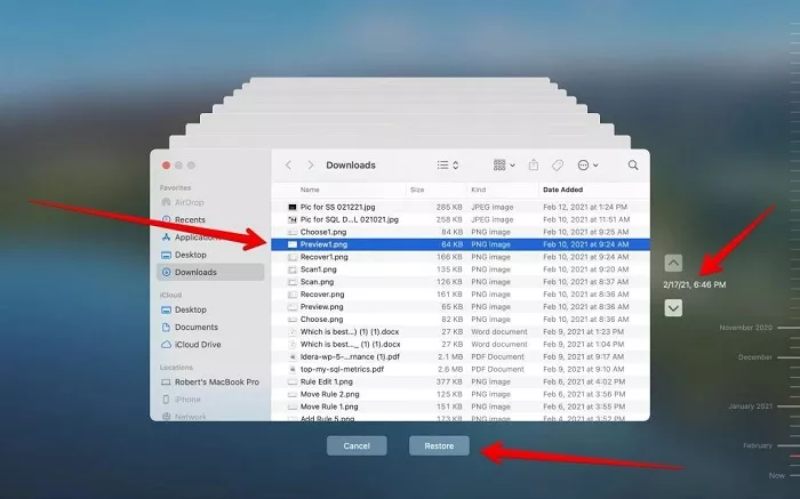
Step 2. On Time Machine, you can search the timeline and check for deleted files. If they're not deleted permanently, you will find them in the same folder as before.
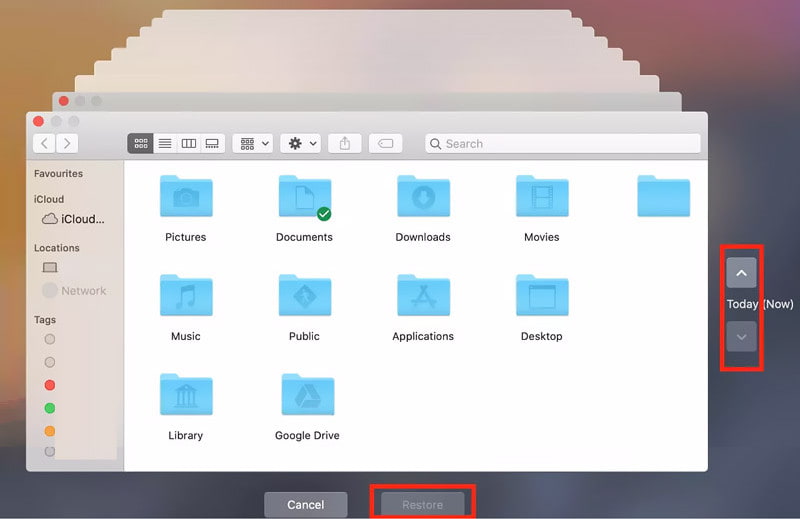
Step 3. You are allowed to check the detailed information of the deleted file by clicking it. After selecting all the files that you deleted by accident, click Restore, and these files on your Mac will be restored from Time Machine.
Part 3: How to Restore macOS on Your Mac from Time Machine
When you restore your Mac from Time Machine to deal with files that are deleted unexpectedly, you should also be aware that Time Machine can also restore the entire macOS system. This is especially useful when reinstalling macOS after a crash or hard drive replacement. With a Time Machine backup, you can bring back your apps, settings, and data exactly as they were before the issue occurred, saving both time and effort during recovery.
Step 1. Restart your Mac and long-press Command and R as soon as the screen turns black. It allows you to access macOS Recovery Mode.

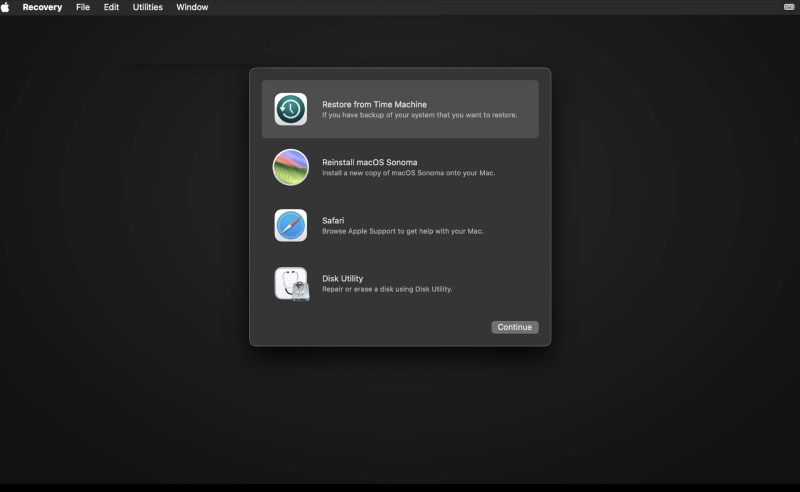
Step 2. In the main interface of macOS Recovery Mode, click Restore from Time Machine and then Continue.
Step 3. Find the storage device that contains your backup of Time Machine, and click to select it. Then, click Continue.
Step 4. From the list of backups available, you can select the backup according to the date. Click Continue. And all you need to do now is wait for the process.
Part 4: A More Professional Tool to Restore Mac Files
While restoring your Mac from Time Machine is a convenient built-in option, it may not always provide the precision or flexibility needed for advanced recovery tasks. Apeaksoft Data Recovery offers a more powerful alternative for Mac users, enabling the restoration of deleted or lost data even without prior backups. This tool allows you not only to restore missing data and files on your Mac, but also to select the specific ones that you want. With professional scanning technology and compatibility, it has never been easier to manage and recover Mac data comprehensively.
Step 1. Download the installation package of Apeaksoft Data Recovery from the official website and install it on your Mac.
Secure Download
Step 2. Launch Apeaksoft Data Recovery on your Mac. Click Mac Data Recovery on the main interface.

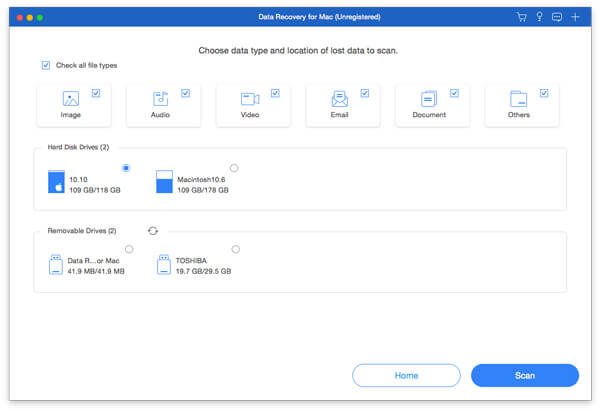
Step 3. All information about your files and storage spaces will be displayed. You can click to select the file types and disk drives for Mac data recovery. Click Scan.
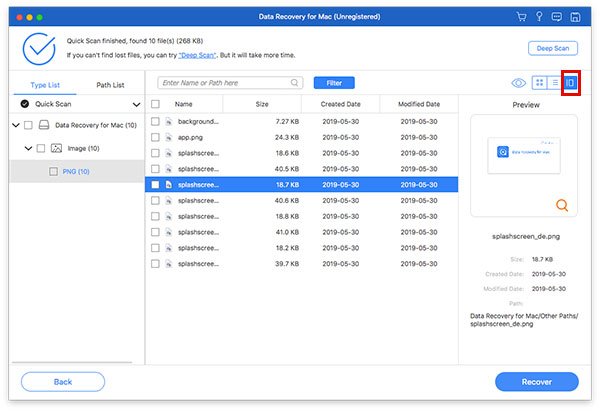
Step 4. After a short time of scanning, all the data and file folders will be detected, and you can see them specifically. You can find the lost data by filtering. Click to select the data you want to recover on your Mac.
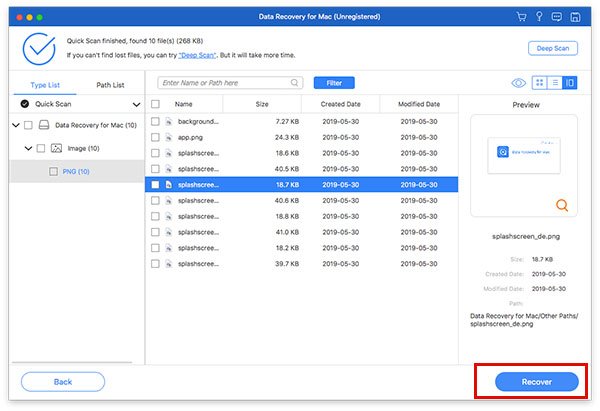
Step 5. You can click on a particular file to preview the detailed information. Once the selection is done, click Recover and choose an output folder to save them. And your Mac will be restored automatically without Time Machine.
Conclusion
Restoring your Mac from Time Machine is a reliable way to recover lost data or rebuild your system after a crash. However, for users who need more advanced features and broader recovery options, Apeaksoft Data Recovery serves as a more professional and efficient choice, ensuring complete peace of mind in any data loss situation.
