When you block a number on your iPhone, you will not receive any phone call, messages or FaceTime from the number. What should you do if you block a phone number by mistake? Can you see blocked numbers on your iPhone? How to unblock a phone number on your iPhone?
In order to remove the blocked phone numbers, you have to find them on your iPhone beforehand. Just learn more about the methods to check and see blocked numbers on your iPhone with different iOS versions. Just read this article and get the desired information accordingly.

- Part 1. How to Find and See the Blocked Numbers on iPhone
- Part 2. Recover Deleted or Blocked Number on iPhone
Part 1: How to Find and See the Blocked Numbers on iPhone
When you update to the latest iOS 18/26, you might find the procedure to see blocked numbers on your iPhone is a bit different from the old versions. Just learn more details about the process as below.
How to find the blocked numbers with iOS 10 or above
Once you have blocked the phone number on your iPhone, you will not receive the phone calls, messages, email, FaceTime, or make phone calls. What you need to do is check and unblock the numbers on your iPhone beforehand.
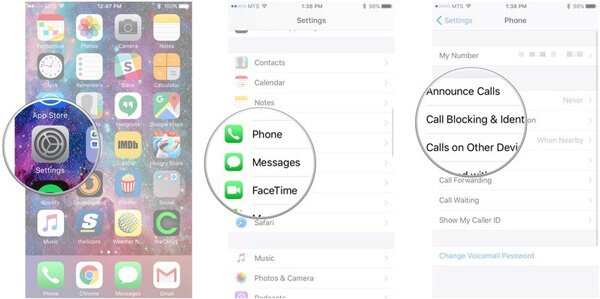
Step 1Open the “Settings” app from the home screen, tap on Apple ID as your name to go to the “Phone”, “Messages” or “FaceTime” option.
Note: As for an iPad that does not use the Phone app, you can choose the “FaceTime” option instead. (See what to do if FaceTime not connecting)
Step 2Find and tap the “Call Blocking & Identification” option on the Phone Settings screen. As for Messages or FaceTime, tap the “Blocked” option to move on.
Step 3Then you can see all blocked numbers and contacts on your iPhone. To unblock a number, find it on the list, and tap the minus button next to the number.
Step 4Once you have tapped the “Unblock” button, the blocked number will be removed on the list. Alternatively, you can swipe left over the blocked number to display the “Unblock” button.
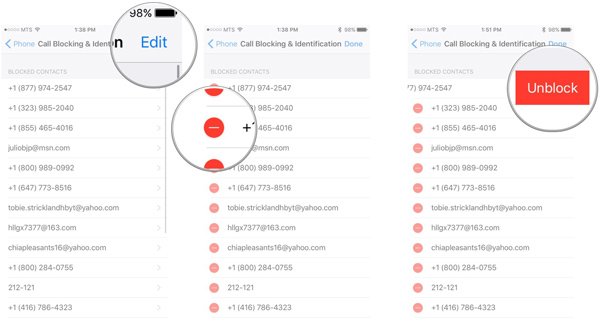
Note: If the blocked number belongs to someone in your “Contacts” list, go to the Contacts list in Phone app, find the contact and tap the “Unblock this Caller” option in the info screen.
How to see the blocked callers on iPhone iOS 9 or earlier
If you were still using iPhone with iOS 9 or earlier, the process to find the blocked numbers on your iPhone should be different. Just learn more details about the method as below.
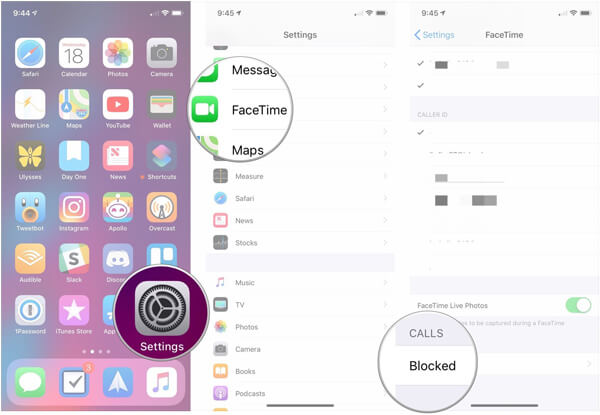
Step 1Open the “Settings” app from your home screen on your iPhone. Go to “Phone” > “Blocked”, you can check the blocked numbers on your iPhone.
Step 2Here you will be presented the list of blocked numbers that you have on your iPhone.
Step 3If you want to unblock a number on iPhone, tap the “Edit” button on the top of the screen, and touch “Unblock”. Now, you can call it after unblocking the number or contact. (See how to edit contacts on iPhone)
Part 2: Recover Deleted or Blocked Number on iPhone
What should you do if you cannot see the blocked numbers on iPhone? Whether you remove the information, or the contacts are erased with some unknown reasons, Apeaksoft iPhone Data Recovery is the ultimate data recovery to get back the lost numbers and contacts from iPhone, iTunes backup and iCloud backup with ease.
Apeaksoft iPhone Data Recovery
- Recover call history, contacts, messages, photos, videos and more.
- Support all file types on iOS devices, including blocked iPhone numbers.
- Preview the lost contacts, messages and numbers before recovery.
- Keep the original condition of your lost contacts and blocked numbers.
- Available to iPhone 17/16/15/14/13/12/11 and earlier, iPad and iPod touch.
How to recover deleted or blocked number on iPhone 7 or above
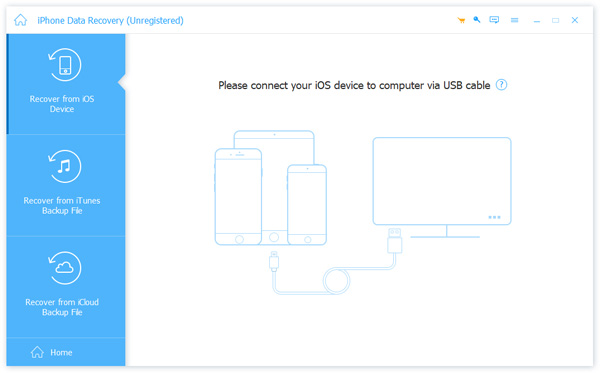
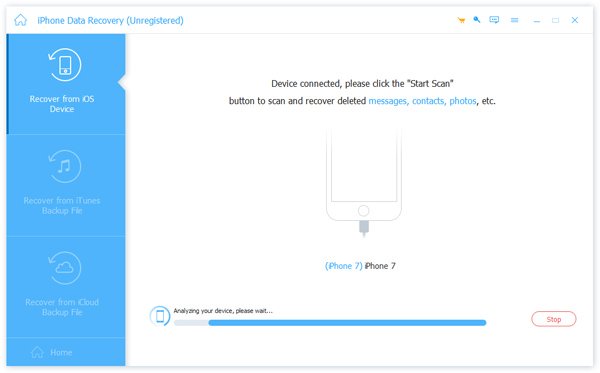
Step 1Install iPhone Data RecoveryFree download and install the iPhone data recovery tool, launch the program on your computer. Connect your iPhone to the computer with a USB cable when you want to recover the blocked numbers on iPhone. Launch the software and it will recognize your iPhone automatically.
 Step 2Preview deleted numbers on iPhone
There are 3 different methods to recover and find the blocked numbers on iPhone. Even if you have not backed up the contacts to iTunes or iCloud, you can also retrieve the blocked numbers from your iPhone directly.
Restore blocked numbers on iPhone directly
Choose the “Recover from iOS Device” option and click the “Deep Scan” mode to locate the blocked numbers on your iPhone as well as the iPhone data. When it is done, you can preview the blocked numbers in the “Message & Contacts” to find the contacts, call histories or messages.
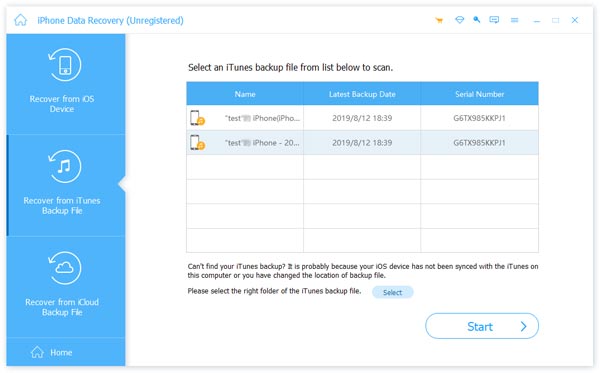
Retrieve blocked numbers from iTunes backup
If you have backed up your iPhone with iTunes, choose the “Recover from iTunes Backup File” tab. After that, you can select the latest backup to access the files you have backed up to iTunes. Then you can preview and recover the lost blocked numbers.
Recover blocked numbers from iCloud backup
To recover phone numbers from iCloud backup, choose the “Recover from iCloud Backup File”, sign in your Apple ID and password, and then download the backup file that may include the lost numbers. Now, you can preview and recover lost phone numbers from your iPhone.
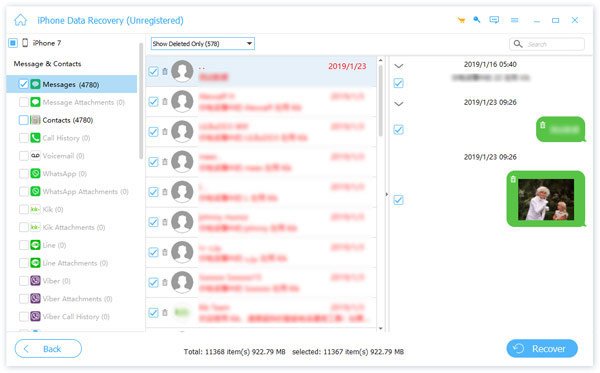
 Step 3Recover blocked number on iPhone
Check the box next to each number you want to recover and click the “Recover” button at the bottom right side. When prompted, select a specific folder and click the “Recover” button again to unblock the numbers on your iPhone. After that, you can make a call with the number now.
You may need: How to block a number on Moto X.
Conclusion
This article shares the methods about how to find and see the blocked numbers on your iPhone. Once you have found blocked the numbers on iPhone, you can unblock the numbers to make phone calls or send text messages with ease. If you still not able to get the blocked numbers on iPhone, you should use the iPhone Data Recovery to retrieve the files back from iPhone, iTunes backup and iCloud backup.