How to Recover iMessages on iPhone Without Data Loss
"How do I recover my iMessages? " iMessages is a convenient communication service between iOS users. You can send iMessages with texts, pictures, and voices only through the internet. However, if you delete some iMessages by accident, how can you recover them? You need to recover important text messages or pictures sent or received via iMessages for work or personal use. Don't be nervous, this article will offer you the most reliable ways to recover deleted iMessages on your iPhone or iPad.
PAGE CONTENT:
Part 1: How to Recover Deleted iMessages from Recently Deleted
If you just deleted the iMessages several days ago, maybe you can recover them from the Recently Deleted album in the Messages app. Check the specific steps below to recover deleted iMessages from Recently Deleted.
Step 1. Open the Messages app on your iPhone or iPad. Then, tap the Filiters button on the top left side.
Step 2. Now, you can see the Recently Deleted album. Tap on it to open the album.
Step 3. Now, you can see many recently deleted messages, including iMessages. You can choose your desired ones and tap the Recover button in the bottom right corner to recover deleted iMessages to your iPhone or iPad.
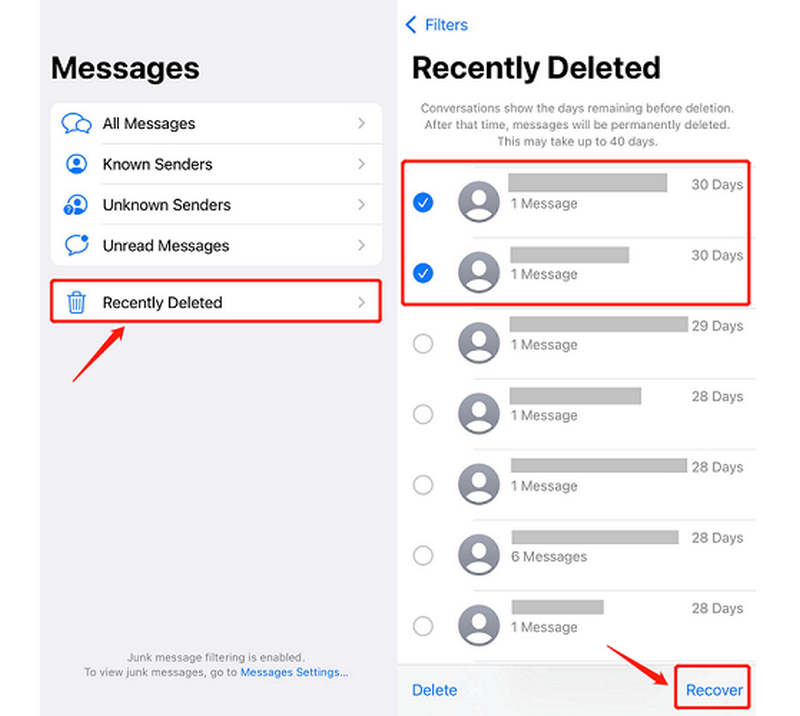
Note: This method can also help you see deleted messages on iPhone. You should ensure that the deleted messages remain in the Recently Deleted folder for less than 40 days.
Part 2: How to Recover Deleted iMessages Without Backup
If you cannot find deleted iMessages in the Recently Deleted folder, and you haven't backed up your iPhone to iCloud or iTunes, you must try Apeaksoft iPhone Data Recovery. This program on Windows and Mac can easily recover all deleted iMessages or other text messages on your iPhone, even if you haven't backed up anything. You only need to connect your iPhone to your computer and let this excellent program recover all deleted data. You can select your deleted iMessages and recover them easily.
One-Click Recover Deleted iMessages Without Backup
- Connect your iPhone to your computer to recover iMessages without backup.
- Quickly scan your iPhone or iPad to retrieve all lost iMessages or text messages.
- Highlight all lost files in red for you to quickly select iMessages.
- Recover deleted iMessages during the scanning process.
Secure Download
Secure Download

How to Recover iMessages with Apeaksoft iPhone Data Recovery
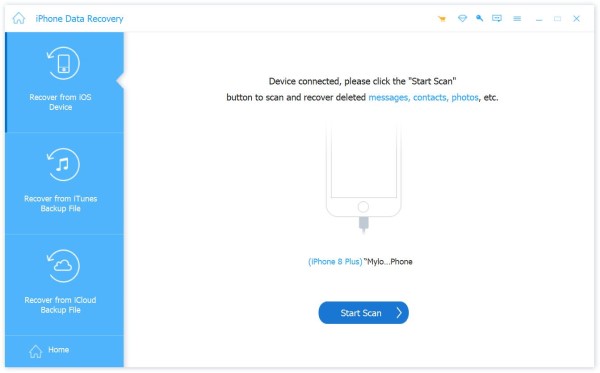
Step 1. Download and install Apeaksoft iPhone Data Recovery on your computer and launch it. Connect your iPhone to your computer. When it's connected, click the Start Scan button to search for lost iMessages on your iPhone.
Step 2. During the scanning process, you can see the deleted iMessages or text messages on your iPhone. You can also wait for the scanning process to complete and then choose your desired ones, and then click the Recover button in the bottom right corner to recover deleted iMessages without backup.
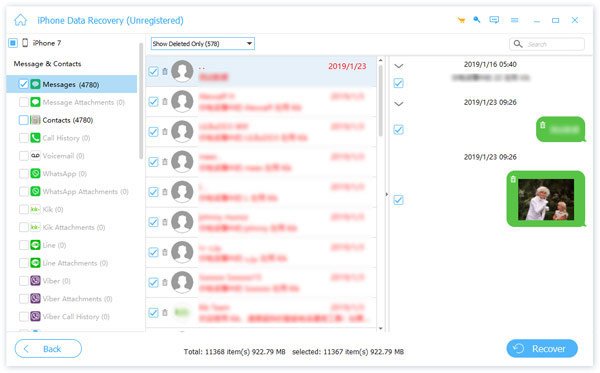
Note: You can also use this program to recover deleted photos from iPhone. You'd better wait for the scanning process to finish so that you can see all deleted files.
Part 3: How to Recover Deleted iMessages from iCloud Backup
You may want to know how to recover messages on iMessages when you keep iCloud Backup turned on. With iCloud Backup, you can easily recover lost data on your iOS devices. However, you should know that recovering data from iCloud may cause your iOS devices. Is there a way to recover deleted iMessages without a factory reset? You can only choose Apeaksoft iPhone Data Recovery instead. iCloud Restore really requires a factory reset on your iOS device. Anyway, check how to restore deleted iMessages on your iPhone with iCloud.
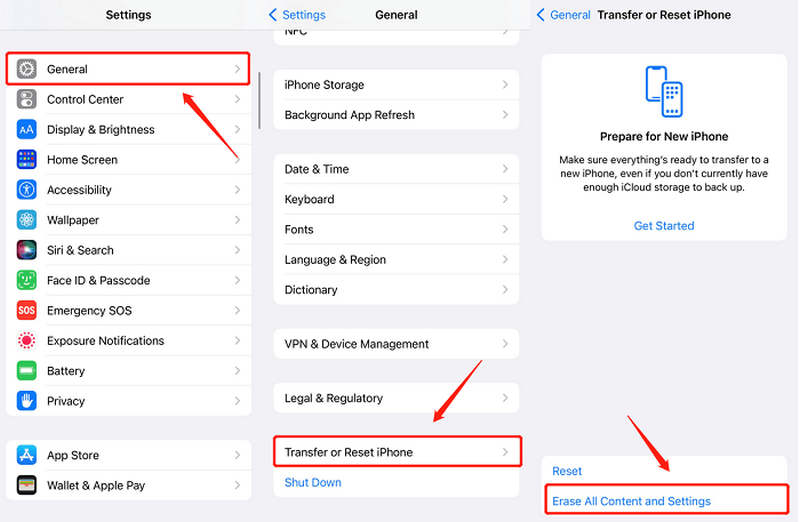
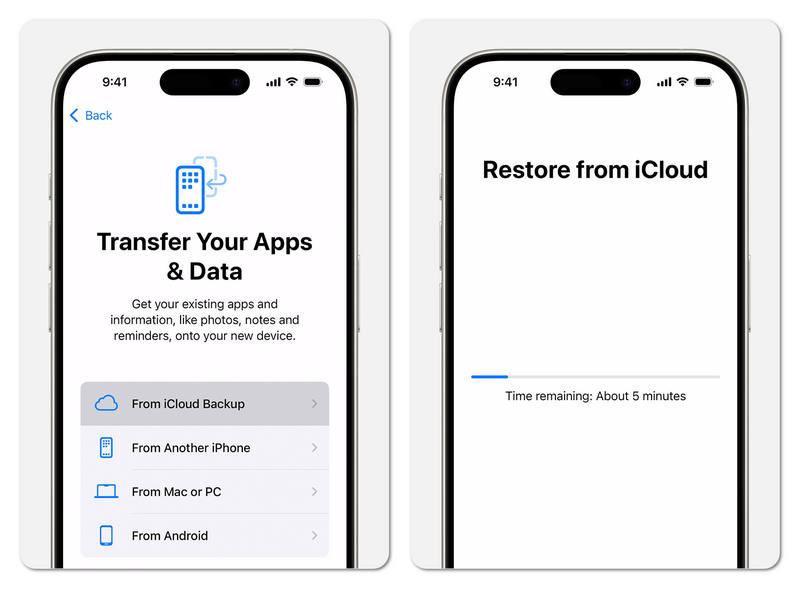
Step 1. You need to factory reset your iPhone. Go to the Settings app and tap General. Then, choose Transfer or Reset iPhone. Then, tap the Erase All Content and Settings button to factory reset your iPhone.
Step 2. Now, your iPhone will restart. You should set it up as a new iPhone. When it comes to the Transfer Your Apps & Data screen, you should choose From iCloud Backup to recover deleted iMessages on your iPhone.
Part 4: How to Recover Deleted iMessages from iTunes Backup
Compared with iCloud, iTunes Restore doesn't require a subscription or a factory reset of your iOS device. You can directly back up your iPhone to your computer with iTunes, which also means there's sufficient storage space to keep your iPhone backup. You can also check how to restore iMessages with iTunes if you have ever backed up your iPhone to a computer with iTunes or Finder.
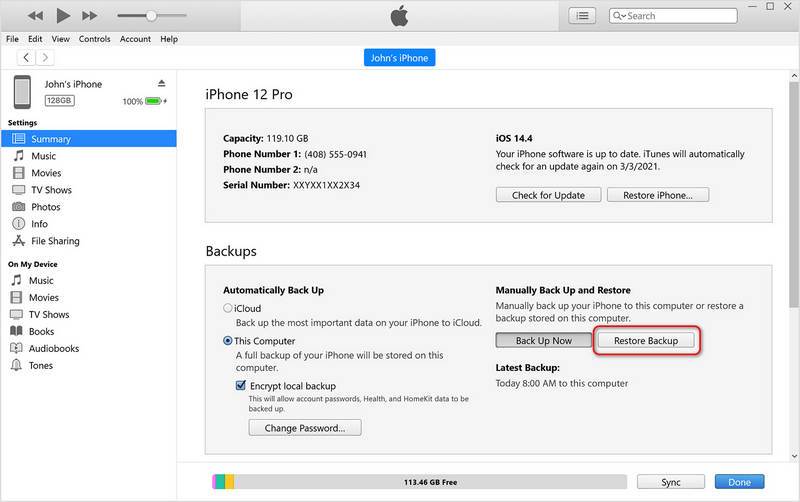
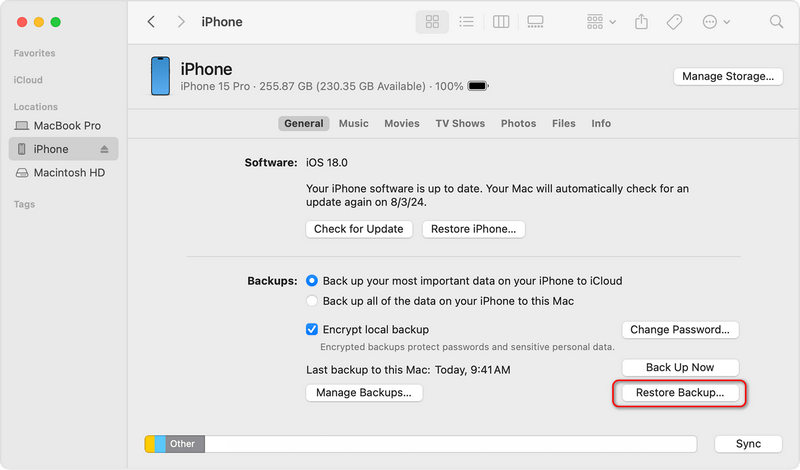
Step 1. Connect your iPhone to your computer and launch iTunes or Finder (on macOS). When your iPhone is connected, click on your iOS device on the top left side of the iTunes or Finder interface.
Step 2. Now, you can recover deleted iMessages from your computer backup to your iPhone with only one click:
on Windows:
Locate the Summary tab and click the Restore Backup button to recover deleted iMessages from the iTunes Backup on your computer.
on Mac:
Directly click the Restore Backup button at the bottom to restore iMessages from the Mac backup to your iPhone or iPad.
Conclusion
This article has told you how to recover deleted iMessages in 4 reliable ways. You can choose iTunes or iCloud Backup files to restore deleted messages on iMessages. If you have no backup files, you can search for deleted iMessages in the Recently Deleted album. If none of the approaches can help, you should resort to Apeaksoft iPhone Data Recovery. This program can easily recover iMessages on your iOS device with only a few clicks. You can easily get back your messages or iMessages even without backup.
