Samsung Odin was an official tool for Samsung firmware flashing. Now, this tool is used by the developer community to root Android devices. Compared to the general method, Odin root is pretty easy to use.

Another benefit is that Odin Root is compatible with almost all Samsung devices since it was originally developed by Samsung. Anyway, you can learn everything you need to know about Odin Root from this page.
- Part 1: What is Odin Root
- Part 2: How to use Odin Root to root Android phone
- Part 3: How to extract data before root Samsung Odin
Part 1: What is Odin Root
As mentioned before, Odin Root is a widely used Android root toolkit for Samsung and other Android devices. Its key features include:
1. Fix boot loop issues or firmware upgrade problems.
2. Downgrade firmware on Samsung Galaxy tablets and smartphones.
3. Support almost all Samsung devices and popular models from Moto, Google, Huawei, HTC and LG.
4. Install custom ROM.
5. Root Android devices with simple operations.
Pros
1. Odin Root is free of charge without ads, virus, or spyware.
2. Developers release updates regularly.
3. It has higher success rate on rooting Samsung devices.
Cons
1. Odin Root lacks some necessary functions, like backup and unroot.
2. You have to download packages based on your build number.
Part 2: How to use Odin Root to root Android phone
For Samsung customers, we suggest you to try Odin Root since it shares higher success rate. There are some preparations you need to do:
1. Access Odin Root developer website and check if your device is supported. Unlock your phone, go to Settings > About Phone and remember the value of Build Number. If you can find the build number on the website, it means you can use Odin Root.
2. Full charge your smartphone or tablet or make sure it charges at least 80% of battery power.
3. Download and install the latest drivers from your manufacturers on your PC.
4. Get the right package, such as Odin mode Galaxy S4, from the developer website according to your build number and device model.
5. Enable USB Debugging mode on your phone, you can find it in Settings > Developer Options. For new device, touch the Build Number for 7 times to activate the hidden Developer options.
6. Back up your device with Apeaksoft Android Data Extraction before using Odin Root.
How to root your Android phone using Odin Root
Step 1: Unzip the package you download from Odin Root website and save the content files to a separate folder. Power off your device, and boot into download mode by holding Home + Power + Volume Down button combination. Then connect the device to your PC with a USB cord.
For latest Samsung devices, like Galaxy S8, the button combination is Power + Volume Down + Bixby. And you can find the combination on the website of your manufacturer.
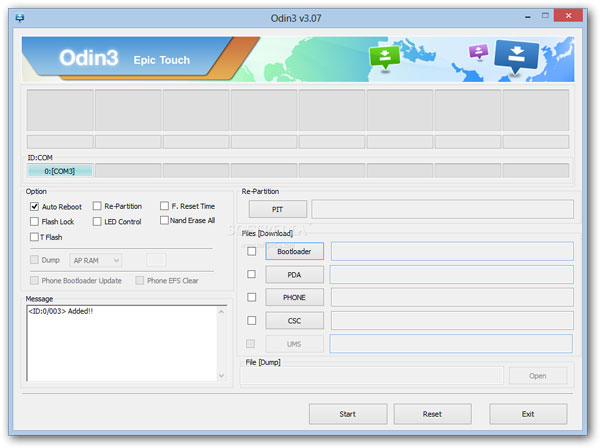
Step 2: Go to the folder and run Odin3.exe file. Wait for ID: COM area turns to blue. It means your device is detected.
If your device is not recognized, right click on Computer on your desktop, go to Properties > Device Manager, find the USB Driver entity, right click on it and choose Update Software, and then follow the onscreen instructions to up drivers to date.
Step 3: Check the boxes in front of Auto Reboot and F Reset Time on left side. Next, click on the PDA button on right side, navigate to the separate folder, select the CF Auto Root file and open it.
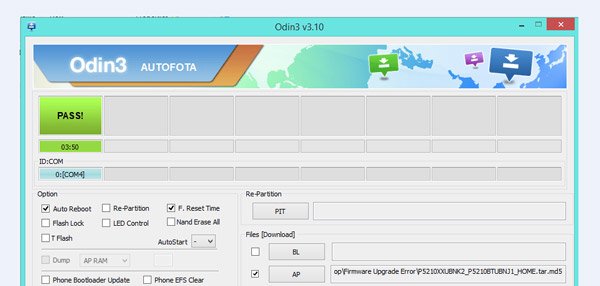
Step 4: Finally, click on the Start button at bottom area to start rooting your device. When it finishes, you can see the PASS message appear on the top of the Odin Root window.
Step 5: Wait for your device to reboot; then quit the Android root toolkit and disconnect your device. If you want to use the rooted device, you have to install SuperSU from Play Store or internet.
Part 3: How to extract data before root Samsung Odin
Before root Samsung using Odin Root, we suggest you to back up your data with Apeaksoft Android Data Extraction, because it offers a lot of useful features, like:
1. Extract data from Android tablet or smartphone and save it to computer simply.
2. Support a wider range of data types, like contacts, call logs, text messages, photos, videos, music, PDFs, app data, and more.
3. Preview data before backup, so you can select all of them or certain files to save to your computer.
4. Protect your data in original conditions and quality while extracting it to computer.
5. At the same time, not damage current data on your mobile device.
6. Available in various situations, like system freezing or crash, black screen, etc.
7. Compatible with almost all Android devices from Samsung, LG, MOTO, Google, Sony, HTC and other major manufacturers.
In a word, it is the best option to back up Android device to Windows 10/8/8.1/7/XP and Mac OS before using Odin Root.
How to extract data before root Samsung Odin
Step 1: Connect Samsung device to Android Data Extraction
Download and install the best Android backup tool on your computer. Plug your Samsung Galaxy S5 to the computer as well.
After launching Android Data Extraction, it will discover your device automatically. Then click on the Start button to move on.
Step 2: Go to the preview window before backup
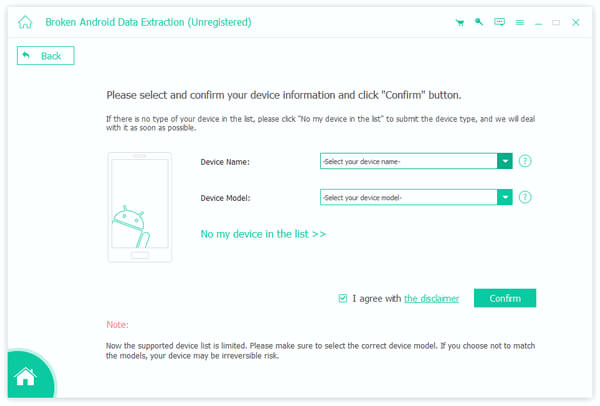
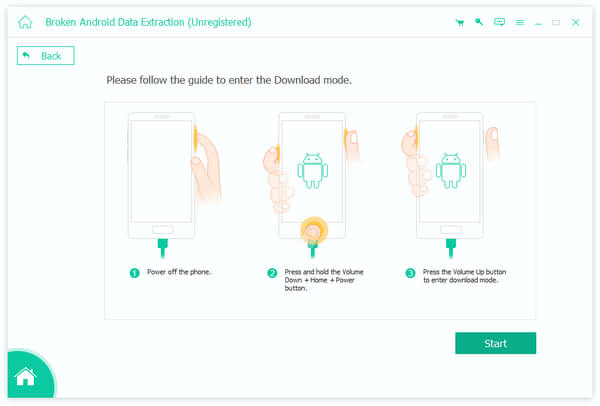
When confirmation window pops up, pick up your phone name and model from the dropdown lists, and click Confirm to go to next window. Next, follow the onscreen guide to put your device to download mode and hit Start to get necessary firmware. When it finishes, the preview window will show up.
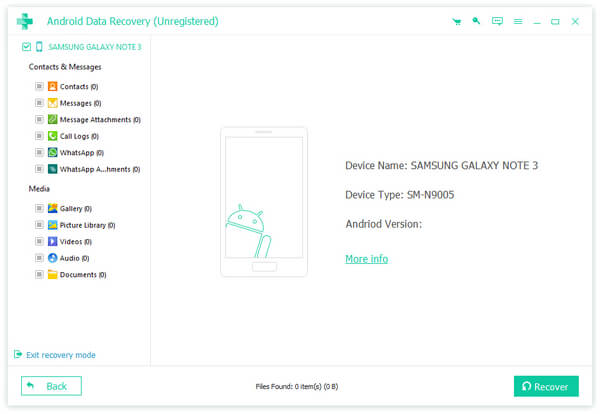
Step 3: Extract data from Samsung before using Odin Root
Locate to the left navigation bar, and select a data type, such as Messages; then you can look at all message contents on right side. Choose the items you want to back up. Next, do the same thing on each other data type. Finally, click on Recover button to save your data to computer.
Conclusion
Locate to the left navigation bar, and select a data type, such as Messages; then you can look at all message contents on right side. Choose the items you want to back up. Next, do the same thing on each other data type. Finally, click on Recover button to save your data to computer.