Today, more and more people decide to root their Android devices to gain complete control. It is true that there are many options to execute Android root, but that is not enough. After being rooted, you also need a file system manager, such as Root Browser.

As a third-party file manager app for rooted Android phone, many people are not familiar with Root Browser. If you wonder whether it is worth to use, spending a few minutes to read the post below, and you can learn everything you need to know about this popular file system manager tool, including how to use it.
- Part 1. What is Root Browser?
- Part 2. How to use Root Browser for Root Android
- Part 3. Tips for Using Root Browser
Part 1. What is Root Browser?
As mentioned, Root Browser is an app that manages file system on a rooted Android phone, similar to Root Explorer. There are excellent features for the Root Browser for Android you should know.
1. View files and folders on 2 different panels.
2. Move, copy and paste, delete, and change any file on your Android phone.
3. Open, access, and hack game files as you wish.
4. Zip a folder or extract files from ZIP on Android.
5. Explore and run any APK, RAR, JAR or ZIP files.
6. Search for specific file on Android like doing it on PC.
7. Look at thumbnails of images.
8. Sort files by name, size and diet.
Pros
1. Root Browser integrates a wide array of features.
2. It is free to download in Google Play Store.
3. You can set the default open app for specific files.
Cons
1. The interface of Root Browser is a little messy, and beginners may feel confused.
2. There is no video guide of how-to.
Part 2. How to use Root Browser for Root Android
Considering developers did not publish guides for Root Browser, we will tell how to use it in this part.
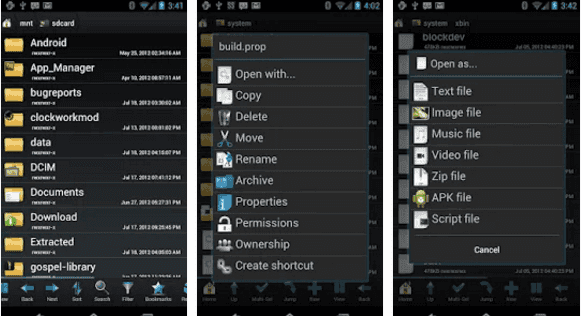
Step 1: First of all, make sure your Android phone is Internet connected and have been rooted. Open your Google Play Store, search and download Root Browser. It is freeware and you can use it without paying a penny. After installed, open the file system manager app.
Step 2: If you want to hack a game, for example, go to the "Data" > "Data Folder" and you will find a list of directories on the screen. Scroll down and locate the game that you want to hack. Then open the "shared-prefs" folder.
Step 3: Find the name of the game in "shared-prefs" folder, open the corresponding XML file and initiate editing it. For instance, you can change your game score and level by editing the value under Level up helper and then hitting the Save button. Next, open the game, you will find the changes.
In addition to hack game, you can get the menu by pressing a file or folder. The menu offers "Open with", "Copy", "Delete", "Move", "Rename", "Archive", and more options.
Part 3. Tips for Using Root Browser
Bear in mind that Root Browser is not a perfect file manager, though it does offer rich features. First of all, Root Browser cannot undo the changes once you tap the Save button, so every time you edit a file or folder, make sure you know what you are doing.
If Root Browser fails on edit the file and even leads to data loss, you will need a professional tool to get back your file from rooted Android, such as Apeaksoft Android Data Recovery. Its key features include:
1. It has the capacity to get back lost data from Android phone unrooted or rooted.
2. You can look at all data on your phone and decide to retrieve all of them or specific files.
3. The one-click recovery function makes it rather easy to use and beginners can grasp it quickly.
4. It relies on a USB cord to communicate with your Android phone, so it works without internet connection.
5. The biggest advantage is to get back your data from Android in original condition and quality.
6. Android Data Recovery works on all Android devices from Samsung, LG, HTC, Sony, MOTO, Google, etc.
In short, it is the best way to retrieve your data when Root Browser fails editing files or folders.
How to retrieve data when Root Browser fails
Step 1: Get the professional Android recovery tool on computer
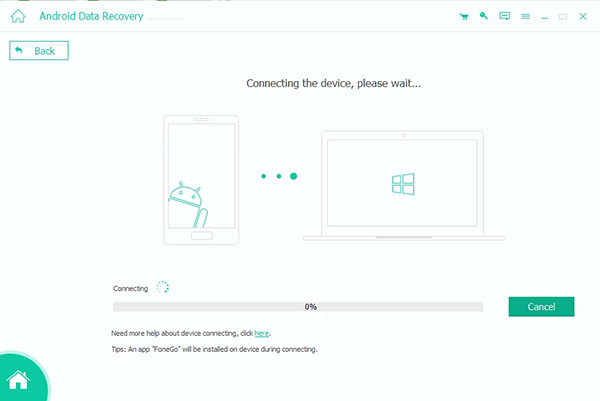
Android Data Recovery offers two versions, one for Windows and the other for Mac computer. Get the right version installed on your computer. Connect your Android phone to the computer using a USB cable. Launch the program; it will discover your phone automatically.
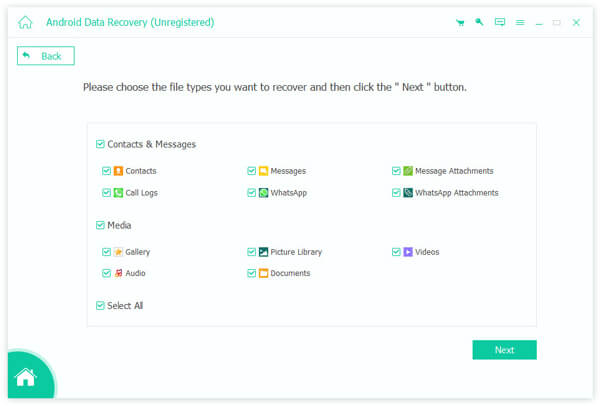
Step 2: Select data types to recover
When going into the data type window, you can select the desired data types by three ways. First of all, select a single data type or certain data types, like "Contacts", "Messages", "Photos", "Videos", and more. Or you can choose a kind of data types, such as Media, and then all media data types will be selected. If you want to check all data on Android, tick the checkbox next to "Select All".
Step 3: Preview and recover Android data
In the detail window, select a data type from left hand column, like Videos. Then all video files on your phone show up on right panel. To recover them, check the box next to each file you want to get back. Finally, click on the "Recover" button at bottom right corner. When prompted, select a proper location to save the data and hit "Recover" again to trigger the process.
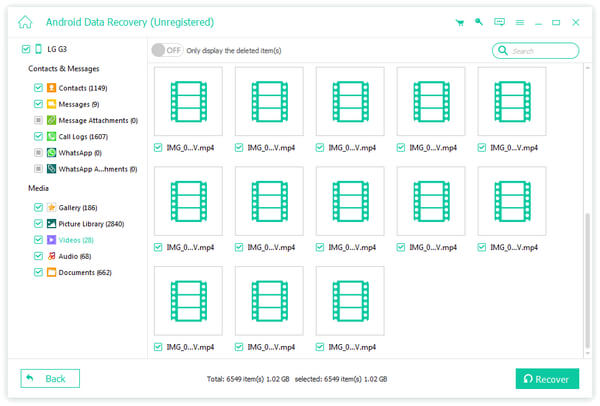
Android Data Recovery allows you to recover multiple files from different data types at one time. It does not have limit on how much data to recover. According to our research, it is able to retrieve over 10GB in a few seconds.
Conclusion
A rooted Android phone provides a lot of privileges and you can edit and change any files as you wish. All you need is a file system manager, like Root Browser. It is one of the best file manager apps for rooted Android, and you should get the full guide of Root Browser from this post. The next problem is what you should do if Root Browser fails. That is why we recommended Apeaksoft Android Data Recovery.
We hope that our guides and recommendations are helpful to you.