Apple ID is an important security tool to protect user's privacy. No matter when you want to sign in iCloud account, or when you log into your account for the first time on a newly-purchased Mac, you are required to enter your Apple ID account to verify your identification. To further protect and secure your account, Apple has launched its new feature called two-factor Authentication. You'll probably see that when you try to sign in to your iCloud account online.

So, what exactly is two-factor authentication, and how to use two-factor authentication on your iOS device? In this post, we will go through everything you need to know about two-factor Authentication.
- Part 1. How does two-factor authentication work?
- Part 2. How to set up two-factor authentication
- Part 3. How to turn off two-factor authentication
- Part 4. FAQ about two-factor authentication
Part 1. How does two-factor authentication work?
Two-factor authentication is an extra layer of security for your Apple ID to ensure this account belongs to you, even if others know your password.
When you sign in your account on a new device for the first time, you will be required to input Apple ID password as well as the two-factor authentication verification code. After entering the code, you're verifying that you trust the new device and you can use the Apple ID on the verified device. For instance, if you want to sign in https://www.icloud.com/ on a new computer for the first time, log in to iCloud with your Apple ID and password, and then you'll receive the two-factor authentication verification code on your iPhone.
Two-factor authentication now works on iPhone, iPad and iPod running iOS 9 and later, or Mac running OS X El Capitan and later.
Part 2. How to set up two-factor authentication
Two-factor authentication is currently available to iCloud users with at least one device that's using iOS 9 or OS X El Capitan or later. Also, you need to prepare a phone number that can be used to receive verification codes by text or phone call. You can follow the steps below to set up two-factor authentication on iPhone/iPad/iPod or Mac.
Set up two-factor authentication on iPhone iPad or iPod
Step 1. Turn on two-factor authentication in Settings
For iOS 10.3 or later: Go to "Settings" > [Your name] > "Password & Security" > "Turn on Two-Factor Authentication", and then tap "Continue".
For iOS 10.2 or earlier: Go to "Settings" > "iCloud", tab on your "Apple ID" > "Password & Security" > "Turn on Two-Factor Authentication", and then tap "Continue".

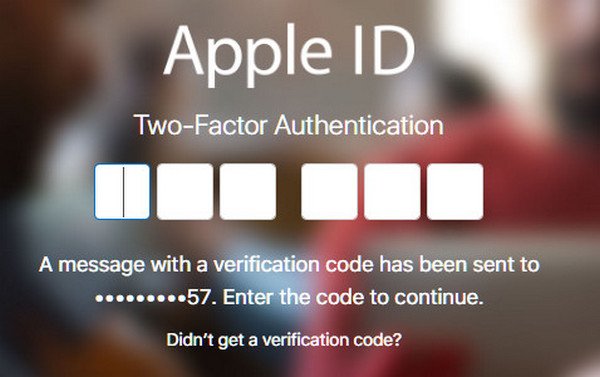
Step 2. Enter and verify your trusted phone number
Enter the phone number for receiving the verification code. You can choose to receive the verification by text or call.
When you tap "Next", Apple sends a verification code to the phone number you provided. Enter the verification code to verify your phone number and turn on two-factor authentication.
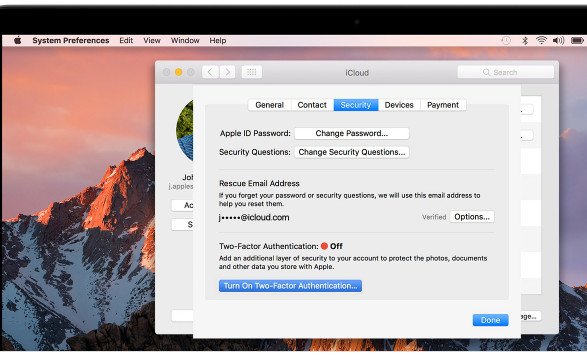
Set up two-factor authentication on Mac
It is actually quite easy to step up two-factor authentication on Mac. Just go to "Apple menu" > "System Preferences" > "iCloud" > "Account Details" > "Security" > Turn on "Two-Factor Authentication".
Part 3: How to turn off two-factor authentication
Although many users benefit from enabling two-factor authentication, sometimes people think that two-factor authentication is like a hassle and want to disable the feature. Moreover, this feature also prevents you from using some third-party software like iPhone Data Recovery to recover deleted photos, notes, videos and many other files, especially when you are trying to log in to iCloud with your Apple ID, it will remind you to turn off two factor authentication firstly.
If you are suffering from Apple two-step verification problem, we suggest you should follow the tutorial to turn off two factor authentication for Apple ID.
Step 1. Go to https://appleid.apple.com/, sign in with your Apple ID and password. If you turn on two-factor authentication, you need to input the two-factor authentication verification code.
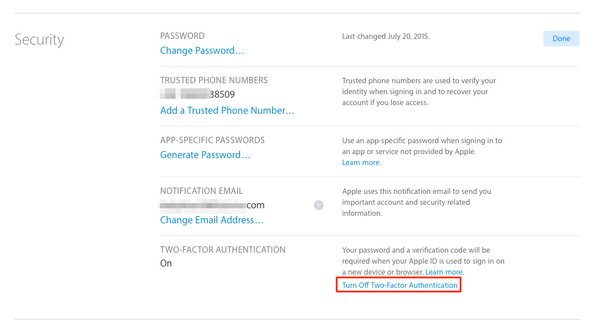
Step 2. Click "Settings" in the LaunchPad, scroll down to "Security" section and click "Edit" in the column.
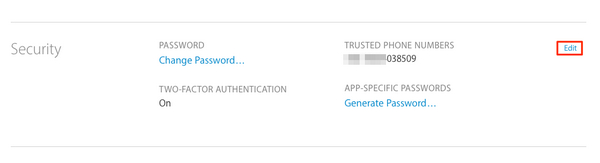
Step 3. Locate the "Two-Factor Authentication" section where it says the feature is ON, and click the link to "Turn Off Two-Factor Authentication".
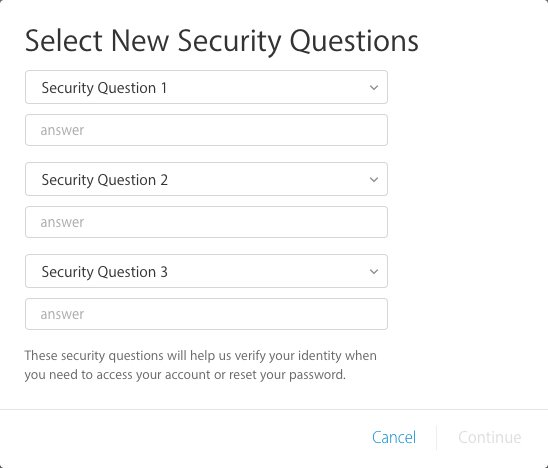
Step 4. Select your security questions and answers, and click "Continue" after confirming your birthday and rescue email. After all of these steps, you have turned off two factor authentication for Apple ID successfully.
Part 4: FAQ about two-factor authentication
Q1: Is two-step verification the same as two-factor authentication?
A: No. Two-factor authentication is a newer security method, while two-step verification is an older security method that is available to users who don't have Apple devices, can't update their devices, or are ineligible for two-factor authentication. The two-step verification works separately for users who are already enrolled.
Q2: Should I type the two-factor authentication verification code every time once apart from my trusted device?
A: Once you signed in, you won't be asked for a verification code on that device again unless you sign out completely, erase the device, or need to change your password for security reasons.
Q3: How to use two-factor authentication on iPhone Data Recovery?
When you use the third scanning mode of iPhone Data Recovery, "Recover from iCloud Backup File", you will need to turn off two-factor authentication on your device. After you use iPhone Data Recovery to restore data from iCloud backup successfully, you can turn on or turn off two-factor authentication again as you like.