Live Photos was introduced in iOS 9 as a new functionality for iPhone 6s/6s Plus. Since then, iPhone users are able to capture animated photos with their handsets. However, there are a lot of questions around Live Photos feature among iPhone users, such as how to take a Live Photo, how to edit Live Photos, how to use and share your Live Photos, etc.
This article will tell you everything you need to know about this amazing feature on iPhone. If you want to take animated photos with your iPhone or you find the Live Photos feature not working, read our guide carefully and then you can produce, edit, and share Live Photos without any problem.

- Part 1: What is iPhone Live Photos
- Part 2: How to Take a Live Photo
- Part 3: How to Turn on or off Live Photos
- Part 4: How to View And Edit Live Photos
- Part 5: How to Use Live Photos
- Part 6: How to Convert Live Photos to GIF or Video
- Recommend: Apeaksoft Video Converter Ultimate
Part 1: What is iPhone Live Photos
As mentioned previously, iPhone Live Photos is a new feature for iPhone 6s and above. It allows you to take animated photos and view them on supported devices. The way iPhone Live Photos works is to take a MOV video file every time you shoot a photo. It is not a video, but rather a 12-megapixel photo that animates 1.5 seconds of motion.
Of course, Live Photos are not perfect. The extra data makes for animated image file sizes are double compared to standard photos. If you make lots of Live Photos on your iPhone, that can quickly eat up iPhone memory and cause shortage of storage space. Moreover, the Live Photos cannot utilize iPhone’s advanced lens technology since the camera is forced to continue shooting.
Part 2: How to Take a Live Photo
It is easy to shoot a Live Photo with your iPhone if you have updated to the latest iOS.
Step 1. Open the built-in Camera app from your home screen and switch to the Photo mode.
Step 2. Tap the Live Photo button on top center of the screen to enable it.
Step 3. Next, focus on the object you want to capture and touch the Shutter button to take a Live Photo on your iPhone. When it is done, the Live Photo will be stored to your Photos app.
Note: Though Apple continues to release new features, the way to capture Live Photos on iOS 9/10/11/12 is the same.
Part 3: How to Turn on or off Live Photos
Unlike other iOS features, there is no setting for Live Photos on iPhone. Instead, you can turn on Live Photos or turn off it in the native Camera app.
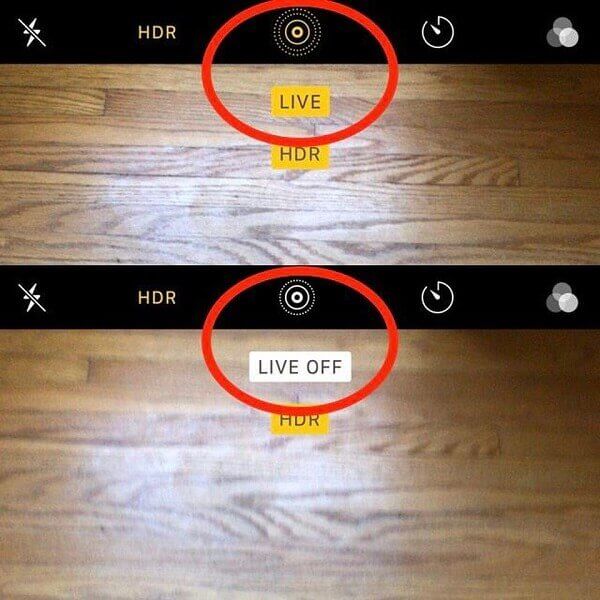
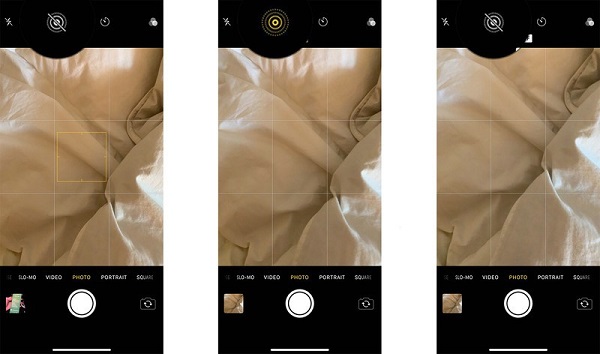
Step 1. Run the Camera app, go to Photo mode and locate the top of the screen.
Step 2. The circle with concentric rings is the switch of Live Photos. If it is yellow, the Live Photos feature is turned on. If it is white, the Live Photos feature is turned off.
Step 3. You can tap the circle button to control the switch simply. By default, the Live Photo is on.
Note: Some people complained that iPhone Live Photos feature cannot be enabled in Camera app. If you encounter the same problem, check the procedure and make sure you capture Live Photos correctly. Moreover, the Low Power Mode will disable most advanced features on your iPhone, including Live Photos. To disable it, go to Settings > Battery, find Low Power Mode option and turn it off.
Part 4: How to View And Edit Live Photos
As you can see, it is easy to take a Live Photo on iPhone; however, you may view a still image if view it improperly. On the other hand, Apple keeps introducing new features into iOS. That makes viewing Live Photos on new iPhone models easier than before.
How to View Live Photos on iPhone 7/7 Plus and Later
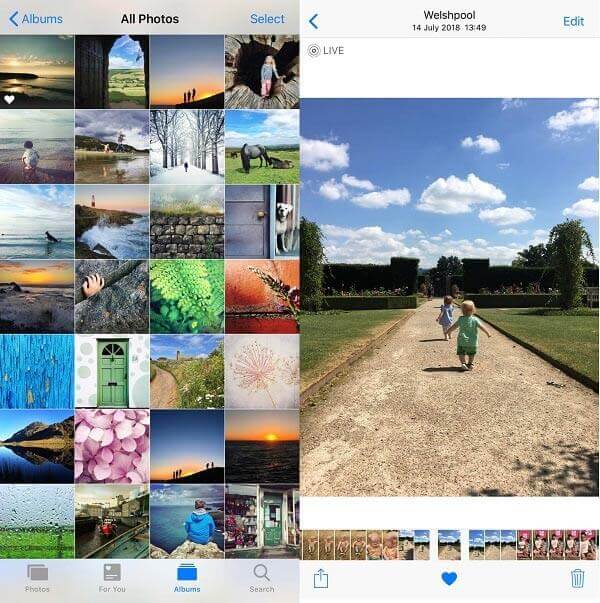
Step 1. Start the Photos app from your iPhone home screen and find the Live Photo you intend to view.
Step 2. Press on the photo to play Live Photos on your iPhone.
How to View Live Photos on Old iPhones
Step 1. Find the Live Photo you wish to view in your Photos app.
Step 2. Tap and hold the photo to play it.
Note: You cannot distinguish Live Photos from still photos with thumbnails. The only way is to tap the thumbnail and open it in full screen. If it is a Live Photo, a Live label will appear at the upper left side.
Cannot play the Live Photos? Try rebooting your iPhone. Moreover, Live Photos take up much space. You should free up your iPhone and make sure that your device has enough space (iPhone says not enough space?).
In some cases, you may discover that your Live Photos are muted. Check your volume setting and disable the mute mode if your speaker works well.
How to Edit Live Photos
Step 1. Locate the Live Photo to edit in your Photos app.
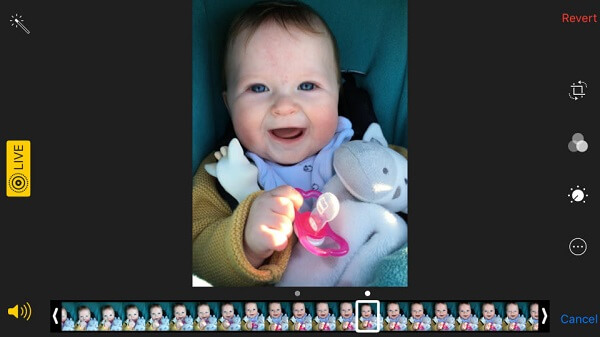
Step 2. Tap the thumbnail to open it and tap Edit at the upper right corner to open the editor screen.
Step 3. The Live Photo will be displayed frame by frame. Select one frame on the timeline and edit it as a still picture.
Rotate or crop the Live Photo: Tap the Crop button, and drag the border to remove unwanted areas, or adjust the orientation by moving the dashboard.
Add filter on the Live Photo: Press the Filters button, swipe forward and backward to find the desired filter. It will add to the frame immediately.
Adjust the Live Photo: Touch the Adjustments button, select Light, Colour or B&W to get the sub-options, and modify them based on your need.
Modify volume: The Speaker button is used to change the volume of your Live Photos.
After editing, preview the Live Photo on the timeline, and tap Done if you are satisfied with it. To get back the original Live Photo, tap Revert and hit Revert to Original on the popup dialog.
How to Extract a Still Shot from a Live Photo
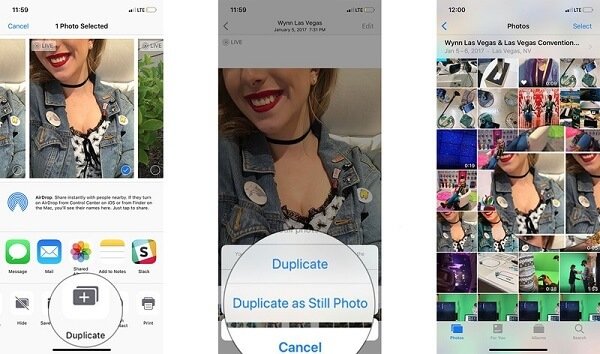
Step 1. Select the Live Photo to open it in full screen.
Step 2. Tap the Share button at the bottom left side and select Duplicate on the option tray.
Step 3. Select Duplicate as Still Photo when prompted. Then you will get a new still photo next to the original Live Photo.
How to Change Key Photo of Your Live Photo
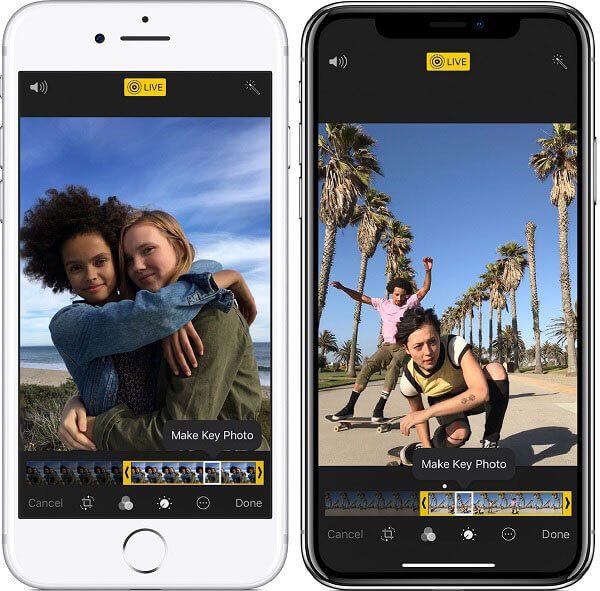
Step 1. Open the Live Photo in Photos app and tap Edit.
Step 2. Move to the frame that you want to set as the key photo and tap Make Key Photo.
Part 5: How to Use Live Photos
How to use Live Photos is another hot topic on forums. Live Photos are only available to supported devices, such as iPhone and iPad. It means that you can share your Live Photos with your friends who are using iOS devices. Another way to use Live Photos is to set them as your wallpaper.
How to Share Live Photos via Messages
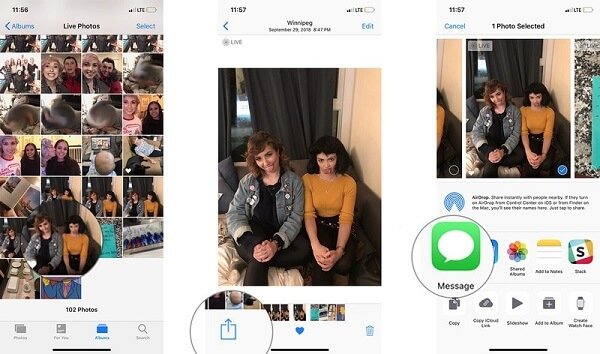
Step 1. Go to your Photos app, find and tap the Live Photo you’d like to share.
Step 2. Tap the Share button at bottom left corner and select Message on the option tray.
Step 3. Then select the contact and share the Live Photo to your friend.
Note: If your friend receives the photo on Android, he or she will get a still image only. Plus, you can select a social network, such as Facebook, Instagram, on the option tray, but the Live Photo will be displayed as a still picture.
How to Set a Live Photo as Wallpaper
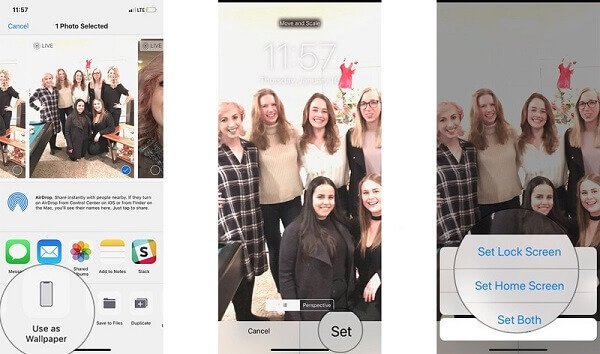
Step 1. Also open the Live Photo in Photos app and press the Share button.
Step 2. Select the Use as Wallpaper option, and tap Set button on the confirm screen.
Step 3. Decide to Set Lock Screen, Set Home Screen or Set Both.
Step 4. Then the Live Photo will appear on your lock screen or home screen as the wallpaper.
Part 6: How to Convert Live Photos to GIF or Video
As said before, Apple Live Photos are only animated on supported devices, like iCloud, Mac, etc. If you share them to Facebook, Instagram or Android, Live Photos will become still images. How to keep the effect of Live Photos anywhere? The answer is to convert Live Photos to GIFs or videos.
How to Convert a Live Photo to GIF on iOS 11 or Later
Apple introduced an animated album into iOS 11 and up, so you can convert a Live Photo to GIF image on the latest systems directly.
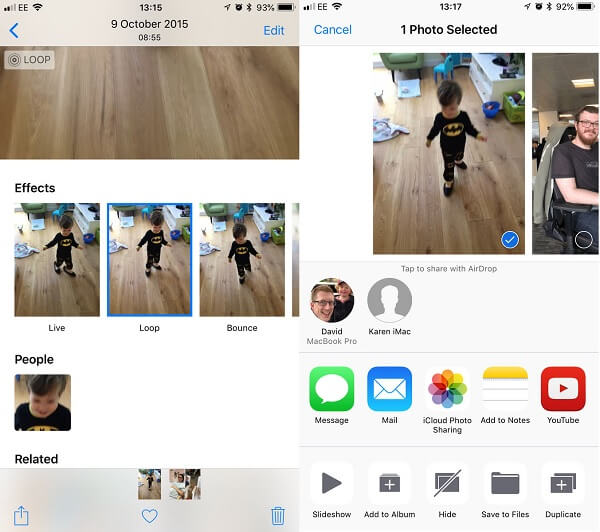
Step 1. Find the Live Photo you want to convert in Photos app and open it in full screen.
Step 2. Swipe upwards to bring up the Effects panel, which several options.
Step 3. Select Loop or Bounce to convert your Live Photo to a GIF image. The former puts the animation on a loop so that it plays over and over. The latter makes the GIF image play once forward and then backward and so on. Both options are infinite animations.
Step 4. Next, go to the Animated album in your Photos app and you will see the GIF image. Now, you can share it to any platforms or social networks.
Learn more details about converting live photo to GIF.
How to Turn a Live Photo to GIF or Video via Lively
When it comes to the old systems, you have to rely on a third-party Live Photo converter app, such as Lively.
Step 1. Search and download Lively from your App Store.
Step 2. Open the app and permit it to access your photo library.
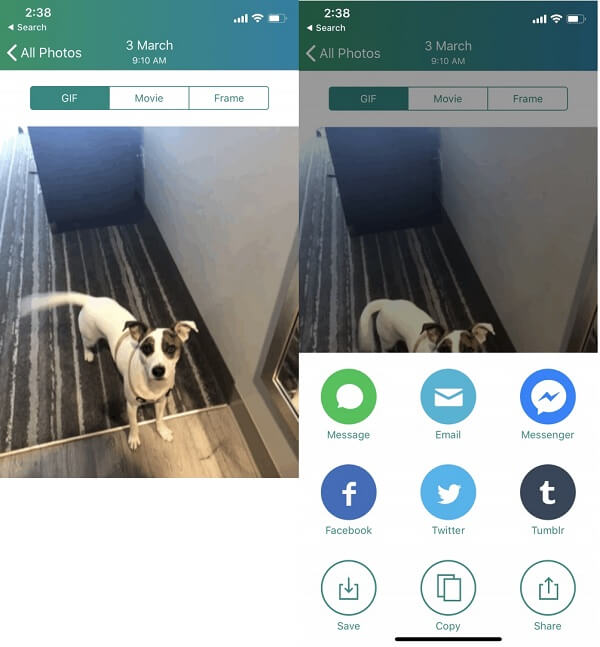
Step 3. Select the Live Photo you intend to turn into a GIF or video, and tap GIF or Movie on the top of the screen. The first one will turn your Live Photo to an animated image and the second one will convert it to a video.
Step 4. Tap Export GIF or Export Movie, and hit Save to confirm it.
Step 5. Next, you can share the GIF image or video file via Message, Email, or social media within the app.
Note: This app permits you to process three Live Photos for free. Unlimited conversion requires payment.
How to Convert Live Photos to GIF with Motion Stills
Motion Stills is a video editor released by Google. It offers more functionality when converting Live Photos, such as combining several Live Photos to create a movie, smooth out shakiness, and more.
Step 1. Install the app on your iPhone. When you first open it, grant the app permissions to access your photo library.
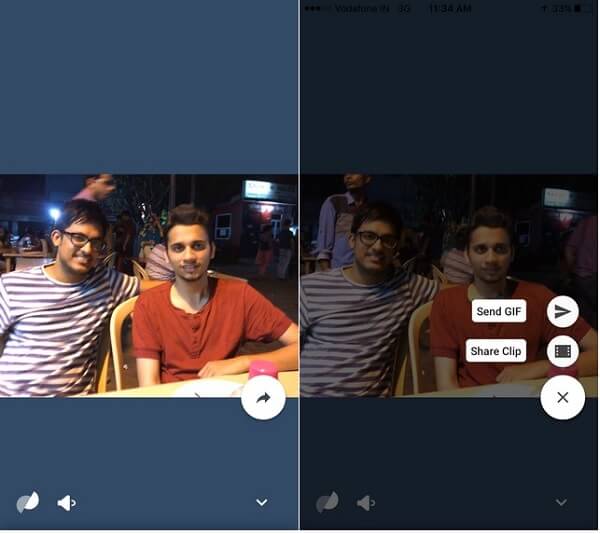
Step 2. Tap a Live Photo and press the Motion Stills button at the bottom left side.
Step 3. You will be presented two options, Send GIF and Share Clip, which share your Live Photo as a GIF image or a video clip.
Note: If you want to combine multiple Live Photos to make a movie, right swipe a Live Photo in the home interface to add more photos, and then select Upload to YouTube or Share Video. To get other tools, swipe down from the top to open the Settings screen in Motion Stills app. Then you can set GIF Quality, Watermark GIFs, and more.
Recommend: Apeaksoft Video Converter Ultimate
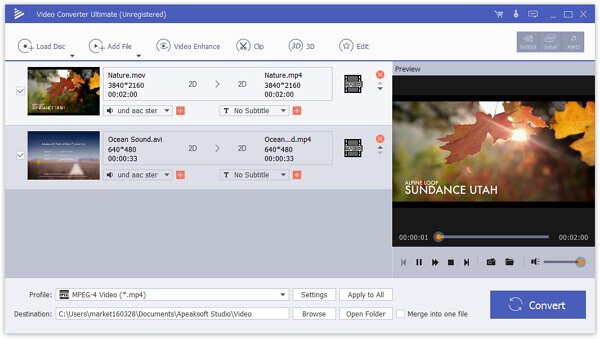
Video conversion is always a difficult task, especially for average people. Apeaksoft Video Converter Ultimate is a simple way to convert your videos to GIF on Windows 11/10/8/7 or macOS. It is not only able to protect the video quality when processing, but also supports one-click video conversion. Another advantage is to offer extensive video editing tools for creating personalized effects with your video clips.
Conclusion
Now, you should master every aspect of iPhone Live Photos feature. As a new visual product, Live Photos are only available to the latest iOS systems. Moreover, the way to view Live Photos on iPhone is a bit different with still images. Fortunately, you can edit a Live Photo as what you do to a standard picture on iPhone. When sharing your Live Photos, you’d better convert them to GIFs or video files. We hope that our sharing is useful to you. Have more questions related to iPhone Live Photos? Please feel free to leave your messages below this article.