How to Quickly Share Notes from iPhone to iPhone or iPad
Notes is an important feature on iOS devices. It allows you to record creative ideas, shopping lists, and other significant information. Sometimes, you need to share notes from an iPhone to an iPhone or iPad. For example, if you just upgrade to a new iOS device, you have to migrate all notes. Plus, you can back up your iPhone notes to another device if you have multiple iOS devices. Anyway, our guide demonstrates five proven methods.
PAGE CONTENT:
Part 1: How to Share iPhone Notes to iPhone Directly
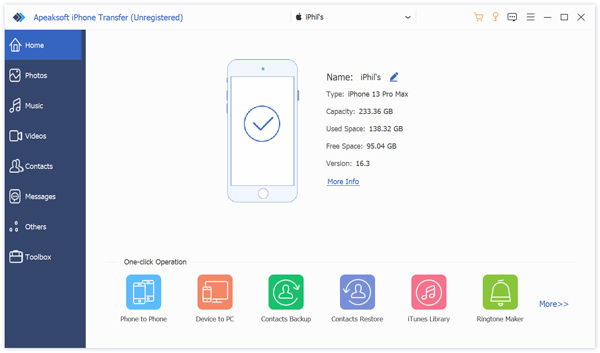
If you wish to sync iPhone notes to iPad or another iPhone directly, Apeaksoft iPhone Transfer is a good option. It allows you to sync iPhone notes through a Lightning cable. More importantly, the intuitive interface makes it easy to navigate. Plus, it equips bonus features.
A Direct Way to Share iPhone Notes to iPhone or iPad
- Sync notes from iPhone to iPad or another iPhone.
- Preview and manage iPhone notes and attachments.
- Backup iPhone notes to a computer or iTunes.
- Support a wide range of data types.
- Compatible with the latest versions of iOS and iPadOS.
Secure Download
Secure Download

How to Share iPhone Notes to iPhone Directly
Step 1. Link your devices
Launch the best note transferring software once you install it on your computer. Connect both mobile devices to your computer with Lightning cables. After they are detected, select the source device from the top option.
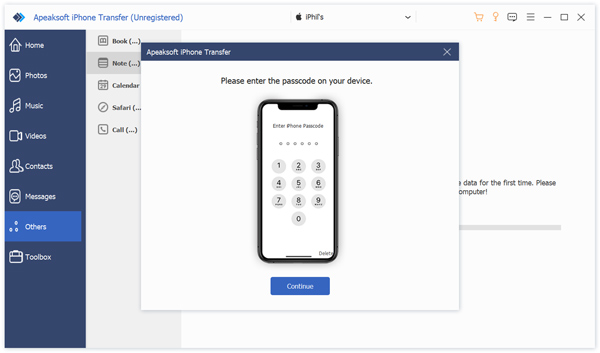
Step 2. Preview iPhone notes
Go to the Others tab on the sidebar, and choose Note. If prompted, enter your iPhone passcode to permit the connection. Now, you can check all notes on your device. You can sort them by title, date, and more.
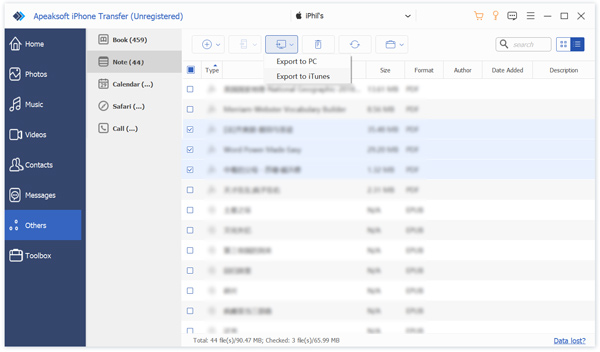
Step 3. Sync iPhone notes to iPad
Check all notes you want to share, click the Phone button on the top ribbon, and choose the target device.
Part 2: How to Send a Note on iPhone by AirDrop
If you just want to share a note with someone on an iPhone, AirDrop is a good option. This wireless connection enables you to send data between Apple devices, such as between iPhone and iPad or another iPhone. You can even AirDrop iPhone to Mac.
Step 1. Turn on your iPad, and go to the Control Center.
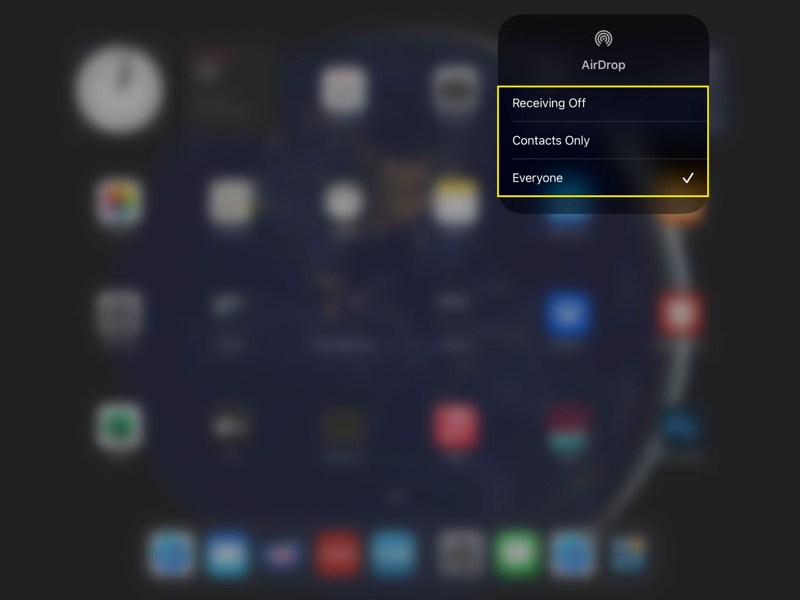
Step 2. Enable Wi-Fi and Bluetooth.
Step 3. Hold the wireless control box and tap AirDrop.
Step 4. Next, choose Everyone.
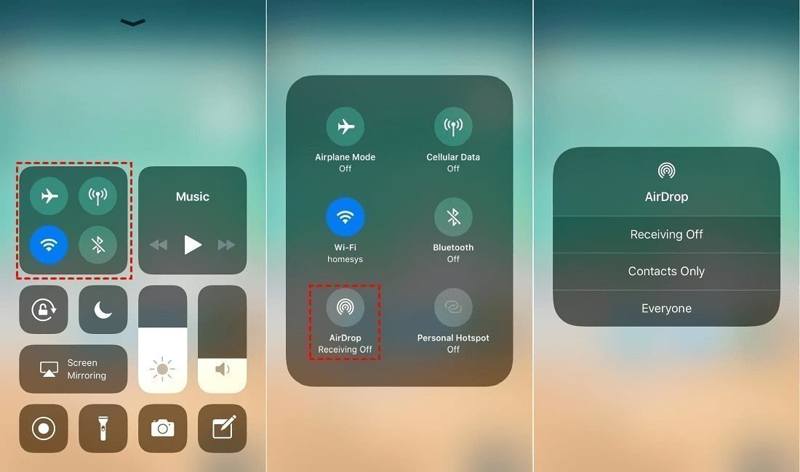
Step 5. Turn to your iPhone. Enable Wi-Fi, Bluetooth, and AirDrop in Control Center.
Step 6. Go to the Notes app on your iPhone.
Step 7. Open the note you wish to sync.
Step 8. Tap the More button with a three-dot icon.
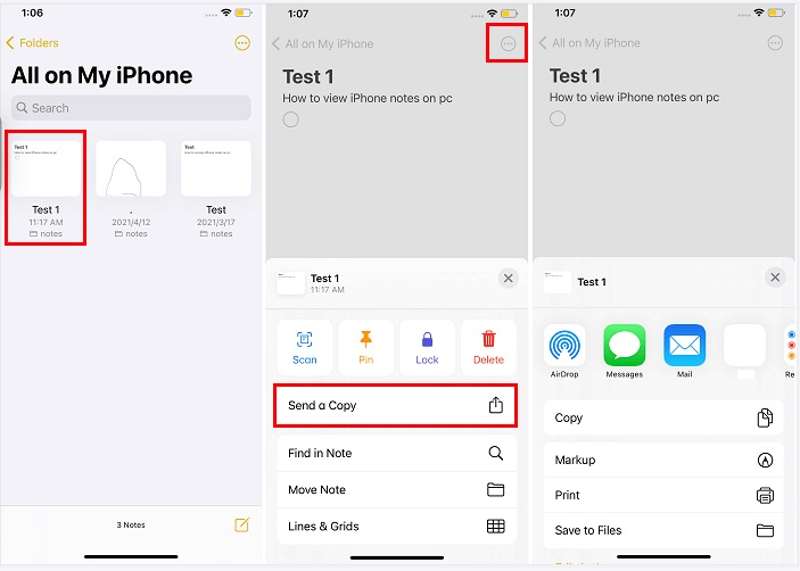
Step 9. Choose Send a Copy, tap AirDrop, and pick the target iPad.
Step 10. Switch to your iPad, and tap Accept to receive the note.
Part 3: How to Share Notes from iPhone to iPhone via Email
Another way to sync notes from iPhone to iPhone is via email. However, the workflows for syncing all notes and specific notes are different. We use a Gmail account as an example to demonstrate the steps below:
How to Share All iPhone Notes to iPhone via Gmail
Step 1. Open the Settings app on the source device.
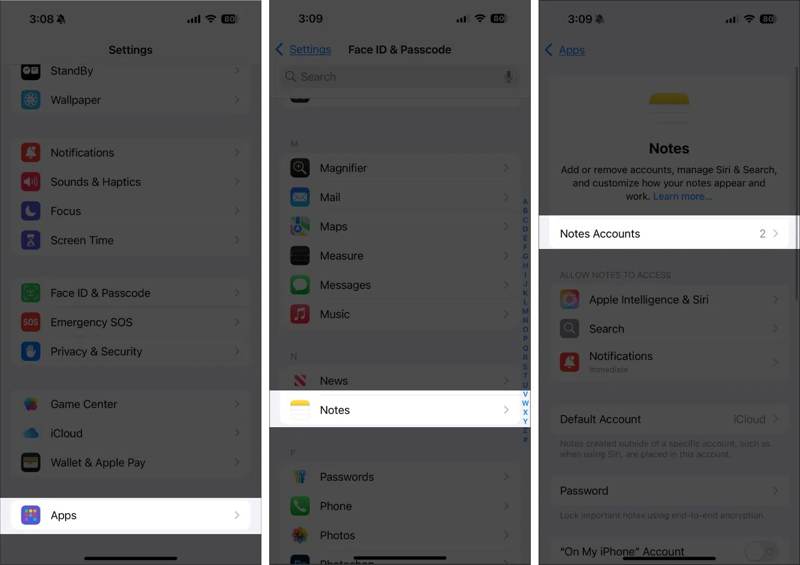
Step 2. Go to Apps, Notes, and tap Notes Accounts.
Step 3. Tap Add Account, choose Google, and enter your Gmail credentials. If you have added a Gmail account, select it directly.
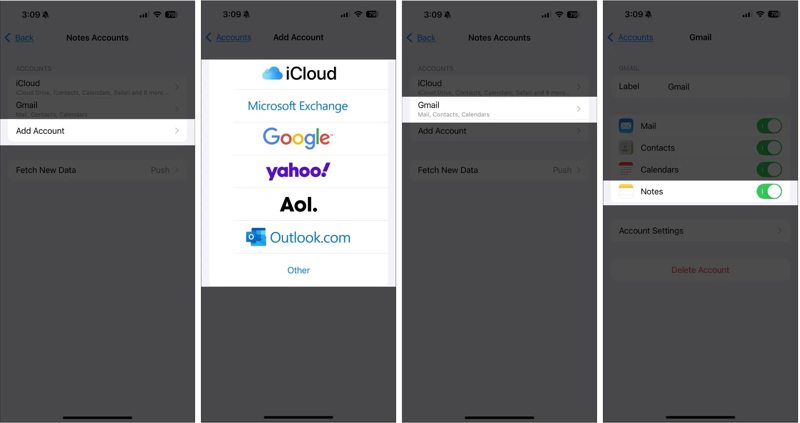
Step 4. Next, toggle on Notes.
Step 5. When it is done, turn to the target iPhone.
Step 6. Repeat the steps above to sync all iPhone notes to the iPhone.
How to Share a Note from iPhone to iPhone via Email
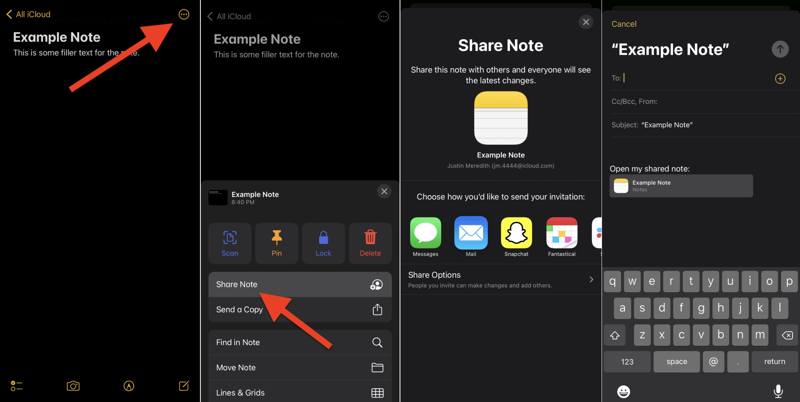
Step 1. Open the desired note in your Notes app.
Step 2. Tap the More button with a three-dot icon.
Step 3. Choose Share Note and pick Mail.
Step 4. Leave a Gmail account in the To field, and tap the Send button.
Step 5. Turn to the target device, access the Gmail account, and read the note.
Part 4: How to Sync iPhone Notes to iPad with iCloud
If you are using the same iCloud account on your iPhone and iPad, that provides a way to sync iPhone notes to your iPad wirelessly. This method syncs all notes and requires a stable internet connection.
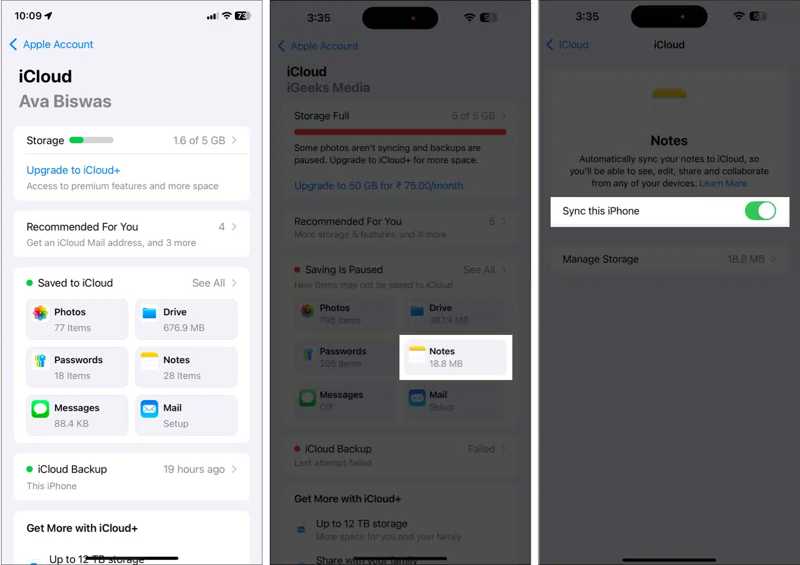
Step 1. Tap on your profile in the Settings app.
Step 2. Connect your iPhone to Wi-Fi or cellular data.
Step 3. Choose iCloud, tap Notes, and toggle on Sync this iPhone.
Step 4. After your notes sync to iCloud, turn to your iPad.
Step 5. Sync iCloud Notes on your device.
Part 5: How to Transfer Notes from iPhone to iPhone Using iTunes/Finder
When you don't have an internet connection, you can transfer notes from iPhone to iPhone using iTunes or Finder backup if you have ever backed up with iTunes. This method requires a computer and compatible USB cables. Moreover, the backup will overwrite all data on the target device.
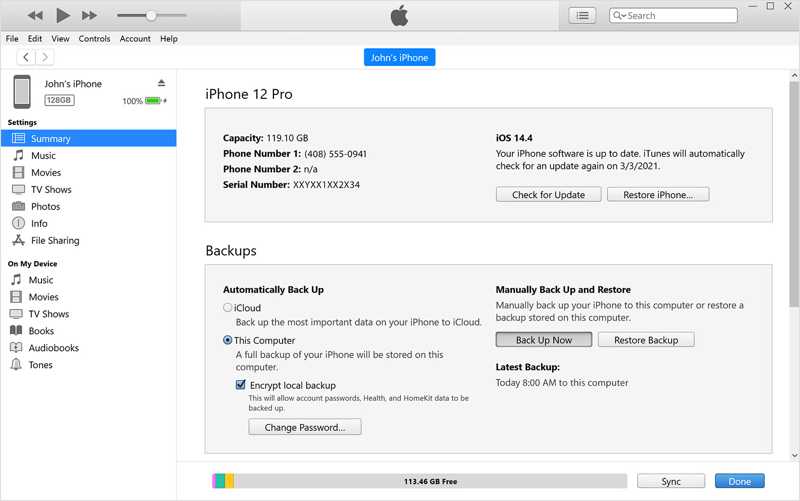
Step 1. Connect your iPhone to your computer with a USB cable.
Step 2. Open iTunes or Finder:
On Windows, open iTunes.
On macOS Mojave or earlier, open iTunes.
On macOS Catalina or later, open Finder.
Step 3. Click your iPhone name, and go to the Summary or General tab.
Step 4. Click the Back Up Now button to make a backup.
Step 5. When it is done, disconnect your iPhone, and plug the other device into your computer with a cable.
Step 6. Then, choose your device name after it is detected.
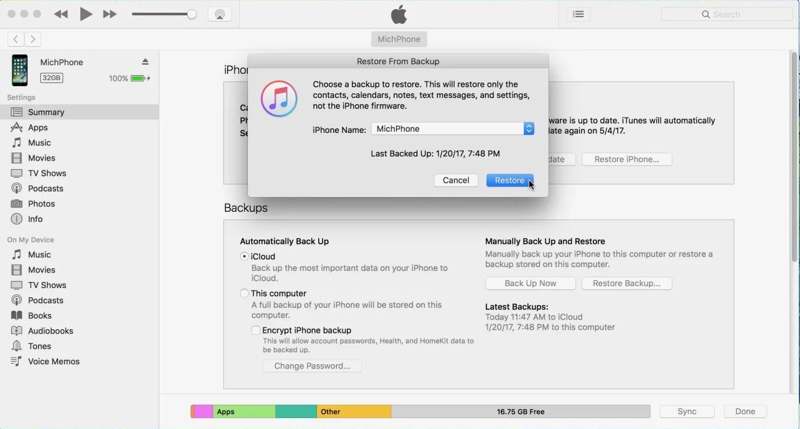
Step 7. Next, click the Restore Backup button in the Summary or General tab.
Step 8. Choose the latest backup and click the Restore button.
Conclusion
This guide demonstrated multiple methods to share notes on your iPhone with another iPhone or iPad. iTunes backup is available for all notes syncing between iOS devices with cables. iCloud Notes, AirDrop, and email allow you to share all notes or specific items on your iPhone wirelessly. If they are unavailable, Apeaksoft iPhone Transfer is a good option for notes migration between iOS devices directly using Lightning cables.
Related Articles
Here are multiple approaches to restore your iPhone, iPad, or iPod Touch to factory settings with or without a computer.
If you see the message said support.apple.com/iphone/restore, don’t worry! Here are multiple solutions to help you fix it.
This tutorial explains the proven methods to get your photos off a broken iPhone or iPad even if you haven’t back up your device.
Did you accidentally delete the Safari history and can't retrieve it? Read this article to recover deleted Safari history on your iPhone.
