How to Copy Video from iPhone to iPad Quickly and Precisely
Suppose you take a 4K video with your iPhone and want to watch and enhance it on your iPad's large display. How can you make the transfer fast and precisely without any quality loss? This is a very practical and high-end demand because you don't want to get your precious video ruined on today's high-res displays. Don't worry; this article will show you how to transfer videos from iPhone to iPad without any quality loss. You can quickly transfer multiple videos 1080p and 4K videos in batches.
PAGE CONTENT:
Part 1: How to Transfer Videos from iPhone to iPad Without Quality Loss
Image quality loss is what we dislike when we move videos from iPhone to iPad. You are making your iPhone and iPad collaborate, two Apple devices, so the quality loss is really a pity. That's what Apeaksoft iPhone Transfer can help you. It can quickly transfer MP4, MOV, ProRes, and other types of large videos between iOS devices, including the latest iPhone 17 and all iPad models. Even 4K videos can be fast transferred. What's more, it won't take your cellular data to deal with those very large videos. During the transferring process, it won't take much CPU storage, and you can do your video editing with the other video being transferred in the background.
The Fastest Way to Transfer Large 4K Videos Between iDevices
- Connect your iPhone and iPad to quickly transfer videos.
- One-click transfer or select your desired videos to move.
- Keep the original video quality and metadata.
- Also transfer images, contacts, messages, and other important and common file types.
Secure Download
Secure Download

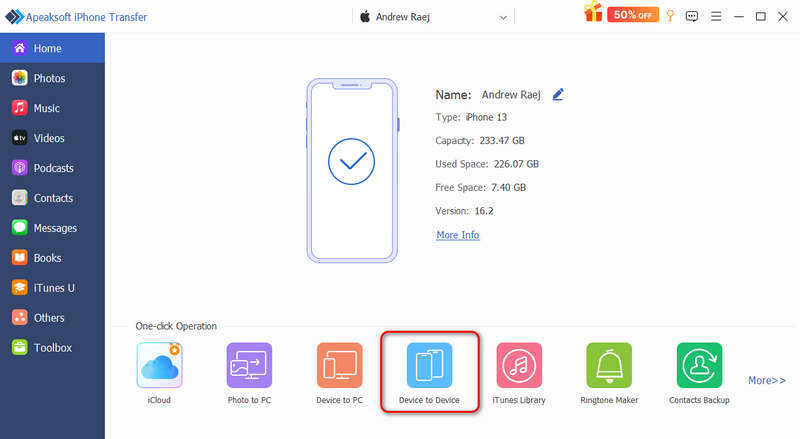
Step 1. Connect Your iPhone and iPad
Download, install, and launch Apeaksoft iPhone Transfer on your computer. Connect your iPhone and iPad to your computer with two USB cables. Then, click the Deivce to Device button at the bottom.
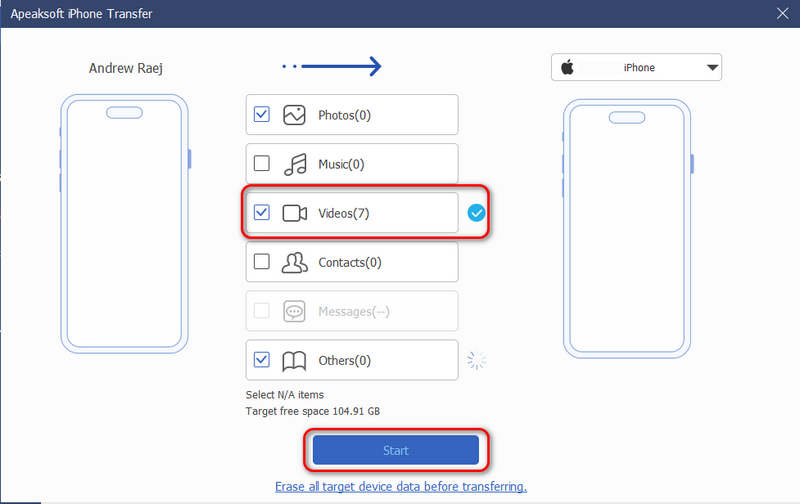
Step 2. One-click Transfer Videos from iPhone to iPad
Ensure that Video is selected. Then, just click the Start button to copy all photos from your iPhone to your iPad.
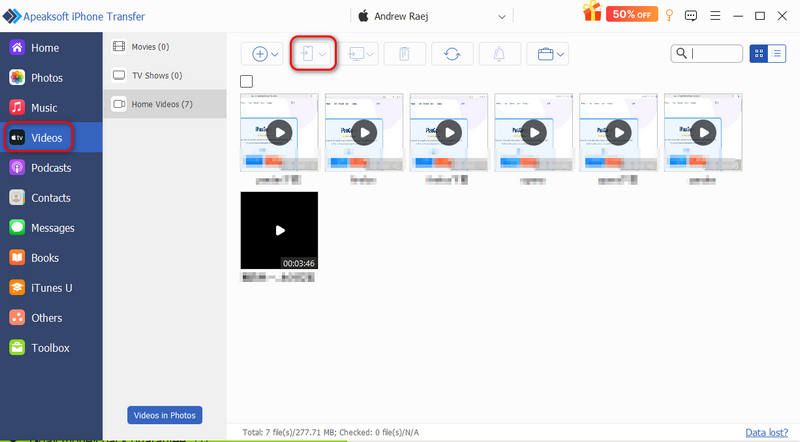
Step 3. Select Videos to Transfer to iPad
If you don't want to transfer all videos, you can go back to the main interface. Click Videos in the left bar. Then, it will detect all videos in your iPhone. Select your desired ones and click the Export to Device button to move videos from iPhone to iPad without quality loss.
Part 2: How to Transfer Videos from iPhone to iPad with AirDrop
AirDrop is a very robust and powerful file transfer service for Apple users. It lets you easily copy videos from iPhone to iPad with original video quality and metadata. As long as your iPhone is not too legacy, this feature is available between different Apple devices and OS versions. It can ensure lossless transfer for any file type. However, the transferring speed is slow, especially when you need to transfer large and long videos with high FPS. But it's still the ultimate solution if you pursue lossless quality.
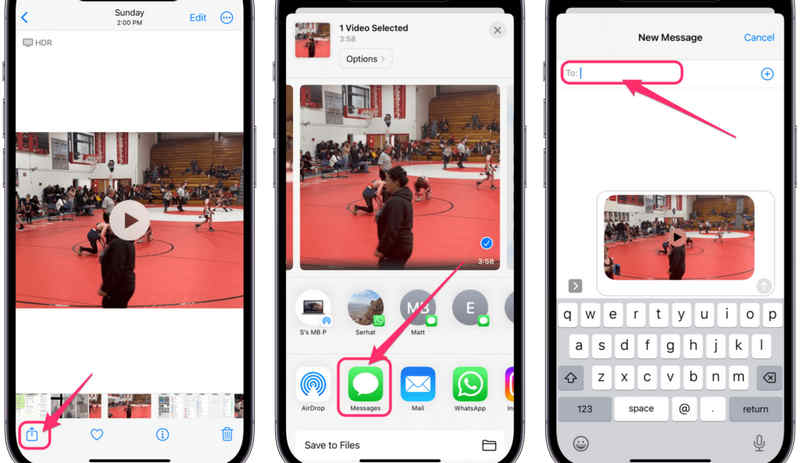
Step 1. Ensure that AirDrop is active on your iPhone and iPad. Open your Photos app on iPhone and select one video.
Step 2. Tap the Share button in the bottom left corner and select AirDrop on the popup window.
Step 3. Now, it will detect your iPad. You just need to tap on your iPad to transfer the video from your iPhone to your iPad.

Tips: AirDrop can transfer multiple videos at once. You should keep waiting on both your iPhone and iPad. This process may take a very long time, but you can get lossless videos on your iPad.
Further Reading
Part 3: How to Transfer Videos from iPhone to iPad via iMessages
If you consider AirDrop to be too slow, you can try iMessages. With Apple accounts logged in on two iOS devices, you can transfer videos and photos in the Messages app directly. This process is a little bit faster than AirDrop and can still maintain the original quality.
Step 1. Ensure that iMessages is on in Settings on your iPhone and iPad.
Step 2. Open the Photos app on your iPhone and find your desired video.
Step 3. Tap the Share button in the bottom left side.
Step 4. Then, select Messages in the popup window.
Step 5. Select your iPad contact in the top box and then send the video from iPhone to iPad.
Part 4: How to Transfer Videos from iPhone to iPad via iCloud
Those quick methods like AirDrop or iMessages will take a long time, which is not ideal if you want to transfer many large videos. Therefore, iCloud can be satisfying. If you need to deal with large videos, then a subscribed iCloud plan is proper for you. With it, you can get more iCloud storage, which can help you easily transfer large videos from iPhone to iPad.
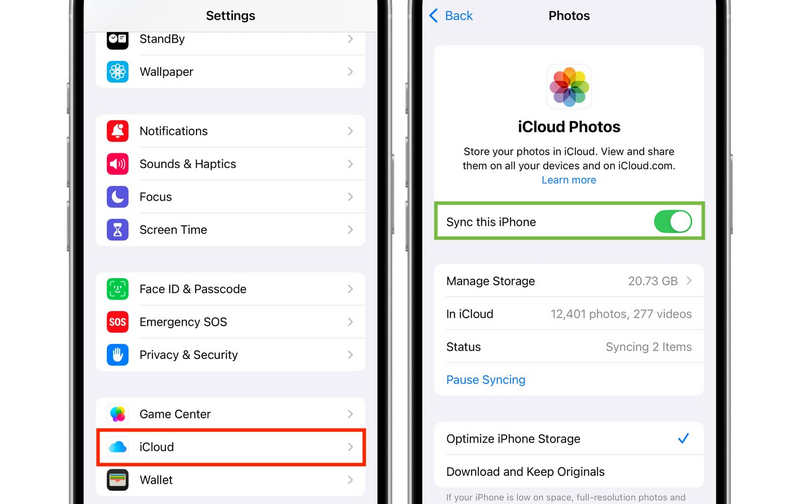
Step 1. Enable iCloud Photos on iPhone and iPad.
- 1.Open Settings on your iPhone/iPad and tap your profile at top.
- 2.Select iCloud, then tap Photos. Turn on iCloud Photos or Sync This iPhone/iPad.
- 3.You can also select Optimize iPhone Storage if you want to save space.
Step 2. Access and Transfer Videos to iPad
- 1.Open the Photos app on your iPad.
- 2.Go to the Library or Albums (specifically the Videos media type folder).
- 3.Now, you just need to wait for it to sync videos from iCloud.
Tips: This process is automatic, but you should ensure that you have enough iCloud storage and spare time in a day to let it transfer videos from iPhone to iPad.
Conclusion
This article tells you how to copy video from iPhone to iPad without losing quality. They can handle different videos between your iOS devices and maintain the original metadata. However, the key factor is the transfer speed. AirDrop and iMessages can perform a direct transfer, but the speed is really not satisfactory. To transfer large 4K videos from iPhone to iPad, Apeaksoft iPhone Transfer is a good choice. It can quickly transfer multiple large videos and photos at once.
