You may personalize your iPhone with apps, wallpaper, lock screen password, and other elements. Among them, ringtones are a special way to create customize experiences through audio, but not visual.
However, Apple does not allow you to set a song in Apple Music as iPhone ringtone. A whole song is too long for iPhone ringtone. Plus, iPhone uses a special format, m4r, as the ringtone.

Fortunately, there are several methods to download ringtones on iPhone, such as iTunes. Users cannot only purchase ringtones from iTunes Store, but also sync ringtones from computer to iPhone. If you do not like iTunes, we also share simple ways to add custom ringtones to iPhone without iTunes. Anyway, you can learn multiple ways to download ringtones to iPhone properly. Do you want to use custom ringtones on your iPhone? This tutorial provides all you needs.
- Part 1: Purchase and download ringtones to iPhone from iTunes Store
- Part 2: Download and sync ringtones to iPhone with iTunes
- Part 3: Add custom ringtones to iPhone without iTunes
- Part 4: Get my old ringtones back on my iPhone
Part 1: Purchase and download ringtones to iPhone from iTunes Store
Officially, any iPhone users could purchase and download ringtones on iPhone from iTunes Store. And there are a lot of exclusive contents in iTunes Store. The benefit is that the purchased ringtones are created for iPhone and you do not need to convert or make it by your own. There are two methods to download ringtones on iPhone from iTunes Store.
Methods 1: Get your favorite ringtone on iPhone
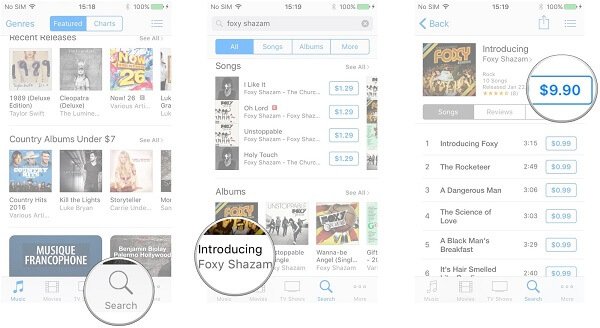
Step 1. Unlock your iPhone and connect it to a Wi-Fi network or cellular. Open the iTunes Store app from your home screen and tap the Search menu at bottom.
Step 2. Type the key words related to your favorite ringtone into the search bar, like title, artist or genr. Select the ringtone you want to download on the search result.
Step 3. Tap the "Buy" button next to the desired ringtone marked with the price of it. Then enter the password for your Apple ID and tap "OK" to put ringtone on iPhone. Now, you can find the ringtone in "New Tone" tab and set it as ringtone for incoming phone, text message, or certain contact.
Method 2: Get the recommended ringtone on iPhone
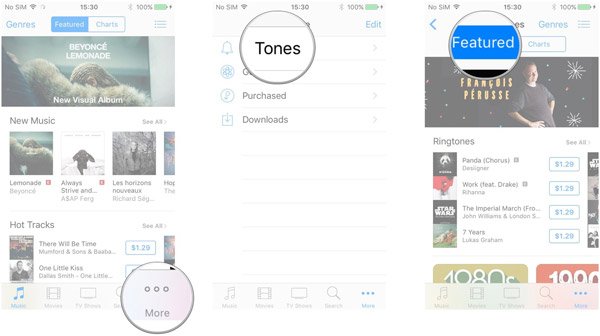
Step 1. Locate to the bottom in iTunes Store app and tap on the "More" menu. Then select Tones and then go to the Featured tab to look at the recommended ringtones, and the Charts tab contains the popular ringtones at that moment.
Step 2. Discover the ringtone you'd like to download from the recommended or popular list. Then buy it with your password for Apple ID.
Note: This way is the easiest way to download ringtones on iPhone. The cost is various depending on the ringtone's price. And if you have not associated your credit card to your Apple ID, this way is not feasible.
Part 2: Download and sync ringtones to iPhone with iTunes
If you do not want to pay for iPhone ringtones, you can create one with your favorite song, and sync ringtone to iPhone using iTunes. Before iTunes 12.7 released, people could set a song as a ringtone in iTunes simply. But Apple removed the ringtone section from the new version of iTunes. In this part, you can learn how to add ringtones on iPhone using iTunes.
Method 1: How to sync ringtones on iPhone using old iTunes
Step 1. After create a custom ringtone with audio editor software, save the M4R file to [username] > "Music" > "iTunes" > "iTunes Music" > "Tones".
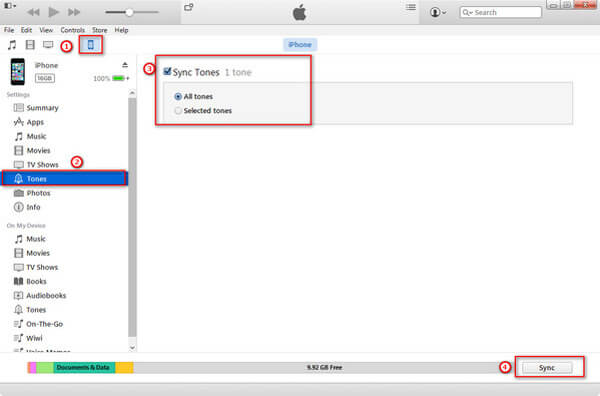
Step 2. Use the Lightning cable to connect your iPhone to your computer and launch the old version of iTunes. After it recognizes your device, click the "iPhone" button at top left corner.
Click here to learn how to do if iPhone won't connect to iTunes.
Step 3. Scroll down to find the Tones option on left sidebar. Click on it to open the ringtone window. Then check the box of "Sync Tones", choose "Selected tones" and select the track you created.
Step 4. Finally, click the "Sync" button to sync ringtone to iPhone immediately.
Method 2: How to sync ringtones on iPhone using iTunes 12.7 or later
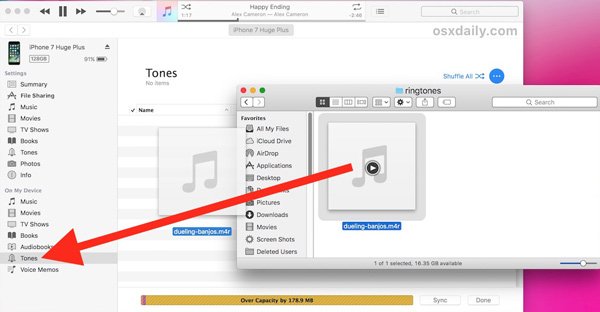
Step 1. Open the new version of iTunes and make sure the iPhone is connected to your computer and detected in iTunes. Also click the iPhone button to display the left hand column. By default, you cannot find Tones or Ringtones on the left ribbon.
Step 2. Next, locate to the folder contains the M4R file you made, drag and drop it into the "On My Device" section to add custom ringtone to iPhone. Now, a new Tones section should appear on the left sidebar.
Note: As you can see, though Apple removes the Tones section from iTunes 12.7+, adding ringtones to iPhone is still quite simply. Besides sync ringtones to iPhone, iTunes is able to shorten a song to create a ringtone for iPhone and export it in AAC file, which could be converted to M4R by changing file extension. The downside is that Apple integrated serious copy-right regulations in iTunes. That means it may refuse to sync some ringtones or your iPhone does not recognize the ringtones synced by iTunes.
Part 3: Add custom ringtones to iPhone without iTunes
It makes sense that many people do not like iTunes, when you consider that there are many bugs and errors in it, such as not recognize iPhone. Is there any alternative solution to download ringtones on iPhone? Apeaksoft iPhone Transfer is a good option. Its main features include:
1. Easy to use. This iPhone transferring software is able to add ringtones to iPhone from computer in one click.
2. Two-way transfer. You can back up ringtones from iPhone to computer, and transfer ringtones from iPhone to iPhone with iPhone Transfer.
3. Create ringtones for iPhone. iPhone Transfer could help you to create ringtones for iPhone using your favorite songs.
4. Manage iPhone ringtones. It has the capacity to display all ringtones on device and let you to manage them.
5. No damage on existing ringtones. The biggest advantage of iPhone Transfer is not to interrupt current ringtones on iPhone during adding custom ringtones.
6. Faster and safer. It uses USB cable to transfer data between computer and iPhone, which is quicker and safer.
7. Higher compatibility. The iPhone Transfer supports all iPhone models, including iPhone 16/15/14/13/12/11/X.
In a word, it is one of the best options to add custom ringtones from computer to iPhone or iPad quickly.
How to add custom ringtones from PC/Mac to iPhone with iPhone Transfer
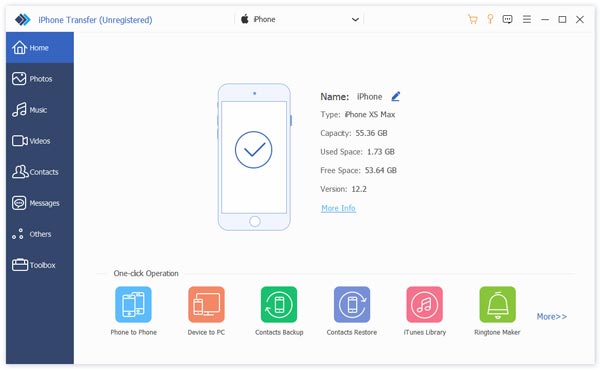
Step 1. Connect your iPhone to iPhone Transfer
iPhone Transfer has two versions, one for Windows 11/8/8.1/7/XP and the other one for Mac OS. Download the right version based on the operating system, and follow the onscreen assistant to install it on your computer. Plug your iPhone to your computer with Lightning cables came in box when you bought the device.
Tip: To avoid data loss, you'd better use the original Lightning cables or the products authenticated by Apple.
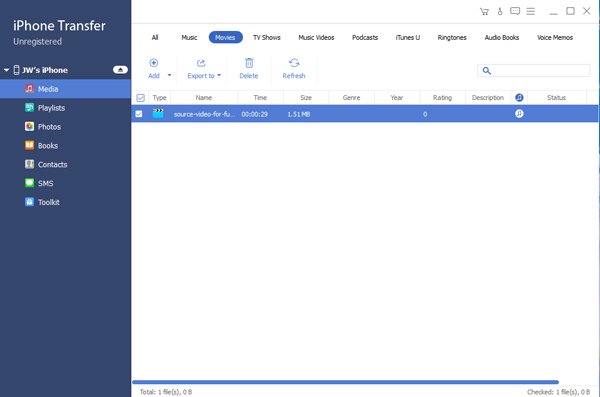
Step 2. Preview iPhone ringtones
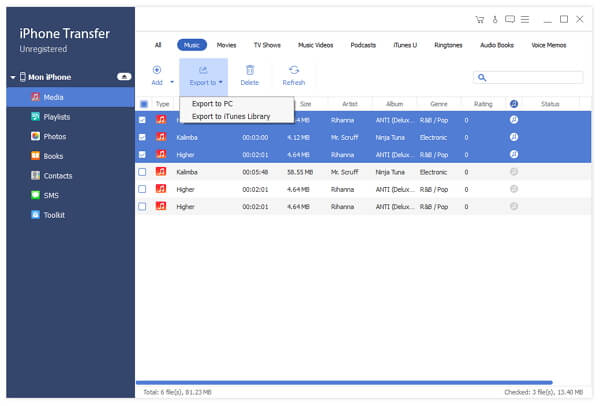
Launch iPhone Transfer and let it recognize your iPhone automatically. Unfold your iPhone's name on left hand and then select the "Media" options under it. Locate to the right detail panel, and go to the "Ringtones" tab from top of the window to display all ringtones on your iPhone.
Step 3. Make a custom ringtone
Go to the Music tab and select a song and click Edit to open it in the edit interface. Here you can set start point and end point to create a short track, and convert the format to M4R. Then save it to your computer.
Step 4. Add custom ringtones to iPhone
Locate to Ringtones tab and click the "Add" button. When the Explorer opens, navigate to the track you made with iPhone Transfer, select it and click "Open" to add it to iPhone. If you want to get free ringtones to iPhone, press Ctrl on Windows or Cmd on Mac OS and select all desired ringtones in Explorer, and then click "Open" to complete it.
The ringtones you added to your iPhone can be used as the text messages ringtone, alarm sound, call ringtone, etc.
Part 4: Get my old ringtones back on my iPhone
Unlike the native ringtones, custom ringtones will be removed from iPhone when performed factory reset or clean media files on iOS, including the ringtones purchased in iTunes Store and synced from computer. If you delete custom ringtones by accident or want to get back old ringtones, you will need a professional tool, such as Apeaksoft iPhone Data Recovery.
It is one of the best data recovery tools for iPhone, partly because you can get back old ringtones from iPhone device without any backup. Of course, it could help you to retrieve lost ringtones from iTunes or iCloud backup simply. And before recovery, you can preview all deleted old ringtones on your device and decide to recover all or certain ones. You may worry that a professional data recovery tool is too complicated to use, but iPhone Data Recovery is able to do it in one click. Here are three ways to get my ringtones back on my iPhone with iPhone Data Recovery.
Way 1: Get my old ringtones back on my iPhone directly
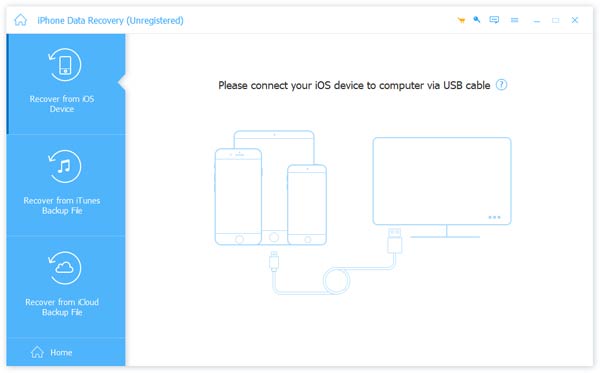
Step 1. Apeaksoft iPhone Data Recovery is available to both Windows and Mac. You can download and install the right version to your computer. Plug your iPhone to the computer using a Lightning cable. Launch the best iPhone data recovery software; your iPhone will be recognized automatically.
Step 2. Make sure to select Recover from iOS Device on the home interface, and then press the "Start Scan" button to let the software look for lost files and data on your device. When it is done, choose the "App Audio" option on result window. Then you can browse all audio files on your device, including the old ringtones.
Step 3. Check the box for each ringtone you want to get back and click on the "Recover" button at bottom right corner. When popup dialog shows, drop a folder to save the old ringtones and click "Recover" again to get them back.
Way 2: Get my old ringtones back from iTunes backup
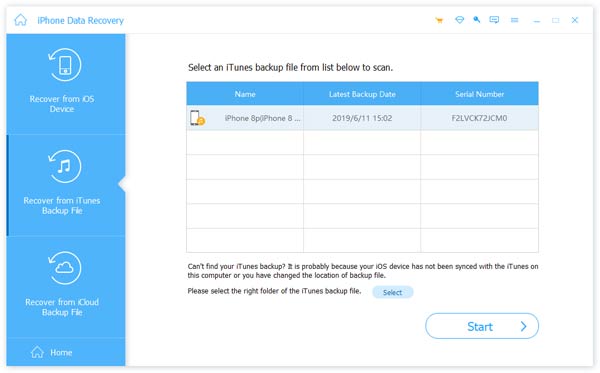
Step 1. Use a USB cable to connect your iPhone and the computer. Open the best iPhone data recovery tool on your computer and wait for it to recognize your device. Select the "Recover from iTunes Backup File" option on left hand column to display all iTunes backup files available.
Step 2. Choose the backup file contains your desired ringtones and click the "Start Scan" button to extract data from it. When going into the result window, choose the "App Audio" option and select the old ringtones to get back.
Note: It is well-known that iTunes backup cannot be open without restoring to iPhone. And that will cover current data on your device. But iPhone Data Recovery uses advanced technology to extract data from iTunes backup and allows you to get back certain files.
Step 3. If you are ready, click the "Recover" button to save ringtones to your computer. And then you can use iPhone Transfer to get ringtones to iPhone.
Way 3: Get my old ringtones back from iCloud backup
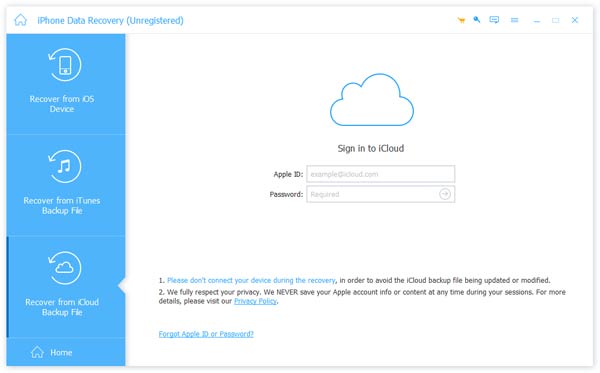
Step 1. If you back up your iPhone with iCloud frequently, click the "Recover from iCloud Backup File" option on the home interface of iPhone Data Recovery. Then input your Apple ID and password on right side.
Step 2. Look at iCloud backups and select the proper one. Click the "Download" button next to the backup file to download it locally. Then it will be open in the application and you can look at all tracks by selecting "App Audio".
Step 3. To get old ringtones back to your iPhone, you have to select them and click the "Recover" button to save them to local drive. Then add ringtones to iPhone using iPhone Transfer.
Conclusion:
Based on the tutorial above, you might understand how to download ringtones on iPhone from iTunes Store, iTunes or third party tools. It is the easiest way to purchase ringtones in iTunes Store, but if you feel it is not affordable, you can make a custom ringtone with your favorite song and transfer the ringtone to your iPhone using Apeaksoft MobieTrans.
Plus, if you want to get back old ringtones, iPhone Data Recovery provides multiple ways to help you. We wish that our guides and suggestions are useful to you.