"I am a movie enthusiast, and now I want to watch my favorite movies on my new iPhone. But how to transfer the movies I saved on my iPhone to computer, please help!"
Apple released new iPhone devices equipped larger screen. And that greatly improves the audiovisual experiences. According to a recently survey, users who own an iPhone 17/16/15/14 are more likely to watch videos on their handsets. Unfortunately, the new iPhone memory is not getting much bigger.
Actually, many experts believed that internal storage of iPhone has reached the limit. The alternative solution is to transfer videos from iPhone to computer and then remove them from handset to free up space.

Luckily, there are many approaches to complete this job. For example, the AutoPlay feature on Windows PC allows users to download videos from iPhone to PC. And the built-in Photos app on Mac is able to sync iPhone videos to Mac computer over USB cable. Plus, iTunes and iCloud are well-known file transferring tools for iPhone.
But around getting video off iPhone, there are still many problems, such as whether these methods are available to all videos. In this tutorial, we are going to tell you how to get videos off iPad/iPhone to computer and basic knowledge you should know about these methods.
- Part 1: Import videos from iPhone to PC with AutoPlay
- Part 2: Transfer videos from iPhone to Mac with iPhoto or Photos
- Part 3: Add movies to iTunes
- Part 4: Transfer videos from iPhone to PC/Mac with iCloud
- Part 5: Transfer videos and movies to PC/Mac with iPhone transfer tool
Part 1: Import videos form iPhone to PC with AutoPlay
It is true that Apple has designed serious system permissions on iPhone and iPad, so users cannot transfer content between iDevices and computer directly. But photos and videos are an exception. There is an interface to let Windows PC treat your iPhone as a media device and access videos saved. It is the easiest way to import videos from iPhone to PC. All you need is a USB cable.
Important notes you should know about this methods include:
1. It is only available to the videos saved in your iPhone Camera Roll, but not movies and TV shows download in third party apps.
2. The original USB cable is necessary.
3. During import videos from iPhone to PC, you have to keep your iPhone turning on; otherwise the videos will not show up on Windows.
4. To use the AutoPlay feature on Windows 10, you have to turn it on in Settings > Devices first.
How to import videos from iPhone to PC with AutoPlay
Step 1. Connect your iPhone to your Windows PC with a USB cable. You'd better use original Lightning cable or authorized products by Apple in order to avoid data loss or device damage. It may take a while to install drivers if it is the first time to connect your iPhone with the computer. When prompted whether trust this computer, make sure to tap on "Trust".
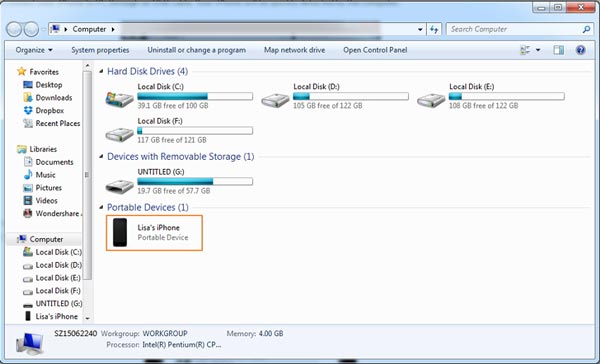
Step 2. Then the AutoPlay window should pop up automatically, and choose Import pictures and videos to access iPhone Camera Roll on your PC. If the AutoPlay window does not show up, click on My Computer on your desktop, you will find your iPhone under Portable Devices area, right-click on it and select "Import pictures and videos".
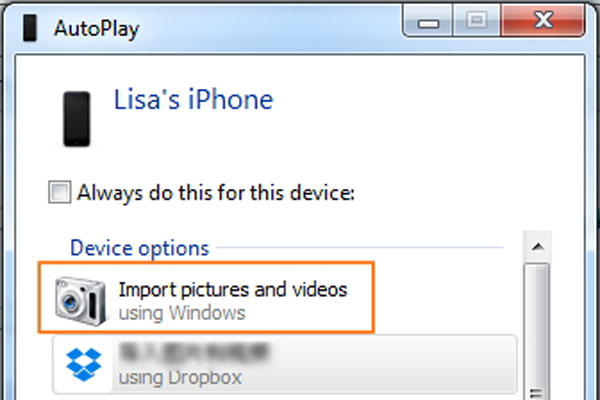
Step 3. Next, hold the "Ctrl" key and highlight the videos that you want to download from iPhone to PC, press "Ctrl + C" to copy them to clipboard, navigate to the desired folder and hold Ctrl + V to paste iPhone photos to local hard drive.
Windows 8 does not permit people to open iPhone Camera Roll folder. But you can still download entire Camera Roll including videos and photos. After click on "Import pictures and videos", two options will show up, Review, organize, and group items to import, and "Import all new items now". To download entire Camera Roll for the first time, choose the first one. Then hit the "More options" link and select a folder to save your videos and photos, click on the "Next" button and then "Import" to initiate the process.
Part 2: Transfer videos from iPhone to Mac with iPhoto or Photos
The iPhoto app for Mac is the easiest way to transfer videos from iPhone to Mac. It does not require you to install anything on your Mac computer or internet connection. But the downsides are obvious as well. First of all, similar to AutoPlay, iPhoto only works on the videos in iPhone Camera Roll. Plus, it only could import movies from iPhone to Mac in original format. And you may need a tool to convert the videos to readable format for players on Mac. On Mac OS X Yosemite and El Capitan, the previous iPhoto is upgraded to Photos app.
How to transfer videos from iPhone to Mac with iPhoto
Step 1. Open the iPhoto app on Mac if it does not run automatically, after connecting iPhone to Mac with a USB cable.
Step 2. Keep your iPhone unlocked, and click on your iPhone name under Devices on left sidebar of iPhoto. Then all photos and videos in your Camera Roll will show up on right side.
Step 3. Select the videos that you'd like to transfer to Mac, and click on the "Import Selected" button. If you want to download entire Camera Roll, click on the "Import [number] Photos" button to trigger the process.
How long does it take depends on the amount and size of the video files. And to look at the iPhone videos, you will need a video converter application.

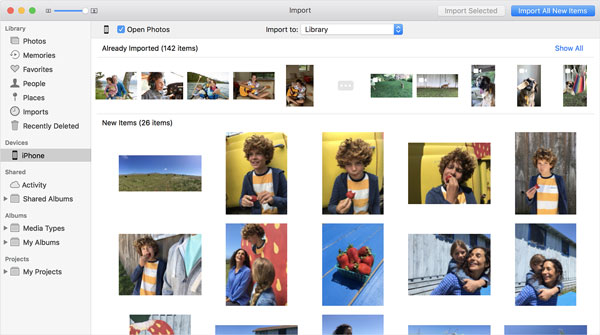
How to import photos from iPhone to Mac with Photos app
Step 1. Also use a USB cable to link your iPhone to Mac computer. By default, the Photos app should start automatically. If not, you can find it in Applications folder.
Step 2. Turn on your iPhone and make sure to trust the computer for the first time to connect them together. Now, your videos and photos in iPhone Camera Roll should be displayed in thumbnails.
Step 3. To copy videos from iPhone to Mac, select desired ones on the detail window, choose a destination in the "Import to" dropdown menu, and click "Import Selected" at upper right corner. Or you can hit the "Import All New Items" button to import videos from iPhone to Mac along with photos.
Similar to iPhoto, the Photos app cannot transcode downloaded videos too.
Part 3: Add movies to iTunes
When get videos from iPad to computer via iTunes, there are something important you should know:
1. First of all, Apple developed iTunes aiming to sync data from computer to iPhone.
2. It only could transfer purchased movies, TV shows, and music videos from iPhone to computer.
3. The videos took by yourselves are not available by this way.
4. There are risks to add videos to iTunes, such as overwrite existing data in iTunes Library or iPhone.
How to add movies to iTunes
Step 1. Install the latest version of iTunes to your computer. Have an iTunes on computer? You may need to up it to date since it requires iTunes 12.5.1 and later.
Step 2. Hook up your iPhone to your computer, your device will be detected. Click on the "Device" button at top left side. If you have turned on the automatic syncing feature in iTunes, you will be asked whether to sync iPhone, make sure to select "No".
Step 3. Then navigate to the File menu at very top ribbon, and go to "Devices" > Transfer Purchased from "iPhone". Then iTunes will start importing movies to iTunes and saving them on your computer.
Step 4. When it is done, iTunes will create a movies playlist. And the location save these movies on Windows is C:\Users\username\My Music\iTunes\Movies. On Mac, you can find the movies "Go" > "Home" > "Music" > "iTunes" > "Movies" in the Finder app.

Don't Miss:
How to send videos from Android to iPhone
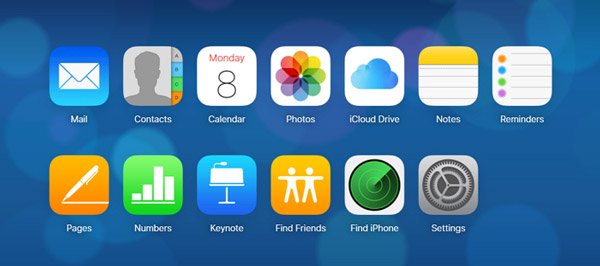
Part 4: Transfer videos from iPhone to PC/Mac with iCloud
iCloud is another way to send videos on iPhone to Windows PC and Mac computer over Wi-Fi network. First of all, you are only allowed to transfer videos in Camera Roll to iCloud Photo Library, and then download them to your computer. Moreover, it usually spends more than an hour to sync videos to iCloud since the wireless connection is much slower.
Step 1. First all, upload videos from iPhone to iCloud. Unlock your iPhone and enter your Wi-Fi credential to put it online, go to "Settings" > "iCloud" > "Photos" and toggle the slider of "iCloud Photo Library" to turn it on.
If you want to backup contacts from iPhone to Mac/PC, just toggle on "Contacts".
Step 2. Next, switch to your computer, open your browser and input icloud.com into the address bar. Then sign in your Apple ID and password attached on your iPhone, enter the verification code or answer the security questions to go to the home page.
Step 3. Click on "Photos" to open your iCloud Photo Library. Select the videos that you'd like to transfer to computer, and copy them to your desktop or desired location.
Part 5: Transfer videos and movies to PC/Mac with iPhone transfer tool
If you are looking for the easiest way to send large video from iPhone to computer, we suggest you to try Apeaksoft iPhone Transfer. Its key benefits include:
1. Easy to use. This iPhone transferring application allows you to transfer videos from iPhone to computer in one click, including purchased movies, home-made videos, videos downloaded online, etc.
2. Two-way transfer. With iPhone Transfer, you can send videos from iPhone to computer, transfer data from iPhone to iPhone, and from computer to iPhone.
3. Preview for selectively transferring. It has the capacity to display all videos saved on your iPhone. And you can preview, manage, and sync certain ones simply.
4. No damage on existing videos. The application will not damage or interrupt current videos on your iPhone during transfer.
5. Faster and safer. It uses physical connection to transfer videos between iPhone and computer, which is quicker and safer.
6. Higher compatibility. iPhone Transfer works for iPhone 17/16/15/14/13/12/11, iPad Pro/Air/Mini or earlier generation, and iPod touch.
In a word, it is the best option to transfer videos from iPhone to Windows 11/10/8/8.1/7 and macOS.
How to transfer videos and movies to PC/Mac with iPhone Transfer
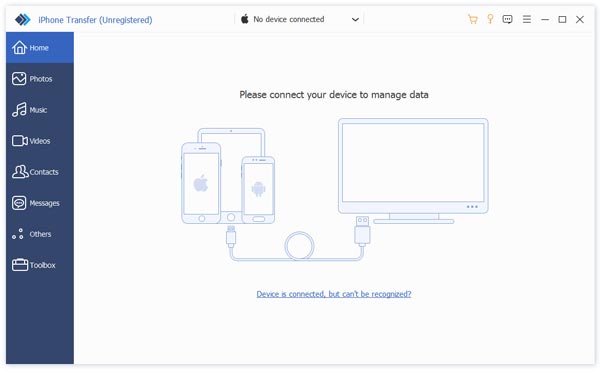
Step 1. Link your iPhone with iPhone Transfer
Download the best iPhone transferring tool to your computer according to the operating system. Double click the installer and install it on your computer following the onscreen assistant. Start iPhone Transfer and it will recognize your iPhone as soon as you plug it to your computer with Apple Lightning cable.
Step 2. Preview movies, TV shows, music videos before transfer
Select the "Media" option from left side column, and then head to the "Movies" tab from top ribbon. Then all iPhone movies will be listed on the detail window. Now, you can preview and organize them, such as select unwanted movies and click on the "Delete" button to get rid of them. TV shows and music videos are listed in the TV Shows and Music Videos tabs.
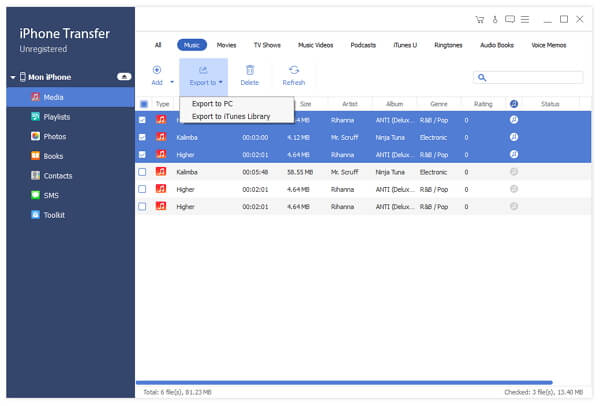
Step 3. Send long videos from iPhone in one click
Select all videos that you want to transfer to your computer, unfold the "Export to" menu from top of the window. If you want to save them to your computer, choose "Export to PC/Mac". And the "Export to iTunes Library" option is able to save iPhone videos to iTunes Library directly. Wait for the process to complete, remove your iPhone from computer.
Moreover, this software is powerful enoguh to help you
Conclusion:
You should understand how to send large videos from iPhone to PC and Mac computer. First of all, the USB cable is the easiest way to do this job. The downside is that this way only supports videos that you took by iPhone Camera.
If you have purchased movies or TV shows in iTunes Store, you can transfer them from iPhone to computer with iTunes. And iCloud is another way to get videos off iPhone over internet. The problem is that these methods are only sending iPhone videos to computer, but not transcode. On the other hand, Apeaksoft iPhone Transfer is a professional video transferring application for iPhone. It is not only easier to use, but also able to download iPhone videos in original quality. Now, you can choose the proper way based on your situations and follow our guides to complete the task.