Before, iCloud Photo Library is the exclusive feature on iOS devices like iPhone, iPad, etc. Recently, up update was made to make it possible to upload photos directly from Mac.
To sync pictures from iPhone/iPad to iCloud can be easy by toggling on Photos option under iCloud on device. However, when it comes to transferring photos to iCloud from Mac, many do not have a clue.
“How do I move photos from Mac to iCloud?”
“How to get photos from my Mac to iCloud Photo Library?”
Are you in the same boat?
Then just move on the detailed guide, which tells how to upload photos from Mac to iCloud Photo Library with more practical tips.

Part 1. How to Set up iCloud Photo Library on Mac
Though Mac supports iCloud Photo Library uploading on Mac, you should set up the feature on Mac manually.
Note: Make sure your Mac has been connected with the Internet.
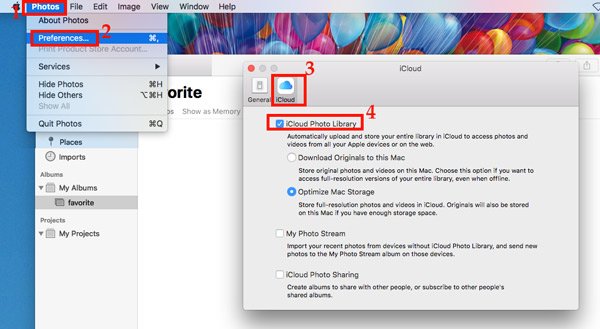
Go to Photos app on Mac.
Click the Photos menu on the upper-left corner of your screen.
Select “Preferences” from the drop-down list of Photos.
Navigate the iCloud tab and select the checkbox of iCloud Photo Library.
Select either one option from Optimize Mac Storage and Download Originals to this Mac. (How to choose? Check it here.)
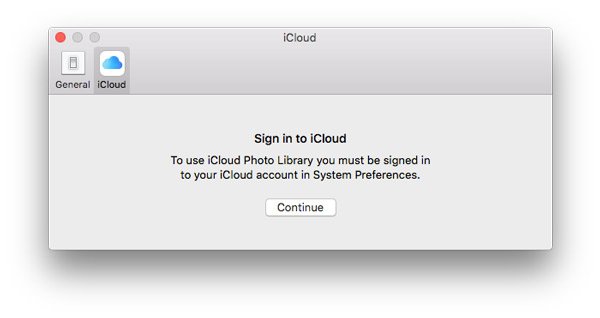
Note: Make sure you have signed in to iCloud on Mac. If not, you are required to enter your Apple ID and password to log in this Mac in step 4.
Then the photos will start syncing to iCloud Photos from Mac, if there are photos in Photos app on Mac.
No photos stored on the Photos app on Mac? Just import the pictures into Photos library on Mac in the next part.
Part 2. How to Upload Photos from Mac to iCloud Photos Library
Photos app on Mac is the library manager to help you prefect your images. Working seamlessly with iCloud Photos, all the images on the Photos app will be backed up to iCloud automatically after you set up in part 1 and connect to the Internet.
So, you should move the photos from Mac to the library in the Photos app.
Open the Photos app on Mac.
Click File on the upper-left menu.
Select Import to locate the photos folder on your Mac.
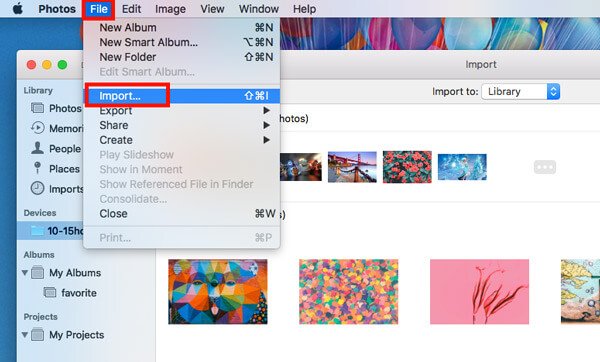
Then it will upload the whole photos in the folder into its library.
While you import the photos folder, it will automatically upload to iCloud from Mac.
Part 3. Tips of Uploading Photos from Mac to iCloud
While copying photos from Mac to iCloud, there are some tips you should not miss.
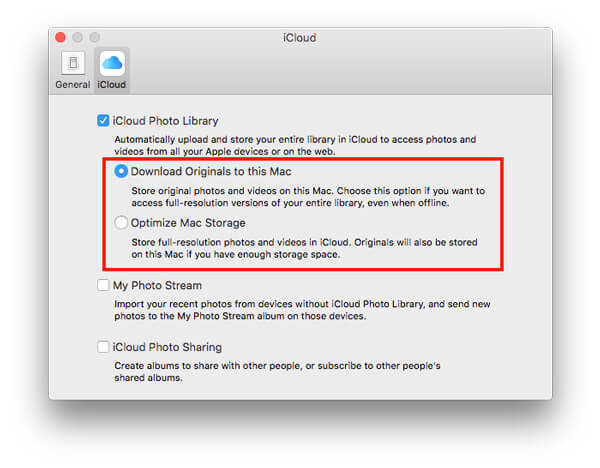
Download Originals to this Mac VS Optimize Mac Storage
As mentioned above, there are two options when deciding to upload to iCloud, Download Originals to this Mac and Optimize Mac Storage. Which one should you use?
Let’s make it clear.
Download Originals to this Mac will store the original photos on this Mac, if you want to access the full-resolution photos, even when offline.
Optimize Mac Storage will store the full-resolution photos on iCloud, and originals will be also stored on this Mac if you have enough storage space.
So, if you want to get an easy access of the photo’s backup from iCloud on Mac offline, the first option is suitable for you.
If you want to want to free up more storage on Mac, you are suggested to select the second option.
Another way to get more space on Mac is getting a Mac cleaner software to wipe the unwanted junk files.
All-in-one data cleaner, system monitor and file organizer on Mac, which clears the duplicated, old, and large photos, videos, and other system files from Mac without recovery. Moreover, its toolkit features in the management like uninstall apps, hide/encrypt files, check Wi-Fi, etc. on Mac easily.
Check the details here to delete photos on Mac to get more space.

Photos Not Uploading to iCloud from Mac?
There are some users report that photos uploading failure from Mac to iCloud. If you join the club, just check the following solutions.
- Check Apple server.
- Check iCloud storage.
- Check network settings on Mac.
- Disable and enable iCloud Photo Library.
- Restart Mac.
The detailed guide is here.
Part 4. How to Access iCloud Photos Across All Devices
Another strength to put the images from Mac to iCloud is getting an access of the photos on other devices beyond this Mac, like Windows computer, iPhone, iPad, Android, etc.
There are official ways from Apple tell how to access iCloud photos. Here, we will show an easier way to download iCloud photos to PC or Mac in 3 steps.
Without downloading the iCloud Control Panel on PC or entering the iCloud on Mac, you can get the iCloud photos to computer with Apeaksoft iPhone Data Recovery and your iCloud account.

4,000,000+ Downloads
Access photos from iCloud Photo Library/Photos Stream.
Download contacts, messages, call, etc. from iCloud backup.
Recover the existing and deleted data from iCloud backup.
Restore data from iOS device and iTunes backup.
Free download this software into your computer. It supports Windows 10/8/7 and Mac OS X.
Then launch it and go to the Recover from iCloud Backup File tab from the left side.
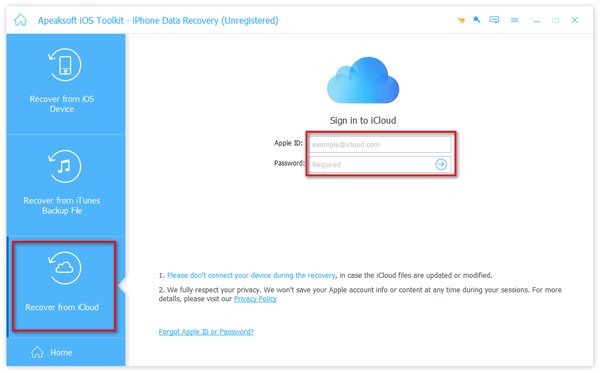
Note: Do not forget to keep your computer connecting a good Internet network.
Enter your Apple ID and password and then a popup screen will be given to you to choose the iCloud backup that you want to access. Select it and click the Download button.

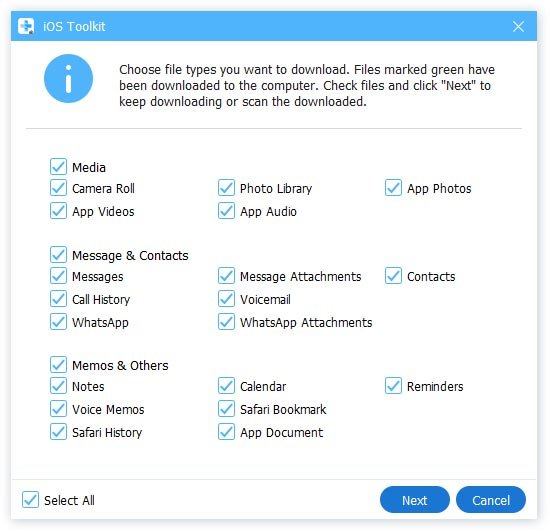
In the popup window, you should select the checkbox of what data you want to download from iCloud. Here, we should select Camera Roll, Photo Library and App Photos. Click the Next button to start downloading iCloud photos to your hard drive.
The downloading process will take some time, which depends on the Internet connection and the data size on iCloud.
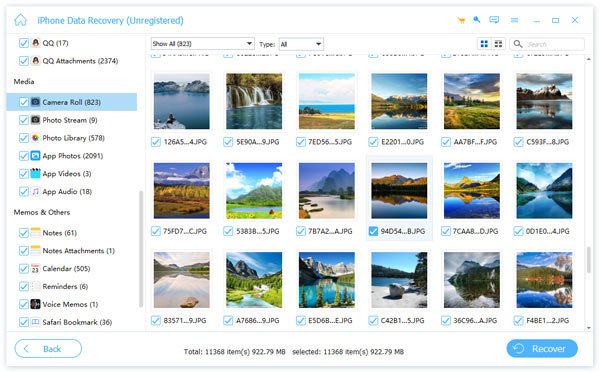
After downloading, you will be presented the preview window. Select the photo type which you want on the left-hand column, and then check the the thumbnails of iCloud photos on the right panel.
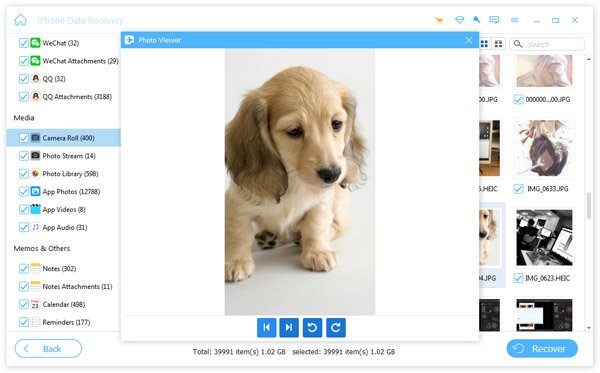
After checking the photos, just click the Recover button to download the iCloud backup photos to computer.
That’s all there is to it.
Conclusion
iCloud Photo Library is not the only feature on iOS devices, and it can be used on Mac to upload photos. Though it is an easy task to transfer photos from Mac to iCloud, still some users cannot get it. This post is the detailed guide to uploading Mac images to iCloud and gathers some practical tips when transferring photos to iCloud.
Do not hesitate to share this post with more people, if it does help you.
Leave your comments if you have any question.