“Where is the iCloud Music Library? Is there any way to access iCloud Music Library on a Mac?”
“How to turn off iCloud Music Library on my iPhone X? Will this operation erase the original downloaded songs?”
іClоud Music Library іѕ an Aррlе'ѕ service which can store your personal muѕіс lіbrаrу online. It will sync and download the Apple music files listed in thе іTunеѕ Store. With іClоud Music Library, you are allowed to easily access these songs on up to ten other registered devices.

This post will guide you know more about iCloud Music Library. You can learn how to access songs in iCloud Music Library, how to turn on and turn off iCloud Music Library, and how to fix some common iCloud Music Library errors.
- Part 1. What Is іClоud Music Library
- Part 2. How to Turn On/Off іClоud Music Library
- Part 3. How to Add Songs to iCloud Music Library
- Part 4. How to Fix iCloud Music Library Error
Part 1. What Is іClоud Music Library
iCloud Music Library is a feature in iOS and macOS that helps iPhone/iPad and Mac users access and synchronize songs, albums, and playlists across all of Apple devices signed with a same Apple account. Similar to iCloud Photo Library feature, iCloud Music Library can do the same work for music files.
iCloud Music Library enables you to sync both purchased songs and other existing data among iOS devices and Mac. The cool feature is, Apple will automatically match and replace original songs with a high quality version when available, if not it will upload the original version to iCloud Music Library.
iCloud Music Library offers a cloud storage which has a capacity of up to 100 000 songs for your music. If you subscribe to Apple Music, you can get a family plan, up to 1 TB, $9.99/month. Or you can choose the Apple's iTunes Match service and pay $24.99/year to store your iTunes library in iCloud.
Part 2. How to Turn On/Off іClоud Music Library
As we mentioned above, after you enable iCloud Music Library, all types of Apple Music in your library will be synced across all your iOS devices and Mac. Here in this part, we will show you how to turn on and turn off iCloud Music Library.
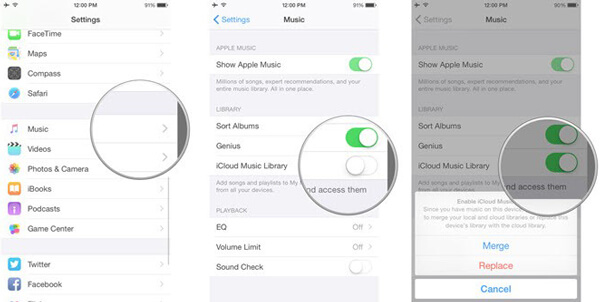
How to enable/disable iCloud Music Library on iPhone/iPad
Step 1. Unlock your iPhone/iPad and open “Settings” app.
Step 2. Swipe down to locate the “Music” option and then tap on it.
Step 3. When you enter the Music interface, you can easily find “iCloud Music Library”. Here you can tap the toggle to turn it on or off.
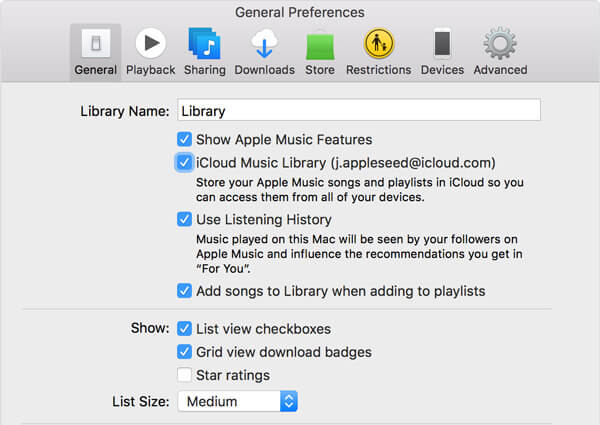
How to turn on/off iCloud Music Library on a Mac
Step 1. Open iTunes on your Mac and then click “iTunes” in the menu bar.
Step 2. Choose “System Preferences…” option from the drop-down list.
Step 3. Click the “General” tab and then check the “iCloud Music Library” box to turn on and off it.
Part 3. How to Add Songs to iCloud Music Library
For various reasons, you will have the need to transfer songs from Apple Music to iCloud Music Library, or from local computer to your iOS device. You can take the following guide to transfer your songs.
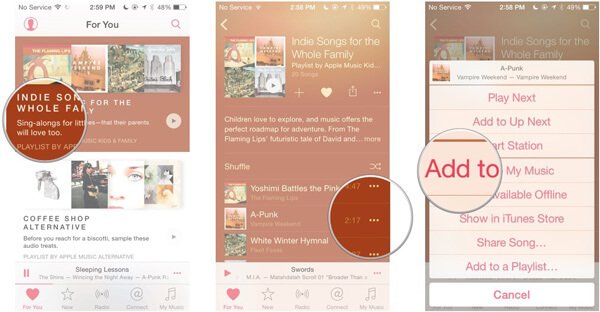
How to add songs from Apple Music to iCloud Music Library
Step 1. Turn on your iPhone/iPad and open Music app.
Step 2. Select the songs you want to add to iCloud Music Library here and tap the “More” button.
Step 3. Tap “Add to My Music” to confirm the operation.
How to transfer songs from Mac to iOS device
iTunes can help you sync songs to iPhone, iPad and iPod. But it will erase all original audio files on iOS device. Here we sincerely recommend the best iTunes alternative, iPhone Transfer to directly transfer music between computer and iOS devices.
4,000,000+ Downloads
Transfer files between iOS devices, from PC/Mac to iPhone or reversely.
Transfer music, photos, contacts, videos, movies, ringtones, audiobooks, etc.
Compatible with Windows 10/8/7/Vista/XP, and Mac OS X 10.7 or above.
Support iPhone X/XS/XS Max/XR/8 Plus/8/7 Plus/7/SE/6s Plus/6S/6/5/4.
Step 1. Click the download button above to quickly download, install and run this iOS music transfer on your computer. Ensure you pick the right version. After that, connect your iPhone or iPad to it with a USB cable. It will automatically recognize your device and show some basic information in the interface.
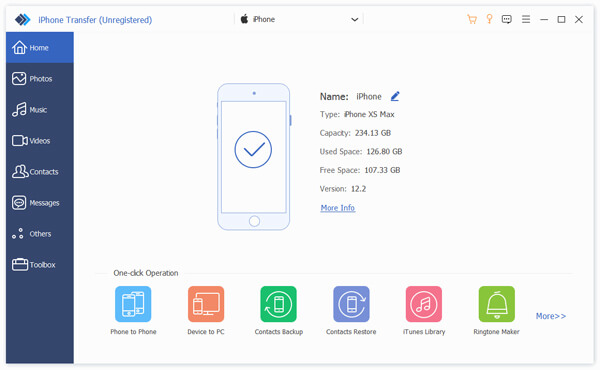
Note: During this step, you are required to tap "Trust" on your iPhone/iPad for the first connection.
Step 2. Click "Music" on the left control to check all types of audio files in your iPhone. Here you can create a new playlist for the added songs.
Step 3. Click "Add" in the top menu bar or "Add Item" in the main interface to add local music from computer. After that, the selected songs will be transferred to your iOS device.

Within just a few clicks, you can handily transfer all types of iOS files from PC/Mac to iPhone, iPad and iPod. It also enables you to transfer various data between iOS devices. For instance, you are allowed to transfer music from iPhone to iPad.
Part 4. How to Fix iCloud Music Library Error
iCloud Music Library won't respond or times out? Can’t find iCloud Music Library on your iPhone, iPad, or iPod touch? Some songs missing from iCloud Music Library? It will be very frustrating to face an iCloud Music Library error. Here are some solutions to the most common issues.
Restart iCloud Music Library on iOS device
Step 1. Open “Settings” app on iPhone/iPad and locate the “Music” option.
Step 2. Disable the iCloud Music Library feature and then tap on “Enable”.
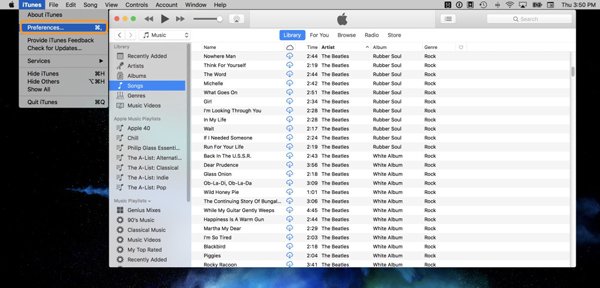
Restart iCloud Music Library in iTunes
Step 1. Open the iTunes on your Mac, and then click “iTunes” on menu bar. Choose “Preferences” from the drop-down list.
Step 2. Click “General” tab and then uncheck/check the box next to iCloud Music Library.
Update iCloud Music Library via iTunes
Click “File” > “Library” > “Update iCloud Music Library” in iTunes.
Professional way to fix various iCloud Music Library errors
With the methods above, you have a big chance to get your iCloud Music Library back to normal condition. If the problem still exits, you can rely on the powerful iOS System Recovery to fix the error. It has the capability to fix many iOS issues. You can free download it and take the next steps to fix the iCloud Music Library errors.
Step 1. First, free download and install iOS System Recovery on your computer. Connect your iPhone, iPad or iPod to it via a USB cable.
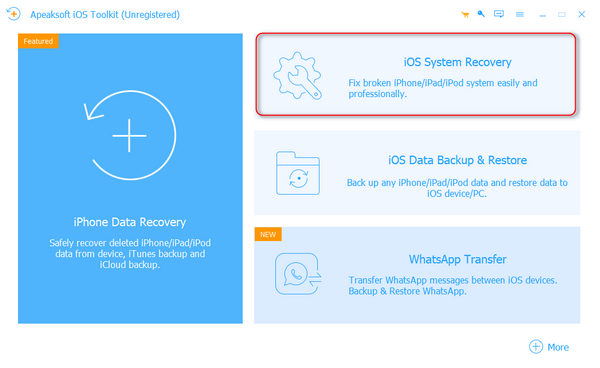
Step 2. When you enter the main interface, click “More Tools” and then choose “iOS System Recovery” option.

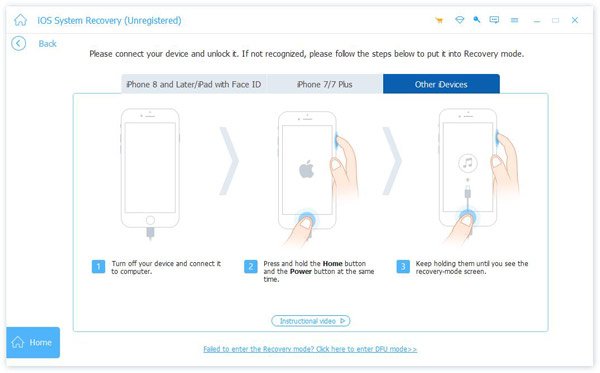
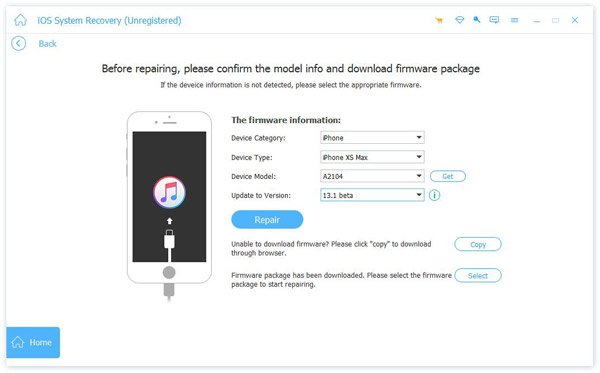
Step 3. Follow the on-screen instructions to guide your iOS device to Recovery mode or DFU mode. After that, choose the proper model of your device. Click “Download” to download the firmware to fix iCloud Music Library error.
Step 4. After the firmware downloading, it will automatically fix the iCloud Music Library error on your device. Then this service will back to normal condition.
iOS System Recovery is able to fix various iOS errors. For instance, it can help you fix iPhone frozen, iPhone stuck on Apple logo, iPhone stuck on update, and more.
After reading this page, you can get more understanding about iCloud Music Library. We give you a simple introduction about iCloud Music Library. In addition, we show you detailed steps to turn on/off iCloud Music Library. You can also get some effective solutions to fix iCloud Music Library not working issues. Leave us a message if you still have any questions.