How to Transfer iMessages to New iPhone Quickly and Safely
If you just got another iPhone, congratulations! If you are searching for information on how to transfer messages to new iPhones, congratulations again! This article provides four useful ways to transfer messages from iPhone to iPhone. Whether you have already set up your iPhone and only want to transfer messages, the four solutions cover you.
PAGE CONTENT:
Part 1: How to Sync Messages from iPhone to iPhone with iCloud Sync?
iCloud sync is a service of iCloud that keeps the data among all iDevices always the same under the Wi-Fi connection. When you delete or add content from one device, all other devices will be updated. Therefore, you can utilize this feature to sync iMessages to new iPhones.
Step 1. On your old iPhone, open Settings. Tap on your device name and enter iCloud.
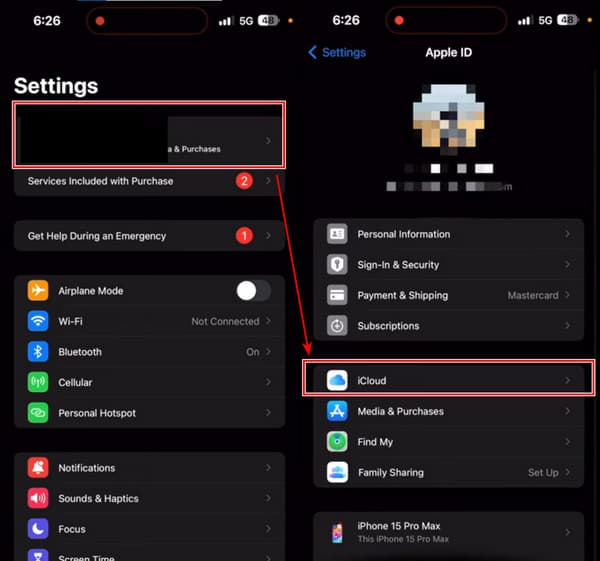
Step 2. Tap Show All under APPS USING ICLOUD. Then, find out Messages and tap on it.
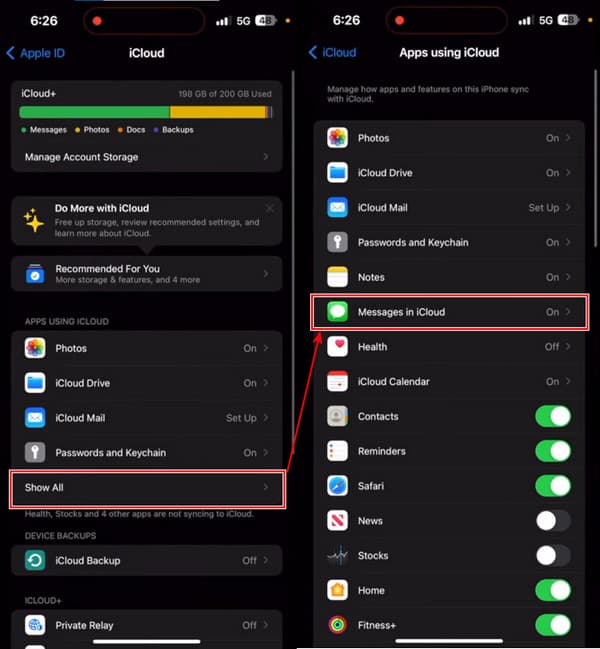
Step 3. Turn on Use on this iPhone and tap Sync Now. If you see the status: Syncing with iCloud, you successfully completed this step.
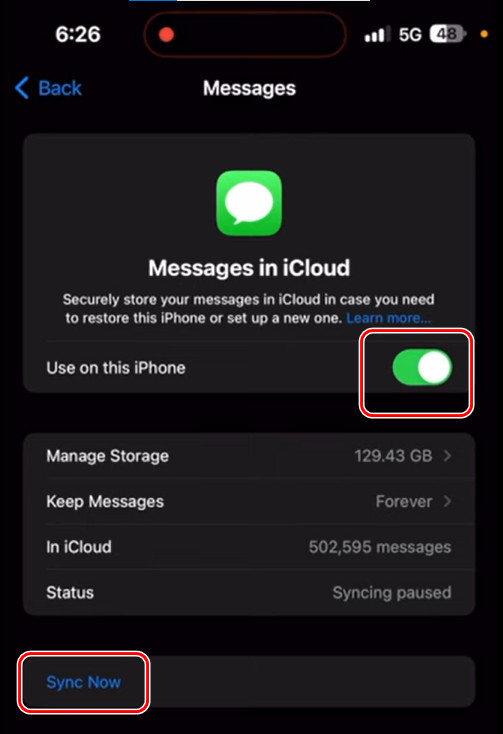
Step 4. Now, follow the three steps on your new iPhone.
Drawbacks: Some users once asked why are my text messages not syncing across my-apple devices. It's true that sometimes iMessage not syncing occurs in this method. According to a user in Apple Discussion, iCloud can't sync messages to his iPhone 14.
Part 2: How to Only Transfer Messages from iPhone to iPhone Without iCloud?
If you wonder how to transfer messages from iPhone to iPhone, Apeaksoft iPhone Transfer is a suitable solution. It is a professional program that transfers files between computers and iPhones and between an iPhone and another. With its user-friendly interface, you can transfer messages, contacts, phone calls, photos, music and so on within several clicks. Moreover, the transfer finishes in only a few seconds and won't lose any data.
Besides, the move SMS to new iPhones function is built into a toolbox, so you can easily utilize it and transfer messages quickly. Want to learn about how to export text messages from iPhones? It can also help you. This program exports text messages from iPhone to PDF, CSV, HTML, and TXT.
The Best Program to Transfer Message from iPhone to iPhone
- Transfer messages, contacts, photos, music, etc., from iPhone to iPhone directly.
- Transfer data between iDevice and computer and iDevice and another without any data loss.
- Celerity, security, and reliability.
- Sync iPhone data to PC/iCloud/iOS devices within one click.
- Support the latest iOS version.
Secure Download
Secure Download

Let's see how to transfer text messages to a new iPhone without iCloud.
Step 1. Launch the program on your computer and connect your old and new iPhones to this computer. If you see this screen, your iPhones are successfully connected. On the top drop-down box, choose your old iPhone.
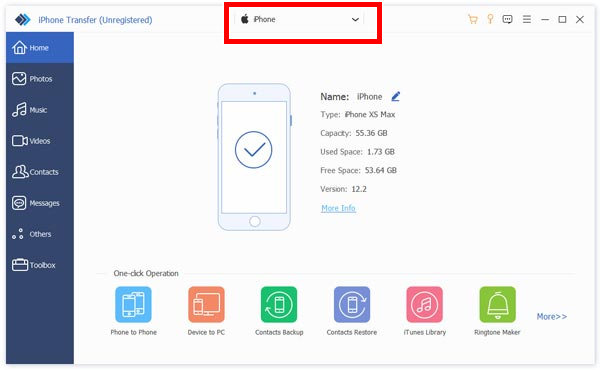
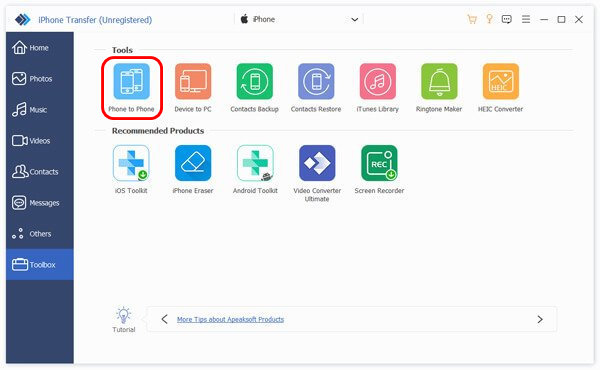
Step 2. Click Toolbox on the left bar. Choose the Phone to Phone button.
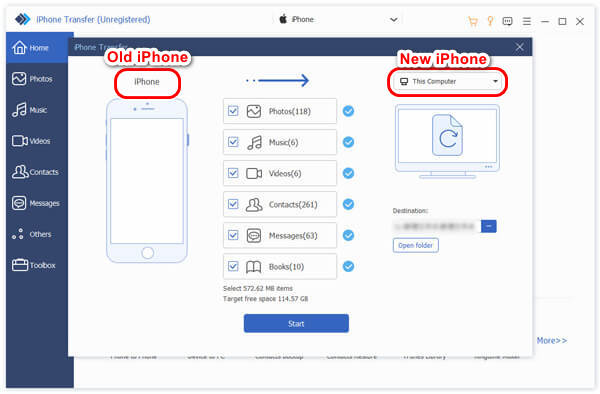
Step 3. Your old iPhone will show on the left automatically because you chose it in Step 1. Now, select your new iPhone on the right drop-down box. Check Messages and click Start. Messages will be transferred in seconds.
Drawbacks: It is hard to find the entrance of this function in the program without a complete and thorough guide.
Part 3: How to Transfer Messages from iPhone to iPhone with iCloud Backup?
This method works for you if you haven't set up your new-got iPhone. You can back up your whole iPhone to iCloud and restore it when you set up your new iPhone. Be sure both iPhones are in charge and connected with Wi-Fi. Let's get started now.
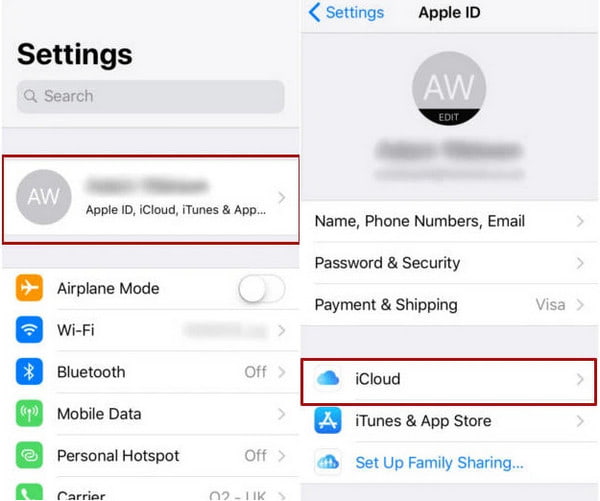
Step 1. Open your old iPhone's Settings and tap on the name. In the next Apple ID screen, tap iCloud.
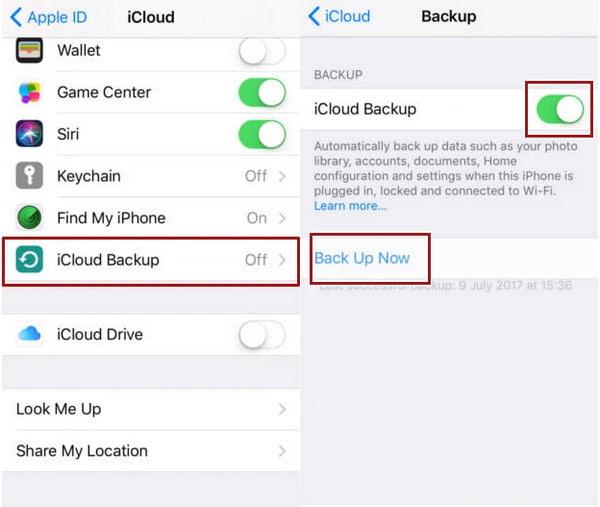
Step 2. Scroll down and tap iCloud Backup. Turn on iCloud Backup and tap on Backup Now. Wait a few minutes for the backup to be established, and go to your new iPhone.
Step 3. Set up your new iPhone following the instructions. When you reach the App & Data screen, tap Restore from iCloud Backup. Now, log in to your Apple ID and restore your backup.
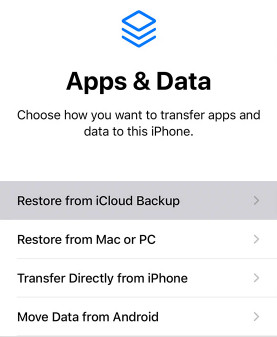
Drawbacks:Some users report that iCloud backup can't be completed and is stuck at a point, and this method is time-consuming. Besides, if there is any running issue on your old iPhone, it has a chance to be copied to your new iPhone through iCloud.
Part 4: How to Transfer iMessages from iPhone to iPhone with iTunes/Finder?
iTunes/Finder is the official backup program for Apple devices, and they all save all data in iPhones for backups, including messages. However, iTunes is different from iCloud Backup because iTunes backups don't take iCloud storage, which makes it more flexible. Let's see how to import text messages from one iPhone to another with iTunes.
Step 1. Open iTunes or Finder on your computer. Connect your old iPhone to this computer. When your iPhone is detected, click the device name.
Step 2. Click the Summary or General tab on the interface. Click the Back Up Now button.
Step 3. You can restore this backup in the App & Data screen shown in Step 3, Part 3. Or, connect your new iPhone to this computer, sign in to the same Apple ID, and click Restore Backup in iTunes/Finder.
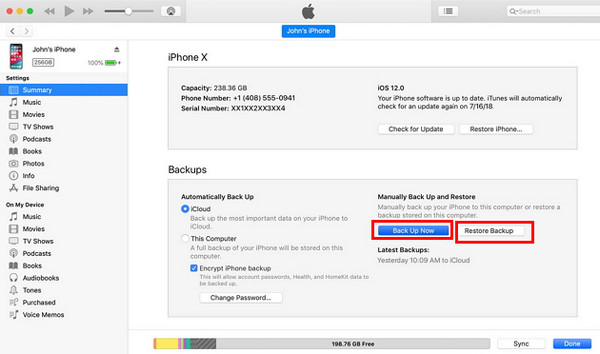
Drawbacks: This method costs many steps and is a little complex. Besides, sometimes iPhones can't connect with iTunes.
Conclusion
How to transfer iMessages to new iPhones? iCloud and iTunes are handy solutions to deal with the problem because they are built into Apple devices. If you want to transfer only iMessages to a new iPhone without internet, Apeaksoft iPhone Transfer helps you easily transfer in one click.
Related Articles
Don't know how to transfer everything from iPhone to iPhone? If you change to a new iPhone or other situations, you must learn it.
This article will show you how to share Wi-Fi password on any device with details. Whether you use an iOS or Android device, you will find the answer here.
Here we show 5 quick ways to transfer Apple Music between iPhone. If you want to switch all your music to the new iPhone, you just come to the right place.
How do you import contacts from iPhone to iPhone? Check at least 4 ways to transfer contacts to new iPhone directly or indirectly.

