How to Sync Text Messages and iMessage from iPhone to Mac
To ensure seamless communication within the Apple ecosystem, users are allowed to sync messages from their iPhone to their Mac. This feature enhances convenience for iPhone users. In other words, if you want to view, send, or receive messages on your iPhone and Mac, you just need to complete the setup process. In this informative article, you can learn everything you need to know about syncing and connecting iPhone messages on a MacBook.
PAGE CONTENT:
Part 1: How to Sync iPhone Messages to Mac
With an Apple ID account, you can access all your messages and conversations on both iPhone and Mac if you are a multi-device user. We explain the requirements and the workflow below:
Requirements
1. Your iPhone should run iOS 11.4 or later.
2. Your Mac needs macOS High Sierra or newer.
3. Both devices should connect to the internet.
4. You must sign in to the same Apple ID on both devices.
Here are the steps to sync an iPhone with messages on a Mac:
Step 1. Open the Settings app on your iPhone.
Step 2. Tap on your profile and choose iCloud.
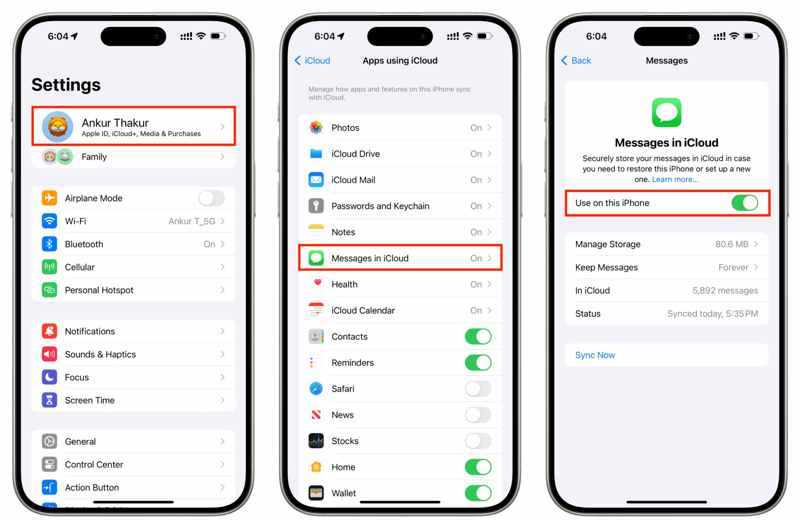
Step 3. Tap Messages in iCloud, and toggle on Use on this iPhone or Sync This iPhone.
Step 4. Turn to your Mac.
Step 5. Click the Apple menu and choose System Settings or System Preferences.
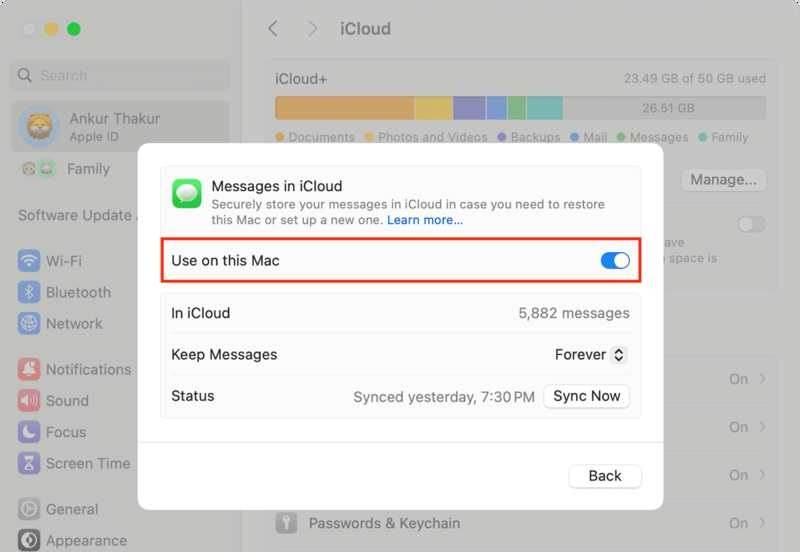
Step 6. Click your Apple ID and make sure it is the same as the account on your iPhone.
Step 7. Go to iCloud, and choose Messages in iCloud.
Step 8. Enable Use on this Mac.
Step 9. Run the Messages app on your Mac.
Step 10. Enter the Apple ID and password you use on your iPhone.
Step 11. Tap Sign In and wait for messages to load.
Part 2: How to Link iPhone Messages to Mac
In addition to viewing your iPhone messages on your MacBook, you can also connect to messages from your iPhone to your Mac. In other words, any iMessage you receive on your iPhone will show up in the app on your Mac and vice versa.
Requirements
1. Your iPhone should run iOS 8.1 or later.
2. Your Mac runs macOS Sonoma 14 or higher.
3. Both devices sign in with the same Apple ID account.
4. Both your iPhone and Mac are online.
Here are the steps to linking iPhone messages to Mac:
Step 1. Run the Settings app on your iPhone.
Step 2. Scroll down and go to Messages.
Step 3. oggle on iMessage, and tap Send & Receive to set or check the email address and phone number.
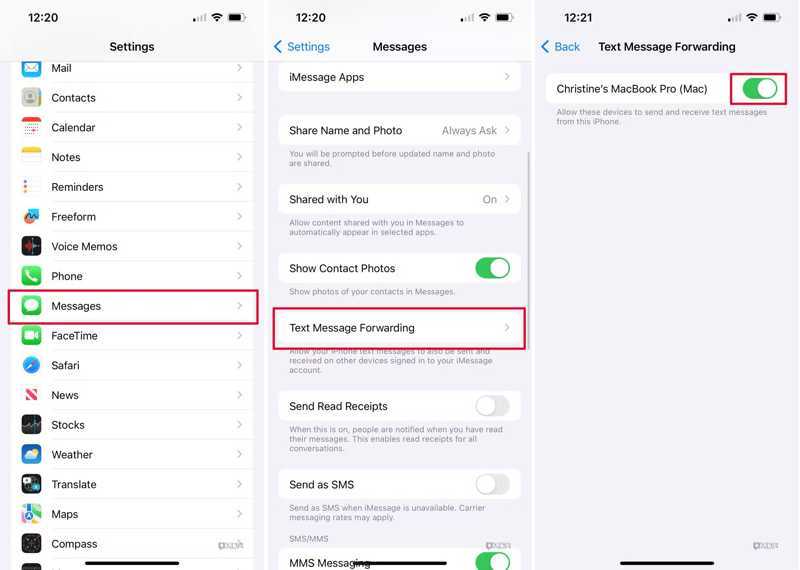
Step 4. Then, choose Text Message Forwarding, find your Mac, and toggle on the switch.
Tip: If your Mac and iPhone sign in with the same Apple ID, it will appear on the list.
Step 5. If Two-factor authentication is enabled, check the verification code on your Mac screen.
Step 6. Enter the verification code on your iPhone and tap Allow.
Step 7. Run the Messages app on your Mac.
Step 8. Click the Messages menu and choose Settings or Preferences.
Step 9. Go to the iMessage tab and check Enable Message in iCloud.
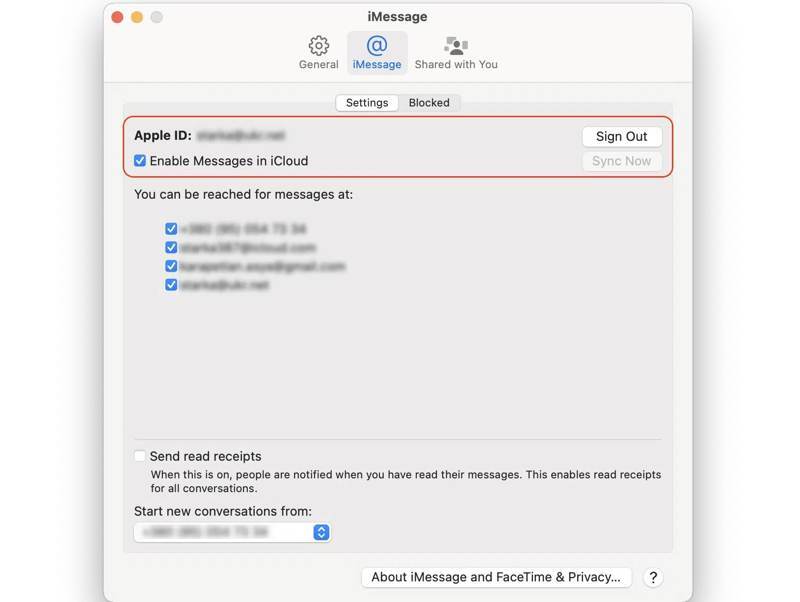
Step 10. Set You can be reached for messages at and Start new conversations from according to the settings on your iPhone.
Part 3: How to Fix iPhone Messages Not Syncing with Mac
Solution 1: Check Your Internet Connection
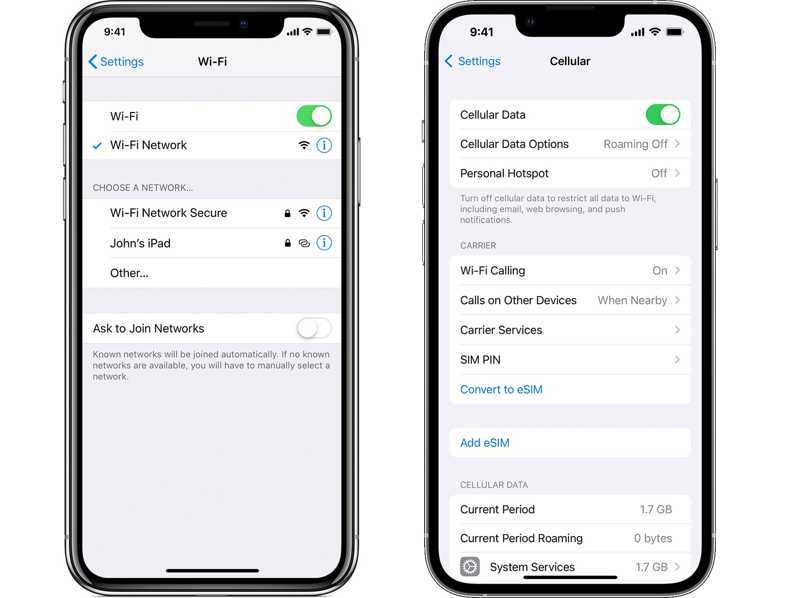
Since conversations go through an internet connection, if iPhone messages are not syncing with your Mac, the first thing you need to do is check your network. Look at the internet signal on the top right side of your screen. If you are using a poor Wi-Fi, switch to cellular data or vice versa. Make sure to use a stable Wi-Fi on your Mac, too.
Solution 2: Check Your Apple ID
If you didn't sign in with the same Apple ID, iPhone, and Mac messages won't sync. Therefore, you'd better check your Apple ID on both devices before syncing messages across your devices.
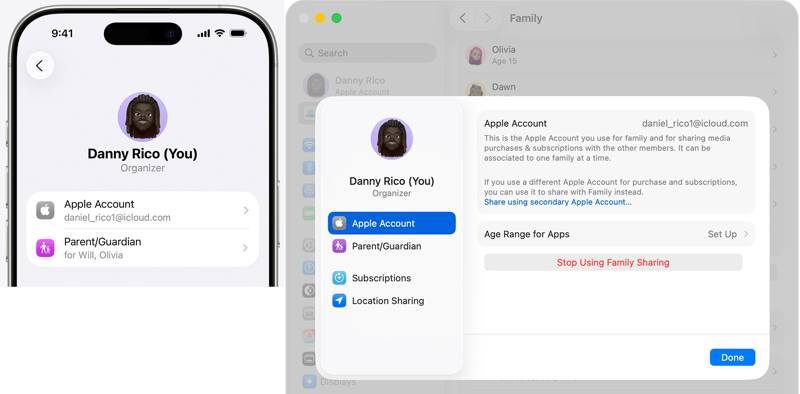
On iPhone
Run the Settings app, tap on your profile, and tap Apple Account.
On Mac
Click the Apple menu, choose System Settings, and click Apple ID.
Compare your Apple ID. If they are different, sign out of the account on your Mac and log in to the same Apple ID. You'd better also change Apple ID in the App Store.
Solution 3: Manually Sync iPhone Messages
In addition to automatically syncing text messages from iPhone to Mac, you can manually do the job on your devices. That force syncs messages across your iPhone and Mac with an internet connection.
Step 1. Tap on your profile in Settings.
Step 2. Choose iCloud, tap Messages in iCloud, and tap Sync Now.
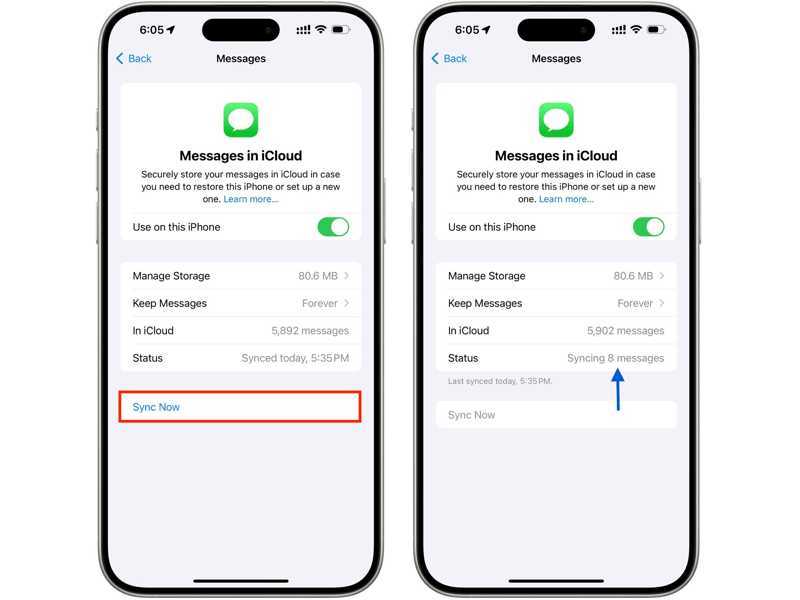
Step 3. Then, check the Status.
Step 4. Turn on your Mac.
Step 5. Click the Apple menu and choose System Settings.
Step 6. Hit Apple Account, choose iCloud, and pick Messages in iCloud.
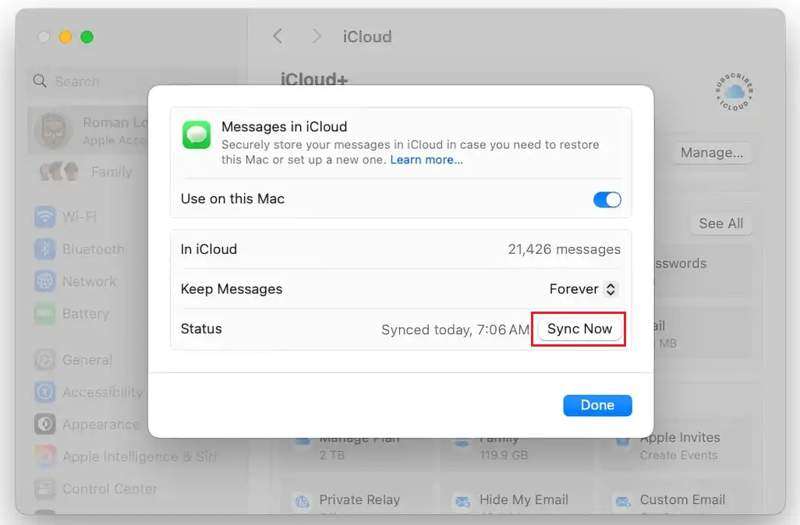
Step 7. Click the Sync Now button.
Solution 4: Look for an Alternative Way to Sync iPhone Messages
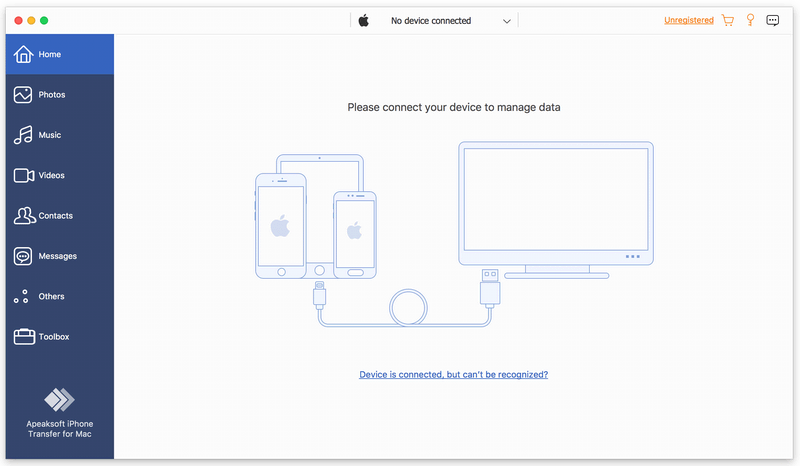
If iPhone messages are still not syncing with Mac, you can use an alternative tool, such as Apeaksoft iPhone Transfer. It allows you to sync messages from your iPhone to your Mac without an internet connection. The intuitive interface streamlines the sync process.
A Quick Way to Sync iPhone Messages to Mac with a Cable
- Sync messages on iPhone to Mac quickly.
- Preview iPhone messages for selective syncing.
- Support SMS, MMS, and iMessage.
- Compatible with the latest versions of iOS and macOS.
Secure Download
Secure Download

Here are the steps to sync iPhone messages to Mac:
Step 1. Connect to your iPhone
Launch the iPhone Transfer software after installing it on your Mac. There is another version for PC. Connect your iPhone to your Mac with a Lightning cable.
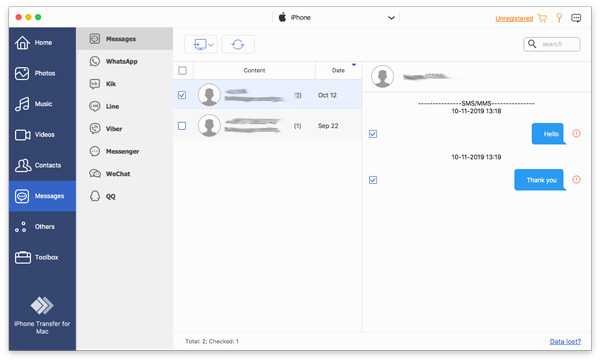
Step 2. Preview iPhone messages
Go to the Messages tab on the sidebar and view all messages on your iPhone, including WhatsApp, Messenger, and more.
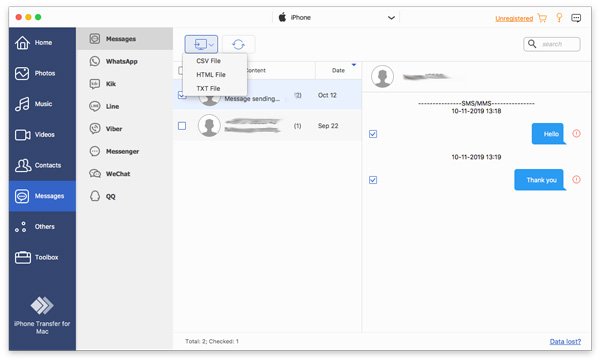
Step 3. Sync iPhone messages to Mac
Select the messages you want to sync, click the Monitor button on the top ribbon, and choose a file type. Then, navigate to an output folder, and confirm syncing iPhone message to your Mac. You can also sync reminders on iPhone and Mac with this program.
Conclusion
Now, you should understand how to sync your iPhone with messages on Mac. You can get access to your messages on both your iPhone and MacBook with the same Apple ID. Moreover, we told you how to receive and send messages on your Mac through your iPhone. If messages stop syncing, Apeaksoft iPhone Transfer is a good alternative message syncing tool.
Related Articles
Searching for how to sync contacts from iPhone to Mac? This article shows you how to do it and fixes the not-syncing issue. We also introduce 3 other methods.
Want to know how to transfer videos from your iPhone to your computer without compromising the original quality? Here are the most effective of the six methods.
If you no longer need them, you can follow our concrete tutorial to quickly delete old iPhone backups on your Mac computer.
To mirror iPhone to Mac, you can make use of Apple’s built-in feature, AirPlay, or QuickTime Player. We also introduce a powerful third-party tool.
