"iPhone 6s disappointed me, after the upgrade to iOS 26, random black screen happens frequently. Now, I have switched my phone to Samsung Galaxy S23. Initially, it takes time to get used to, but now I do not think of going back. The problem is that I have saved some important photos on iPhone 6s, do you know how to transfer photos from iPhone to Android? Please help."
Any time when major brands launch new Android phones, some people will switch from iPhone to Android. It makes sense when you consider that many iPhone owners reported black screen, random crash, freezing and other problems after update software. Transferring photos from iPhone to Android is not an easy task due to the lack of connectivity between the two operating systems.

Therefore, we are going to tell you several simple approaches to transfer pictures from iPhone to Android Smartphone. First of all, Apple left an interface to download photos from iPhone to computer, though you cannot send pictures to Android directly. And some cloud services are available to both iPhone and Android, which could send photos between Smartphone through internet. Anyway, you can learn 4 best methods on how to send photos from iPhone to Android phones in this tutorial. If you are ready, let's start the awesome journey.
- Part 1: The manual ways to transfer photos from iPhone to Android
- Part 2: Move photos/pictures from iPhone to Android through iCloud
- Part 3: Get photos from iPhone to Android using Dropbox
- Part 4: The best way to transfer photos from iPhone to Android
Part 1: The manual ways to transfer photos from iPhone to Android
Manually transferring photos from iPhone to Android Smartphone includes two steps. Firstly, you have to download photos to PC from iPhone using a USB cable. And then send photos to your Android phone. The process does not require Wi-Fi network or any third-party apps.
How to transfer photos from iPhone to PC
Step 1. Use Apple's lightning cable to connect your iPhone and your PC. To avoid data loss and device damage, you'd better use the products authorized by Apple if there is not the original cable.
Tip: When prompted, make sure to tap on "Trust" on your iPhone if you connect the two devices for first time.
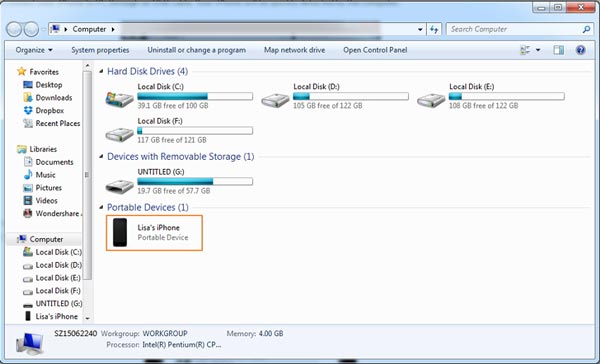
Step 2. On the AutoPlay windows, choose "Import pictures and videos" to open iPhone Camera Roll on Windows PC. If the AutoPlay does not show up automatically, go to "My Computer" from desktop, locate to the "Portable Devices" section and find your iPhone. Right click on it and select "Import pictures and videos" on the menu bar.
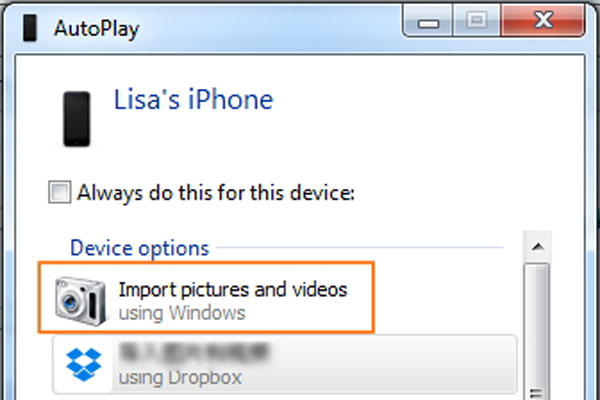
Step 3. Select all photos that you want to send from iPhone to Android phone, then drag and drop them to your hard drive.
On Windows 8, you are not allowed to access iPhone Camera Roll. After click on Import pictures and videos, you will be presented two options, Review, organize, and group items to import, and "Import all new items now". The former one is used to import all iPhone photos to PC. If it is not the first time to import pictures, the second option could only download new photos. Then click on "More options" link, select a destination, click on the "Next" button and then hit "Import".
On Windows 10/11, you have to turn on "AutoPlay" in "Settings" > "Devices" before transfer photos.
You should note that, the photos in HEIC on iPhone will not be available on Windows computer, and you need to turn HEIC to JPG/PNG for direct viewing.
How to transfer photos from PC to Android
Step 1. After downloading photos to PC, remove iPhone from your PC. Then hook up your Android phone with a USB cable.
Step 2. Go to My Computer and find your Android phone, double click on it, find the folder named DCIM, which is the Photo Gallery for Android.
Step 3. Now, save photos downloaded from iPhone to Android phone. Congratulations! You have completed the process of sharing photos from iPhone to Android.
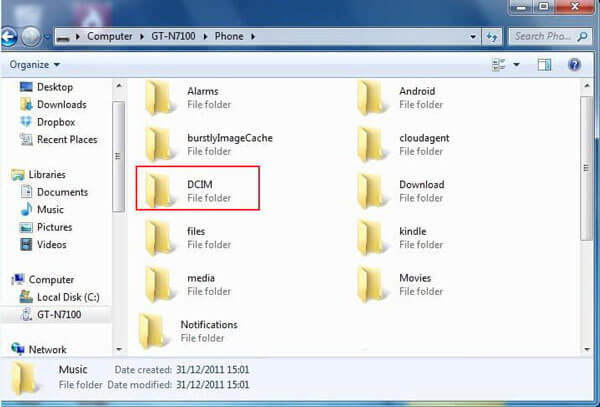
The downsides of manually transferring photos are obvious. It is only feasible to the pictures saved in your Camera Roll. If you have moved photos to iCloud and turned on Optimized Storage, you can find the proper way in next part.
Part 2: Move photos/pictures from iPhone to Android through iCloud
Many people prefer to sync photos to iCloud Photo Library in order to free up space on iPhone. On the other hand, it is also a simple way to transfer photos from iPhone to Android. Frankly speaking, you cannot use iCloud on Android phone. Much like the USB connection, you have to transfer photos from iCloud to PC and then move them to Android phone.
How to get photos from iCloud to Android
Step 1. Unlock your iPhone and connect it to a well-working Wi-Fi network. Open the Settings app from home screen, you need to tap on Apple ID and go to "iCloud" > "Photos". Make sure to enable "iCloud Photo Library" and move photos to iCloud.
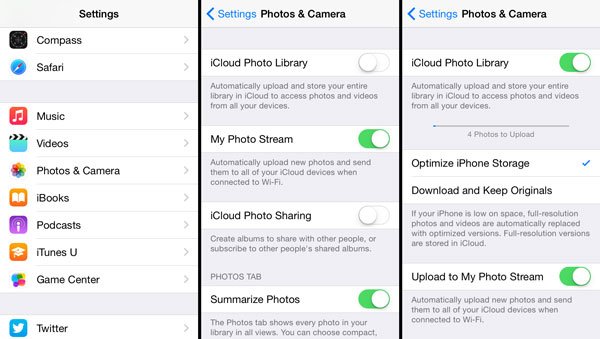
Step 2. Next, turn on your computer, input icloud.com into the address bar of your browser, and sign in your Apple ID and password that used to save your photos (Forgot iCloud password?). Answer the security questions or enter the verification code if you have turned on two-factor authentication.
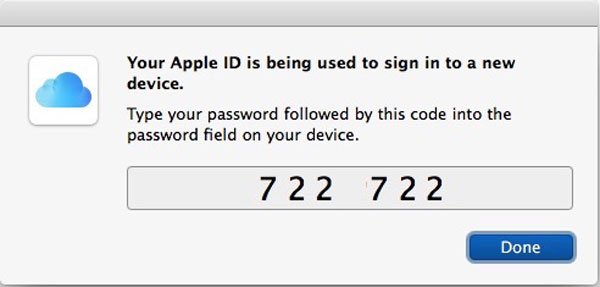
Step 3. On iCloud home page, choose the "Photos" button to open your iCloud Photo Library. Then choose desired photos and drag and drop them to your desktop to download iCloud photos to computer.
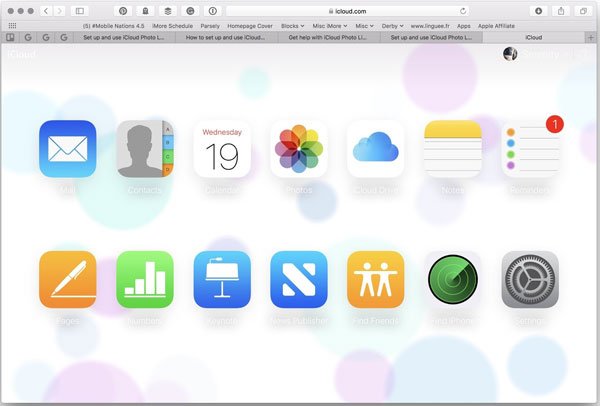
Step 4. To transfer iCloud photos to Android, you have multiple choices, such as SD card. Insert a SD card into your computer and move photos to SD card. Then take out SD card and put it into your Android phone.
Note: It is also a good way to view iCloud photos on PC. But there are somethings you should know about iCloud Photo Library. First of all, it only has 5GB free storage for each account. If you have a lot of photos to transfer and the free storage is not enough, you need to purchase storage capacity from Apple. And uploading photos from iPhone to iCloud Photo Library usually spends more than half of an hour or up to 24 hours due to wireless connection is much slower than USB cords. And other problem is cyber security.
In order to enhance security, Apple suggests users to enable two-factor authentication. But some users who forgot their iCloud password said that it is difficult to get back their account. Though Wi-Fi networks have covered everywhere, cybercriminals may utilize public wireless networks to attack your device, so we do not suggest you to move pictures to iCloud under unsecure internet environment.
Part 3:Get photos from iPhone to Android using Dropbox
Another simple way to get photos from iPhone to Android is cloud services, such as Dropbox. Developer has released Dropbox apps for iOS and Android respectively. And a lot of third part apps support uploading files to your Dropbox as well. One advantage is that you can select certain photos to upload from your Camera Roll to Dropbox.
Step 1. Launch Dropbox app from the home screen of iPhone after install it from App Store, and log in your account. Tap on the "menu" button at top of the screen, then select "Upload" on the floating menu bar. Now, you can navigate to your Camera Roll and select desired photos by checking the boxes.
Note: Make sure your iPhone and Android device connected with Wi-Fi. (Learn here to share iPhone Wi-Fi password to Android.)
Step 2. Once tap on the "Upload" button at top right corner, selected photos will go to your Dropbox account over internet. Dropbox has integrated automatic syncing feature into the apps. If you have two smartphones, this feature could sync photos between two devices automatically. To set up automatic syncing feature, go to the "Settings" tab in Dropbox for iOS, tap on "Camera Uploads" and put the switch to "ON" position.
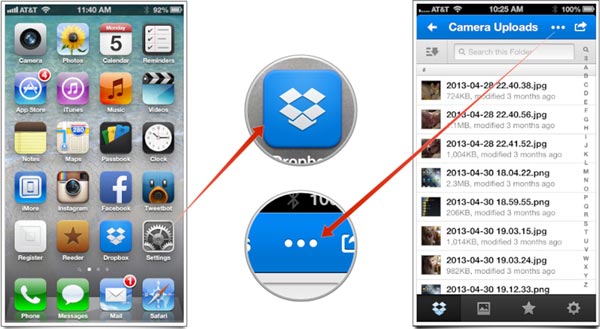
Step 3. Next, turn on your Android phone and install the Dropbox app from Google Play Store. Open it and log in the same account used on your iPhone. Now, you can look at iPhone photos on your Android phone. If you want to view them offline, Dropbox allows you to move pictures to SD card as well. On your Android phone, launch Dropbox app, tap on the menu button and hit "Settings", you will find the "Camera Uploads" option, which you can turn on the option. Then iPhone photos will sync to Android automatically as soon as the two smartphones connect to internet.
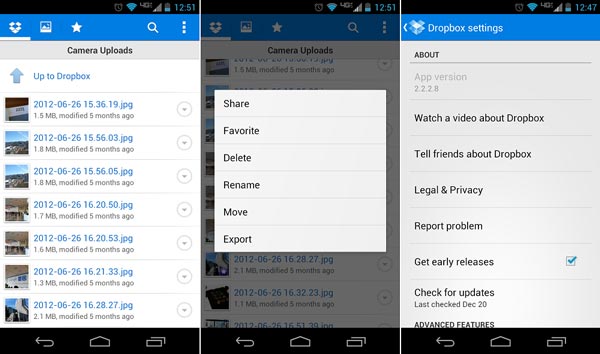
Though Dropbox app is free to download, it only provides 2GB free storage to each account. It may be not enough to sync a lot of photos, especially high quality ones.
Part 4: The best way to transfer photos from iPhone to Android
As you can see either manual transferring approach or iCloud and Dropbox have some shortcomings, such as limited storage capacity. If you need a professional way to transfer photos from iPhone to Android, we suggest you to try Apeaksoft Phone Transfer.
Its key features include:
- One click transfer. It has the ability to transfer photos from Android to Android, iPhone to iPhone, Android to iPhone, and iPhone to Android in one click.
- Lossless transfer. Phone Transfer will not overwrite or damage existing photos on both Android phone and iPhone during transfer.
- Faster and safer. It uses USB cables to send photos from iPhone to Android, which is much quicker and safer.
- Keep original conditions. It is able to extract HD photos from iPhone and save them on Android phone in original quality and format.
- Support a variety of data types. In addition to photos, Phone Transfer works for videos, music, contacts and other documents too.
- Higher compatibility. This phone transferring application is compatible with all iPhone models, like iPhone 17/16/15/14/13/12/11, and Android phones from Samsung, HTC, Sony, Google, Moto, Huawei, Xiaomi, etc.
- It has two versions, one for Windows 11/10/8.1/8/7/ XP and the other one for Mac.
In short, it is the best way to sync photos from iPhone to Android. And we use an iPhone 6 as the source device and Galaxy S8 as the target phone to show you the procedure.
How to transfer photos from iPhone to Android in one click
Step 1. Connect iPhone and Android phone to the best phone transfer
Download the right version of Phone Transfer based on your operating system and follow the onscreen assistant to install it on your computer. Run the best phone transferring application, it will detect your handsets as soon as plug both iPhone 6 and Galaxy S8 to your computer with original USB cords.

Step 2. Set up for transferring photos
Make sure that iPhone 6 appears in the "Source Device" box and Galaxy S8 shows up in the "Target Device" box. If not, click on the "Switch" button at top of the home interface to correct it.
If you want to migrate data from Android to iPhone, do not switch it.
Tick the checkbox in front of the Photos option. If you do not want to damage current photos on Galaxy S8, make sure to uncheck "Remove the chosen data on Target Device before copy" under the target device.
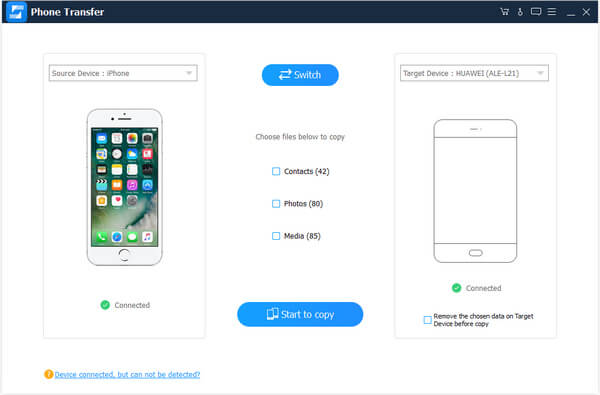
Step 3. Transfer photos from iPhone to Android in one click
Finally, click the "Start to copy" button to initiate transferring photos from iPhone 6 to Galaxy S8. The process may take a few seconds to several minutes depending on the amount of photos transfer. Then remove your smartphones from your computer. Now, you can view iPhone photos on Android phone at any time.
Conclusion
In this tutorial, we have talked about how to transfer photos from iPhone to Android phones. There are a lot of approaches to sync photos between iPhone and Android, but people may want to learn about the best ways to complete this task. Generally speaking, USB cable is the easiest way to download photos from iPhone to PC and then send them to Android phone. The entire process only needs USB cords. But it is not available to photos in iCloud. Actually, you can get photos from iCloud to Android with computer as the medium as well. And Dropbox is a wireless approach solution to send photos from iPhone to Android through Wi-Fi network. On the other hand, we also shared a professional phone transferring application, Apeaksoft Phone Transfer. Its benefits are obvious, quicker, safer and easier to use. Now, you can pick an appropriate way and follow our guides to complete this job.

