How to Delete or Disable Face ID on Your iPhone Quickly
While Face ID is convenient to unlock an iPhone, you have to remove your face in some cases. If you have an outdated Face ID on your device, for example, you’d better delete it since you can only set two different appearances. Plus, you have to delete Face ID on your iPhone if you are in extreme circumstances. In any case, this article outlines the proven methods and illustrates the workflows.
PAGE CONTENT:
Part 1: How to Remove Face ID on iPhone
The easiest way to delete Face ID on your iPhone is resetting Face ID. This feature removes all saved Face ID appearances from your device. Then, you can set up new Face IDs on your device.
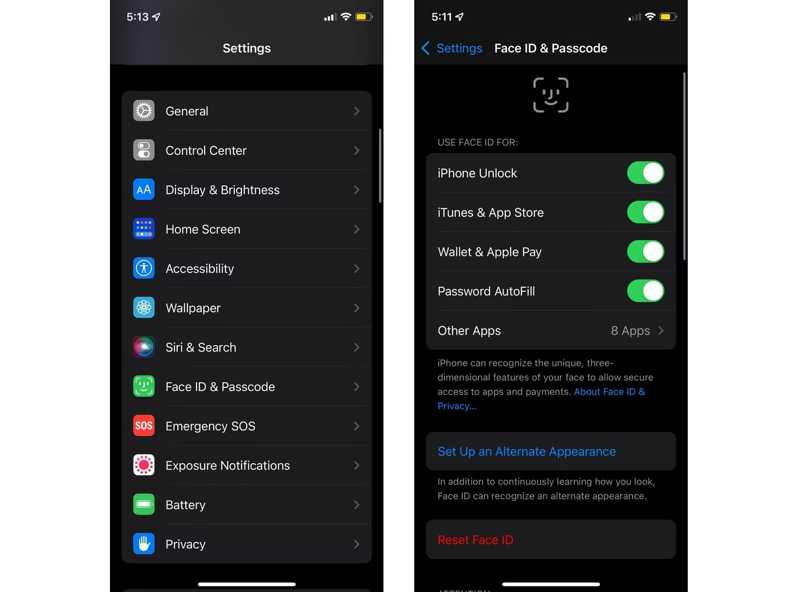
Step 1. Open the Settings app on your iPhone.
Step 2. Go to Face ID & Passcode.
Step 3. If prompted, enter your passcode to verify the ownership.
Step 4. Scroll down and tap the Reset Face ID button to remove Face ID on your iPhone.
Tips: If you hope to remove Face ID in specific scenarios, like your lock screen, when downloading apps, accessing passwords, and more, toggle off the relevant options under the USE FACE ID FOR section.
Part 2: How to Temporarily Disable Face ID on iPhone
In addition to resetting Face ID, you can also get rid of Face ID on your iPhone by turning off the feature temporarily. There are a few methods to disable Face ID, and we demonstrate the proven ones below.
Way 1: Disable iPhone Face ID via Siri
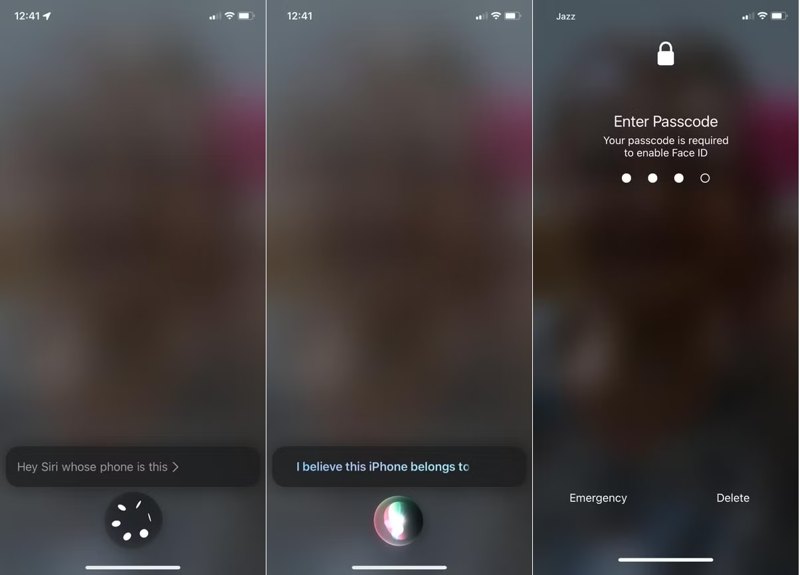
Step 1. When your iPhone is locked, say Hey Siri, whose phone is this.
Step 2. Siri will display your contact card and temporarily disable Face ID.
Step 3. Enter your iPhone passcode to unlock it. Face ID will work normally again.
Way 2: Disable iPhone Face ID by Wrong Attempts
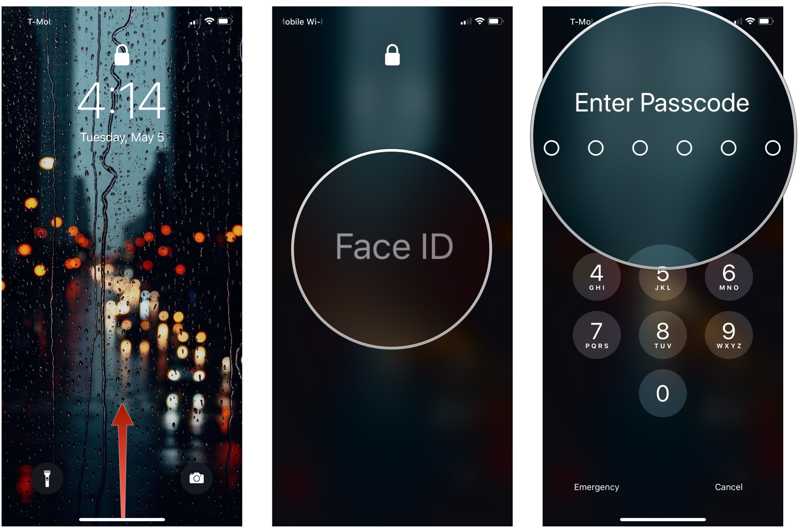
Another simple way to temporarily get rid of Face ID on your iPhone is to make unsuccessful attempts. When you want to access your device, place your iPhone in front of other people or a portrait five times. After the five unsuccessful Face ID attempts, Face ID will be disabled temporarily. You are asked to unlock your device with the passcode.
Way 3: Get Rid of Face ID on iPhone in Emergency SOS Mode
iPhone comes with an Emergency SOS mode, which allows you to make emergency calls without unlocking your device. It is also a handy method to disable Face ID on your iPhone temporarily.

Step 1. Hold the Side button and either the Volume button at the same time.
Step 2. Release the buttons when you see the Emergency SOS screen.
Step 3. Tap the Cancel button to back to the Lock Screen.
Step 4. Here, you need to unlock your device with the passcode but not Face ID.
Way 4: Disable iPhone Face ID by Find My
If your device is remotely locked by Find My, you can get rid of Face ID on your iPhone until you unlock it. This method requires you to turn on Find My on your device. Moreover, it needs another device to complete the job.
On the Web
Step 1. Go to www.icloud.com/find and sign in with your Apple ID and password.
Tips: If you have turned on 2FA, enter the verification code.
Step 2. Pull down the All Devices menu and choose your iPhone.
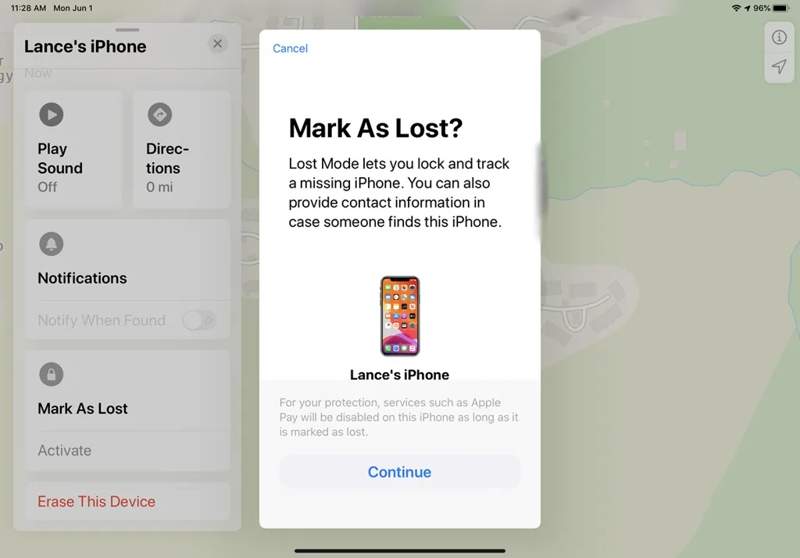
Step 3. Click the Mark As Lost button.
Step 4. Read the alert and click Continue.
Step 5. Follow the onscreen instructions to lock your device.
On an iPhone/iPad/Mac
Step 1. Open the Find My app on a borrowed device.
Step 2. Go to the Devices tab and choose your iPhone.
Tips: If you cannot find your iPhone, tap the + button, choose Add AirTag or Add New Item, and search for your iPhone. When prompted, enter your Apple ID and password.
Step 3. Tap or click Mark As Lost on the toolbar.
Step 4. Then, confirm the action and get rid of Face ID on your iPhone.
Part 3: How to Remove Face ID from iPhone Without Passcode
If you forgot your iPhone passcode, it is difficult to remove Face ID. Apeaksoft iOS Unlocker is what you need. Moreover, it can force delete Face ID on your iPhone in any situation. The user-friendly interface makes it a good option for beginners.
The Easiest Way to Remove Face ID on iPhone Without Passcode
- Delete Face ID from an iPhone in three steps.
- Available in any situation, including a disabled iPhone.
- Don’t require your iPhone passcode or Apple ID password.
- Compatible with the latest versions of iOS and iPhone models.
Secure Download
Secure Download

How to Remove Face ID from Your iPhone
Step 1. Connect to your iPhone
Launch the best Face ID removal tool after you install it on your PC. There is another version for Mac. Connect your iPhone to your PC with a Lightning cable. Go to the Wipe Passcode mode and click the Start button to move on.
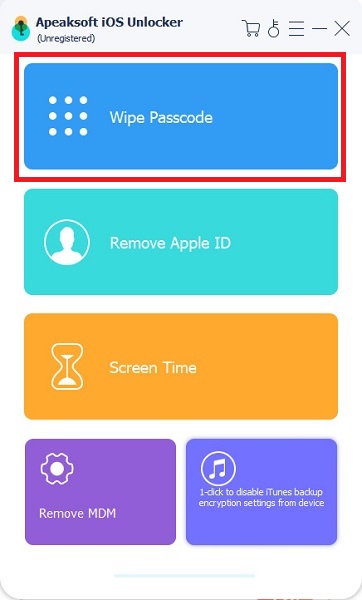
Tips: If you link the two devices for the first time, tap Trust on your screen to trust this PC.
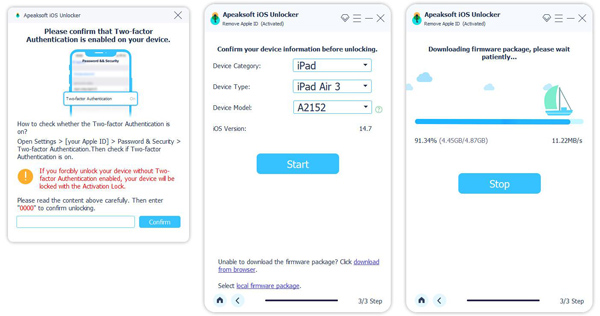
Step 2. Check your device information
The software will detect your device and automatically read its information. Once your device information is loaded, check each item. Then, click the Start button to download the firmware package.
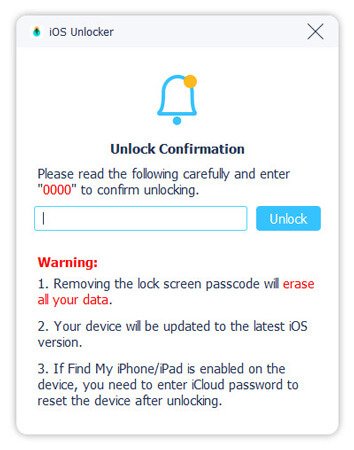
Step 3. Delete iPhone Face ID
As long as the download is complete, enter 0000 and click the Unlock button to begin deleting Face ID on your iPhone. When it is done, disconnect your iPhone, and you can unlock your device without any block. Then, you can set up a new Face ID. The entire workflow won't factory reset your device.
Conclusion
Now, you should understand how to remove Face ID on an iPhone. The Reset Face ID option erases all saved Face IDs on your device and disables the feature. Plus, you can temporarily disable Face ID and unlock your device with the passcode following our tutorial. Apeaksoft iOS Unlocker can force remove your appearances. If you have other questions, please write them down below this post.
Related Articles
Do you want to turn off Face ID for your iPhone data privacy? This article illustrates how to do it on the Settings or home screen.
Click here to read a comprehensive tutorial about how to bypass Face ID on iPhone when your Face ID doesn't work and you forget the iPhone password.
If your Face ID is not working due to software glitches, you can effectively fix this problem following our proven solutions.
Normally, Face ID does not work with eyes closed under the protection of Attention-Aware. You can turn this off in Settings to make Face ID work again.
