How to Back up iPhone Photos to External Hard Drive
Before you free up space or sell your iPhone, you'd better back up your entire device. Generally speaking, it is very simple if you back up your iPhone to a computer. However, sometimes, you may want to back up your iPhone to an external hard drive directly. An iPhone backup can take up large amounts of storage space. Using an external hard drive with enough space, you can keep your data safe.
PAGE CONTENT:
Part 1: An Easy Way to Back up iPhone to an External Drive
As an easy iPhone backup tool, Apeaksoft iOS Data Backup & Restore enables you to export iPhone photos to an external hard drive along with other data types. More importantly, the intuitive design makes it straightforward to navigate. It also allows you to restore your iPhone backup anytime.
An Easy Way to Back up an iPhone to an External Hard Drive
- Back up iPhone data to an external hard drive quickly.
- Encrypt your iPhone backup with a password.
- Compatible with a wide range of data types.
- Restore iPhone backup from iCloud and iTunes easily.
- Support the latest versions of iOS and iPadOS.
Secure Download
Secure Download

How to Back up Your iPhone to an External Hard Drive
Step 1. Connect to your iPhone
Start the iOS Data Backup tool after you install it on your PC. There is another version for Mac users. Connect your iPhone to your PC with a Lightning cable. Once your device is detected, click the iOS Data Backup button to move on.
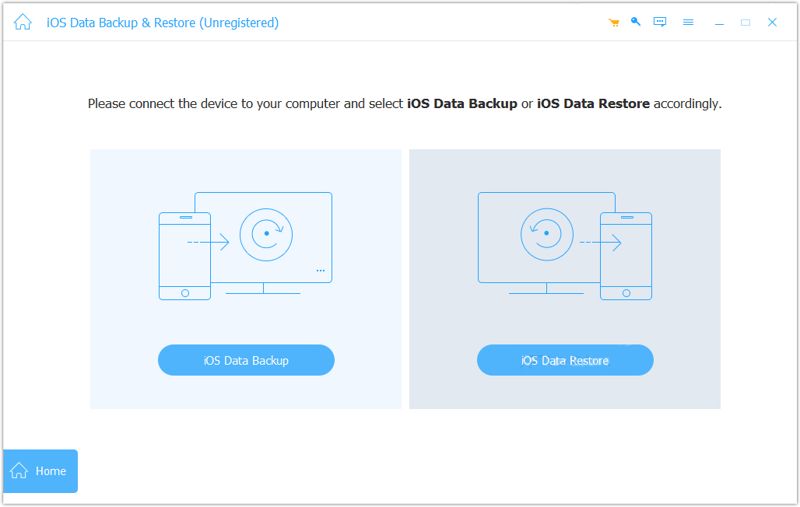
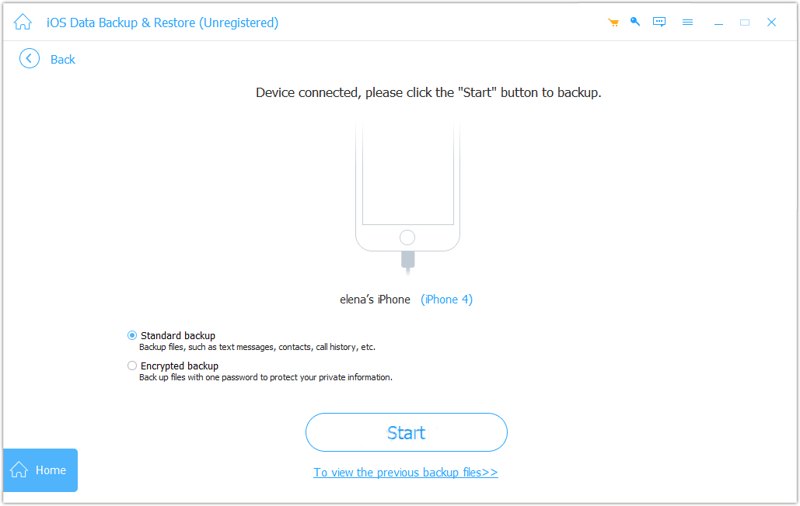
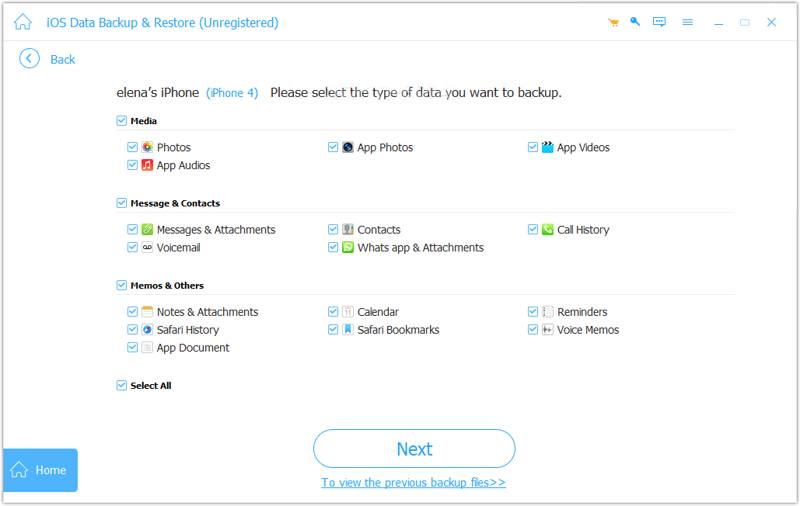
Step 2. Select data types
If you want to protect your iPhone backup, select Encrypted backup and leave a password. If not, select Standard backup. Click the Start button, and check the data types you want to back up, such as Photos, Messages & Attachments, Contacts, etc. To back up the entire iPhone, check the box next to Select All.
Step 3. Back up your iPhone
Once you are ready, click the Next button. For iOS 13 or later, you need to enter your iPhone passcode to back up call history, Safari history, and more. When it is done, find the backup file on your hard drive. Insert an empty external hard drive, copy and paste the backup file.
Part 2: How to Back up an iPhone to an External Drive on a Mac
You can back up your iPhone to an external hard drive using a MacBook. This method requires iTunes or Finder, depending on your edition of macOS. Remember that iPhone backup files are encrypted and cannot be opened.
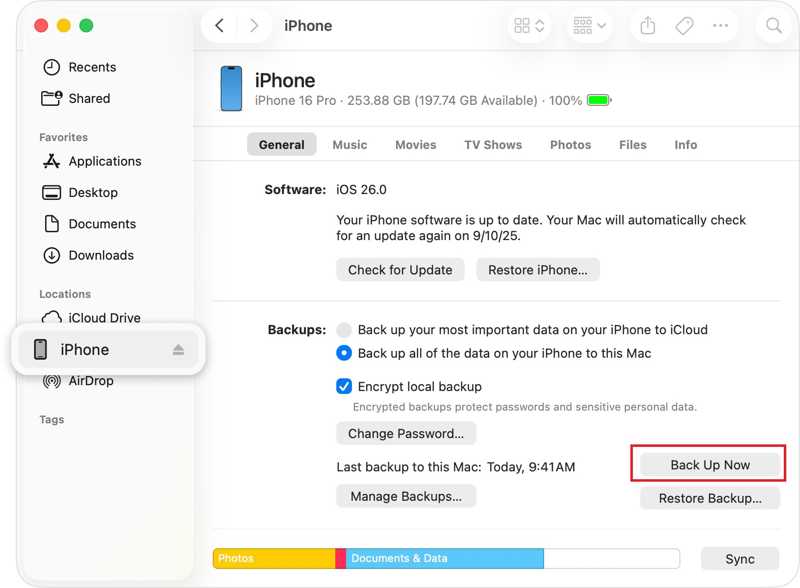
Step 1. Plug your iPhone into your Mac with a USB cable.
Step 2. Run Finder on your computer.
Tips: If you are running macOS Mojave or earlier, use iTunes instead.
Step 3. Click your iPhone name.
Step 4. Select Back up all of the data on your iPhone to this Mac under the Backups section.
Step 5. Click the Back Up Now button.
Step 6. When it finishes, click Manage Backups.
Step 7. Control-click on the backup and select Show In Finder.
Step 8. Then, control-click the backup and choose Copy.
Step 9. Insert an external hard drive and locate it on the sidebar.
Step 10. Next, hit Paste to export iPhone backup to external hard drive.
Note: If you want to transfer iPhone photos to an external hard drive, import your photos in the Photos app on Mac, and export them to your flash drive.
Part 3: How to Export iPhone Photos to an External Drive on PC
If you wish to transfer photos from your iPhone to an external hard drive using a PC, you just need a USB cable. While iOS is a closed operating system, Apple allows you to access your Camera Roll and transfer photos from iPhone to your computer or external hard drive directly.
Step 1. Insert an external hard drive into your PC.
Step 2. Hook up your iPhone to your PC with a compatible cable.
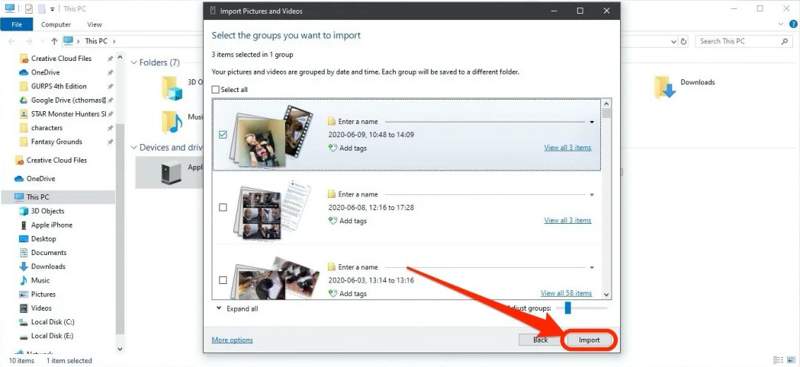
Step 3. Open a File Explorer, right-click on your iPhone, and choose Import pictures and videos.
Step 4. Click Review, hit the More options link, and set the external drive as the destination.
Step 5. Click Next to scan photos on your iPhone.
Step 6. Next, select the groups you wish to export and click the Import button.
Step 7. Once transferring iPhone photos to external hard drive is complete, disconnect your device.
Note: If you don’t have a cable, you can also sync photos to iCloud, and then download them to an external hard drive from icloud.com in a web browser.
Part 4: How to Transfer iPhone Photos to an External Drive Without a Computer
Since iOS 8, Apple has allowed you to transfer iPhone photos to an external hard drive without a computer. If you have a Lightning flash drive, connect it to your iPhone directly. Otherwise, use a USB-C connector to link your iPhone and flash drive.
Step 1. Connect a flash drive to your iPhone.
Step 2. Open the Files app, go to the Browse tab, and check the flash drive under Locations.
Step 3. Run the Photos app from your home screen.
Step 4. Tap the Select button, and touch each photo you want to back up.
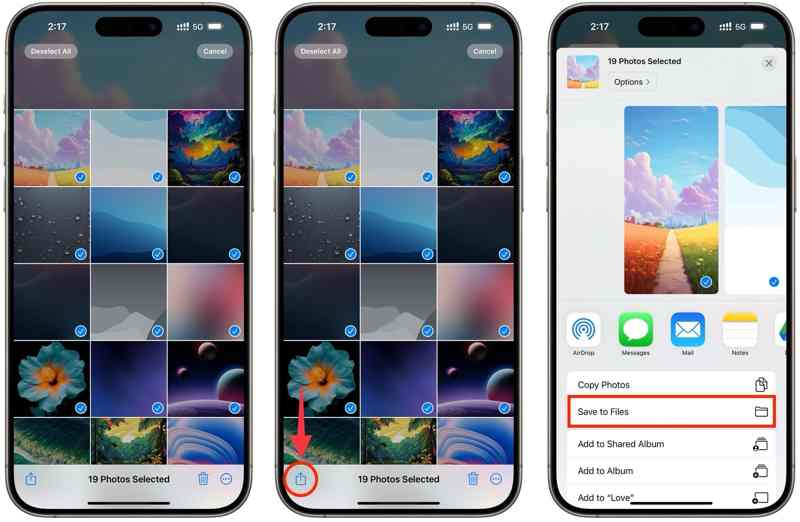
Step 5. Next, tap the Share button and choose Save to Files.
Step 6. Tap On My iPhone, and choose your flash drive.
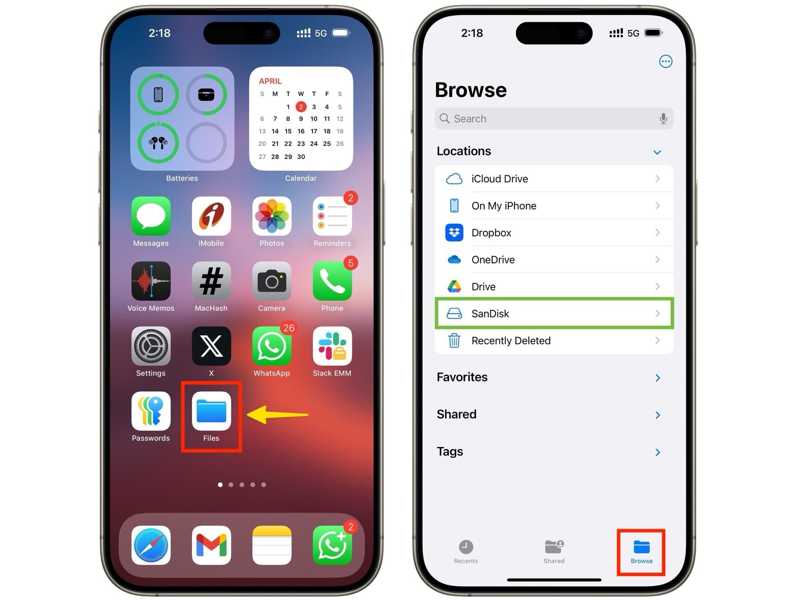
Note: If you cannot find your flash drive after tapping On My iPhone, create a new folder and save it. Then, redirect to the Files app, locate the new folder, and select all photos. Next, tap the Folder button at the bottom, choose your flash drive, and tap Copy to back up iPhone photos to an external hard drive.
Conclusion
This article shared a step-by-step guide to using an external hard drive for iPhone backup in various situations. You can use a computer to back up your iPhone or iPhone photos with a USB cable. Then, transfer the backup to your external hard drive. With a Lightning flash drive, you can also transfer photos and files on your iPhone directly. Apeaksoft iOS Data Backup & Restore is able to back up iPhone data to an external hard drive quickly.
Related Articles
This concrete guide explains how to recover recently or permanently deleted files from your iPhone with or without backup.
You can learn three methods to transfer text messages from an iPhone to an Android phone with a USB cable or wirelessly.
Your iPhone contacts cannot be syncing to iCloud or Mac? Here you can learn multiple solutions to fix this problem quickly.
You can learn four effective approaches to transfer contacts between an iPhone and an iPad with a USB cable or wirelessly.
