One advantage of Android devices is that Google Play Store offers oceans of apps. However, some apps do not work well with others, which may cause them to crash even affect your handset.

Technology experts will suggest you to wipe cache partition to get rid of various problems.
In fact, many Android users are not familiar with cache partition, not to mention how to clear it.
Therefore, we are going to focus on this topic in this tutorial and tell you how to clear cache partition on Android phone simply and quickly.
- Part 1: What is cache partition on Android?
- Part 2: Back Up Your Android Phone Data
- Part 3: How to Wipe Cache Partition on Android
- Part 4: What If Error Happens When You Wipe Cache Partition
Part 1. What is cache partition on Android?
Android will download an update, store it on the system cache partition along with other system data, and then apply it to your system partition when you reboot your phone. The process takes a while if there are a lot of data on your cache partition.
In addition, the temporary system data on the cache partition may cause some problems, such as freezing your phone.
That is why we suggest you to clear cache partition on your Android phone frequently.
Part 2. Back Up Your Android Phone Data
To avoid data loss, you need to back up your Android phone with Apeaksoft Android Data Backup & Restore. Its main benefits include:
1. Create a backup for entire phone in a single click.
2. Preview your data on Android and select certain data types for backup.
3. Support contacts, call history, photos, videos, messages, videos, music, documents and other files.
4. Add password on your backup to protect your data.
5. Back up your data on Android to computer without interrupting current data on your phone.
6. Compatible with Android devices from Samsung, LG, Sony, Moto, Google, etc.
7. Available to Windows 10/8/8.1/7/XP and Max OS.
In short, it is the best option you can find to back up your Android phone.
How to back up your Android phone data
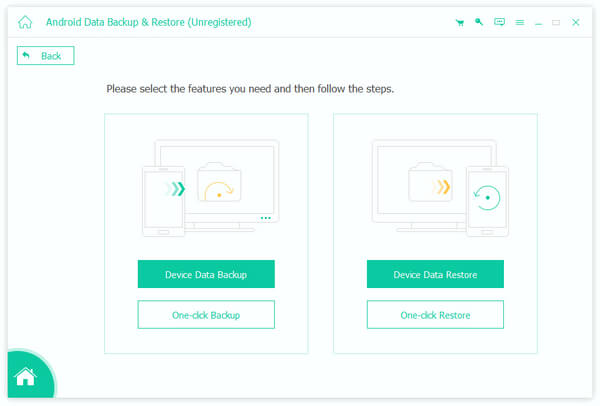
Step 1: Install the best Android backup tool on your computer and start it. Click on the Device Data Backup button to open the next window. If you want to back up entire phone, hit One-click Backup to initiate it immediately.
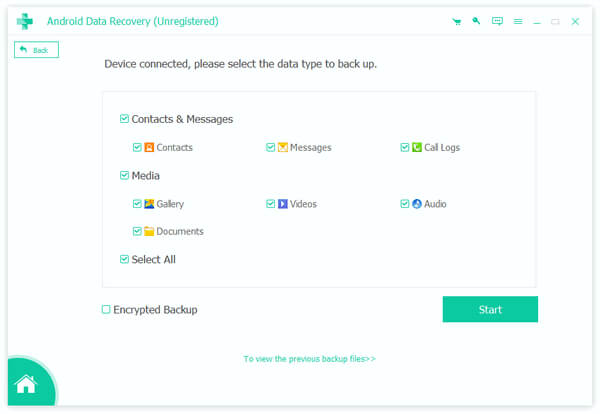
Step 2: Plug your phone to the computer using the Lightning cable. Android Data Backup & Restore will detect it automatically. Select the data types that you want to back up, such as Contacts, Messages, and more, and hit the Start button to begin making a backup.
If you need to add password on your backup to prevent others from viewing your data, tick the checkbox next to the Encrypted Backup option, and then drop your password.
Part 3. How to Wipe Cache Partition on Android
Now, you can feel free to wipe cache partition on your Android device following the steps below.
Method 1: Wipe cache partition in Recovery mode
Step 1: Press the Power button to evoke the power-off screen, touch the Power off option to turn your phone off.
Step 2: Boot your Android phone into the Recovery mode:
On Samsung Galaxy devices, hold down Volume Up + Bixby + Power buttons. If your phone does not have the Bixby button, use Home button instead.
On most of the Android devices, keep press Volume Up + Home + Power buttons, or Volume Up + Power buttons.
If you are not sure, you can find the button combination on your manufacture’s website.
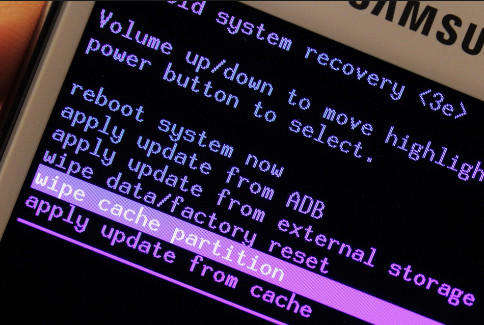
Step 3: When the Android System Recovery screen shows up, release the buttons. Then use the Volume up/down buttons to highlight the Wipe cache partition option, and press the Power button to execute the command. If you are asked to confirm it, select Yes on the screen.
Step 4: Wait for the process to finish, you will get the confirmation message telling you that the cache partition is cleared successfully.
Step 5: When prompted, select Reboot system now with the volume buttons and confirm it with the Power button.
Wiping cache partition is not only able to remove system cache data, but also an easy way to speed up your device and get rid of various issues.
Method 2: Clear cache partition in Settings
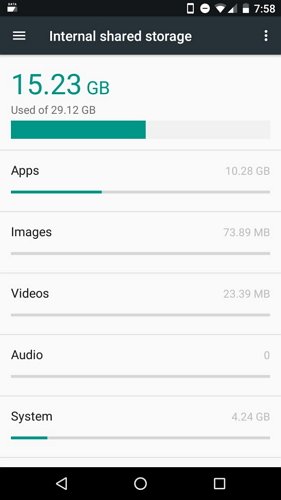
Step 1: Open the Settings app from your app drawer, and go to the Storage screen.
Step 2: Locate the Cached data tab at the bottom of your screen, and then tap the OK button to trigger the process.
Only a part of manufacturers have integrated an option to clear cache partition in the Settings app. If you cannot find the option in your Settings app, it is the only way to clear your cache partition in Recovery mode.
Part 4. What If Error Happens When You Wipe Cache Partition
Some people reported that they encountered errors when wiping cache partition on Android. According to our research, you cannot delete the data on your cache partition if the RAM is accessing it.
The solution is simple, and you can perform a hard reboot to free up your RAM used. It also could protect your valuable data from deleting.
Now, Google implemented a new update system starting with Android Nougat. The new system still uses two partitions, but they are both system partitions. The system data and update will be stored on the system partitions. That makes clearing cache partition is no longer needed.
If you also have an iPhone and want to get more space on iPhone, you can check this post.
Conclusion
We hope that your problems were resolved with our guides above. Firstly, you might understand that it is important to grasp a way to clear cache partition on Android. Plus, we shared two simple methods to achieve the task. You can pick up a proper method based on your situations and then get rid of various problems on your phone. However, we recommend you to make a backup for your device using Apeaksoft Android Data Backup & Restore before the process. It is the best way to avoid data loss when clearing cache partition on Android. Moreover, the backup tool is very easy to use and all you need to do is a single click. Now, you can enjoy your Android phone smoothly without any problems.