
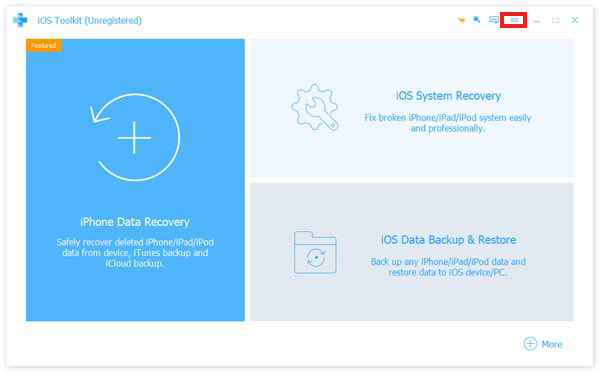
User Guide
- Introduction
- Install and Launch
- Set Output and Backup Path
- Recover from iOS Devices
- Recover from iTunes Backup
- Recover from iCloud Backup
- Different Recovering Solutions
- iOS System Recovery Guide
- iOS Data Backup & Restore Guide
- WhatsApp Transfer Guide
Try It Now!
Introduction
Welcome to the guide page of Apeaksoft iPhone Data Recovery.
Following the details in this page, you can recover deleted or lost iOS files including photos, messages, contacts, notes, call history, videos, calendar, videos, etc. and the chatting records, even an emoticon you sent, in APPs including WhatsApp, Facebook and Kik, etc. on your devices.
As the leader in iOS data recovering, Apeaksoft iPhone Data Recovery can help you select the wanted time-point backup and download it in iTunes or iCloud to recover data you have backed up. Furthermore, it is also OK for you to flexibly select the data to recover, or to recover all data in one click.
Install and Launch
Install
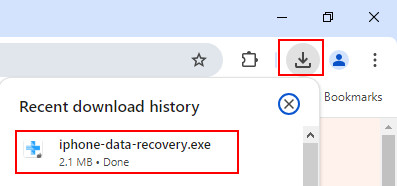
Step 1. Go to its official website or click the button below to download it. Then go to the top-right corner to click the download button to find the file just downloaded. Click it.
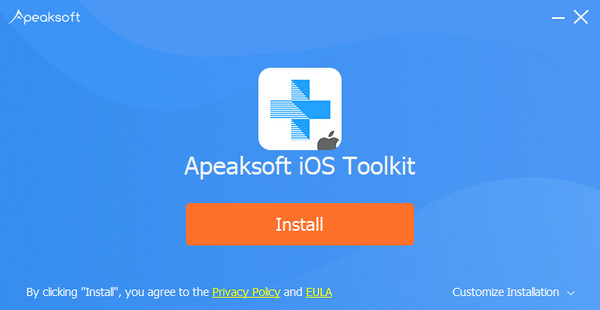
Step 2. Choose Yes to allow the installation and press the Install button. You can run it after several seconds.
Register
When you first launch this software, the register window will pop up for you. Input your e-mail address and the registration code.
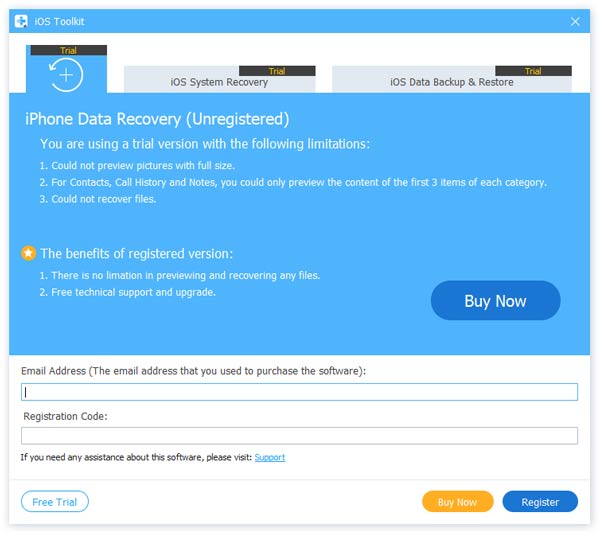
And you also can click the key button on the top right corner of the interface to open the register window.
It is the same to click menu button to find Register option.
Note: After you purchased it successfully, the registration code will be sent to your email address that you filled in the order form.
Email Address: The email address that you fill in the order form.
Registration Code: A string of characters marked as Activation key, license code or KEYCODE(S) in the order confirmation letter you received after the successful purchase.
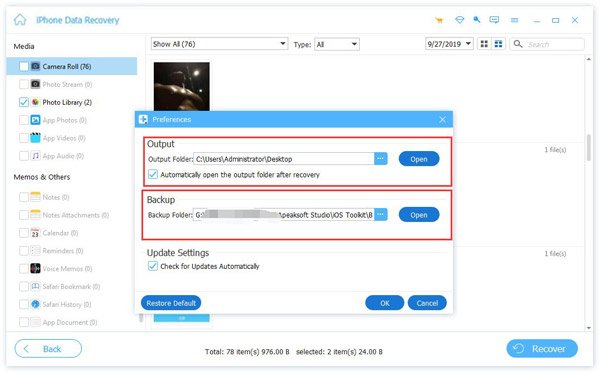
Set Output and Backup Path
Before you recover your data, you would need to set the save path for your recovered data and the backup.
Click Preferences in the menu list.
You will see the preferences window. In this window, you can set the path the output path and the backup path.
Recover from iOS Devices
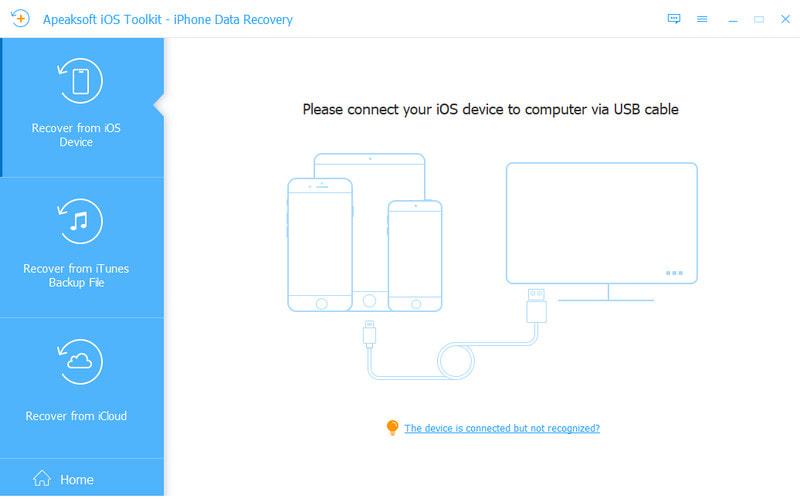
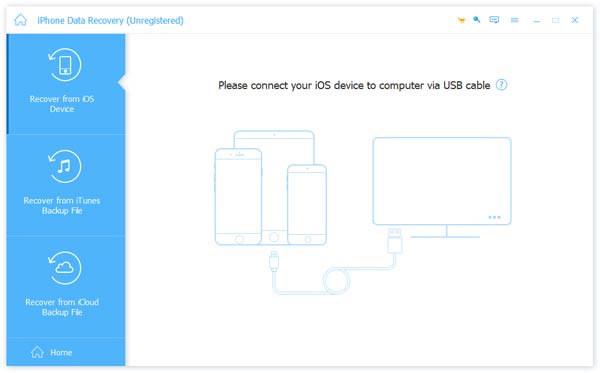
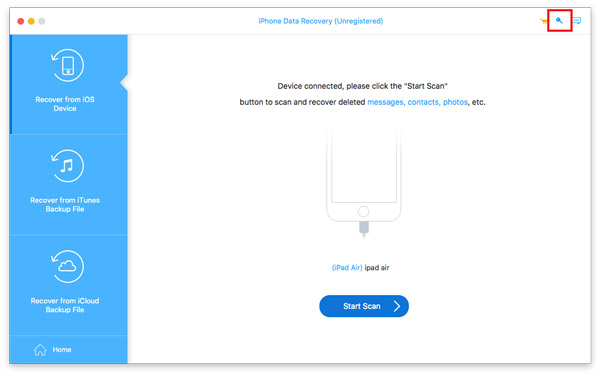
Step 1. Connect Devices
Double click the software button to open the program and choose the iPhone Data Recovery part. You need to connect your iOS devices via USB.
Step 2. Scan Data
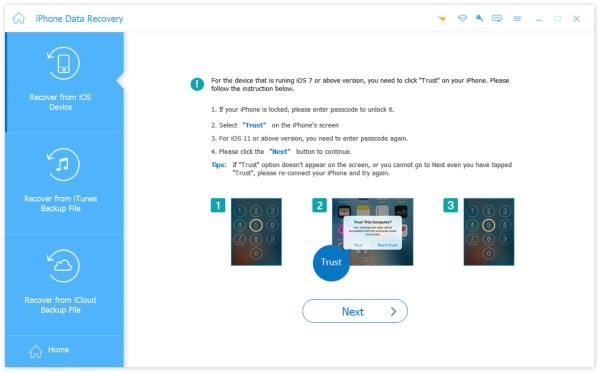
It will remind you to unlock the device and ask you whether trust the computer or not. Here you need to tick Trust. Then click Next button. If your device is iPhone 4/3GS, iPad 1 or iPod touch 4, you will need to download a plug-in and enter the scanning mode following steps on the interface.
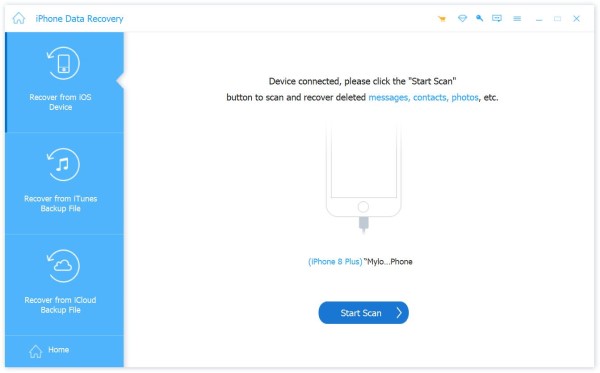
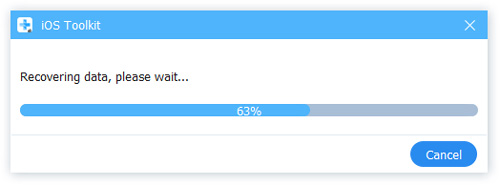
Then click the Start Scan button and it will scan all your data on your iPhone.
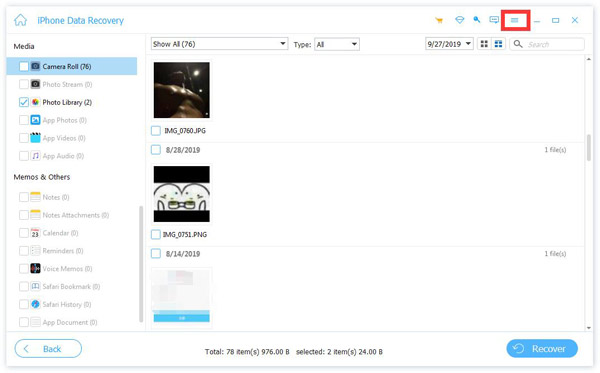
Step 3. Recover Data
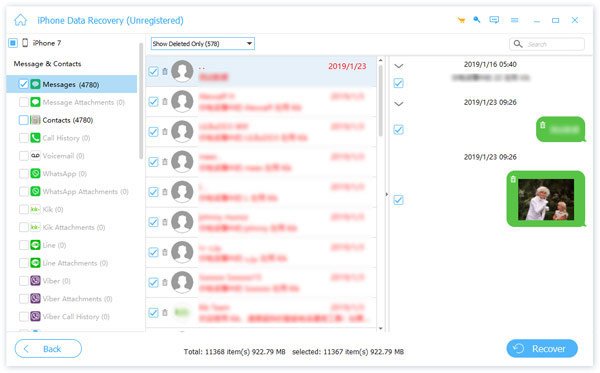
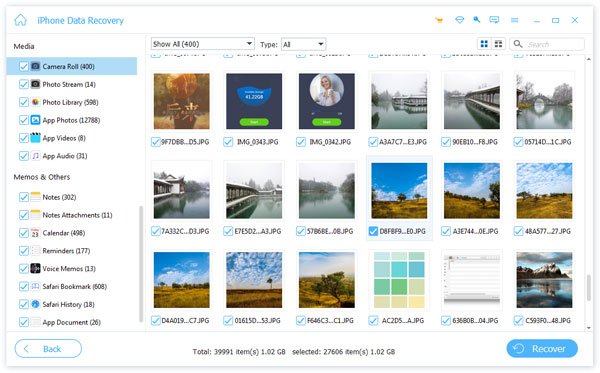
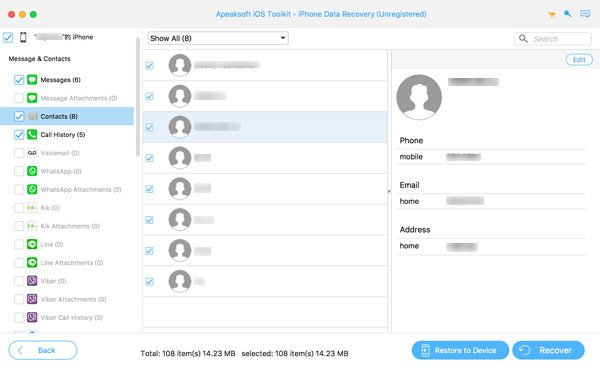
As you see in the following picture, it will show you the scanned data on your device in the left bar. Whatever you have or don’t have, there are all types of data it can be recovered in this bar.
On the top, you can select the shown result – Show all or Show Deleted Only. You also can preview these data on the right bar, like contacts information.
Select the data you want to recover.
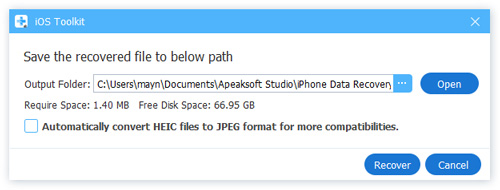
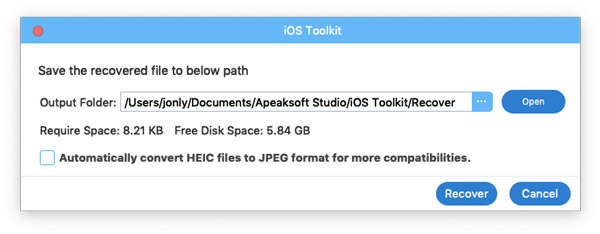
After you have decided the data you want to recover, click Recover button on the right down corner to start. Then it will pop up a window as the next picture. It will save the target data on your PC. The only thing you need to do in the last is setting the save path for your data to save them as backup.
In a few seconds, it will be done.
And if you need to transfer the recovered data to your iPhone or other iDevice from PC, you may need iPhone Transfer to do it. Click here to find the best solution.
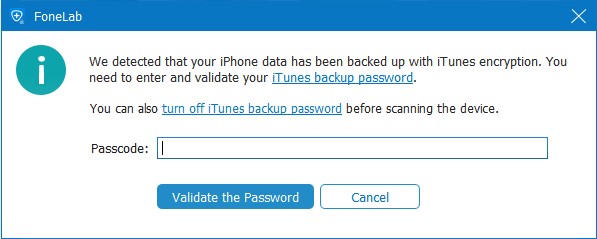
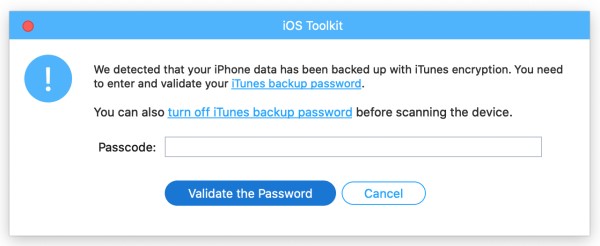
Note: If you have iTunes password for backup files, the software will pop up a window for you to enter the iTunes password. You need to enter the password so that the program can continue to scan your data.
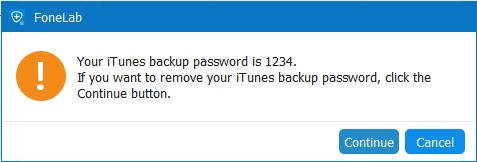
If you don’t have the iTunes password, this software will set a simple password for you.
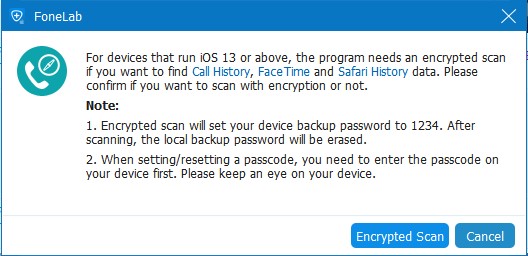
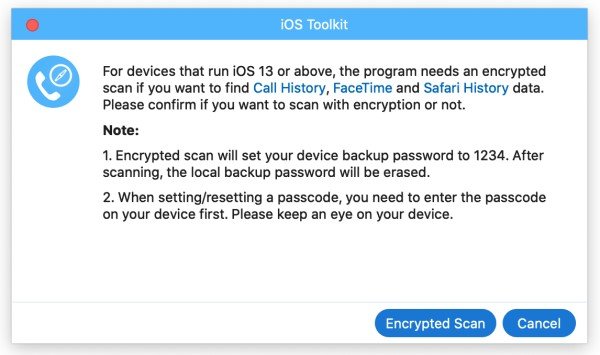
For iOS 13 or above users, you need to confirm if you want to scan Call History, FaceTime and Safari History data with encryption or not. If you want, please click Encrypted Scan. If not, click Cancel and you won’t see Call History, FaceTime and Safari History data in scanned results.
Recover from iTunes Backup
To pay attention, when you want to recover data in iTunes backup, you should make sure that there is iTunes app in your PC. So that you can use it to scan the backup.
Step 1: Download iTunes backup
Run the program and connect iOS device. Enter iPhone Data Recovery and select the second part in the left bar.
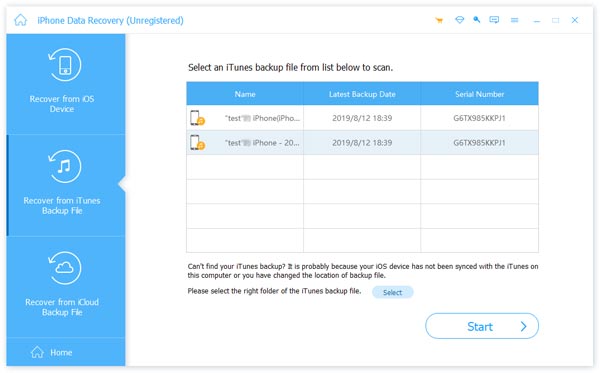
In the chart on the right, you can see each backup name and the time of it.
Compared that iTunes only can save the latest backup, Apeaksoft iPhone Data Recovery can show you every backup in different time points you made.
Select the target one and click Start.
Then this software will scan the iTunes backup quickly for you.
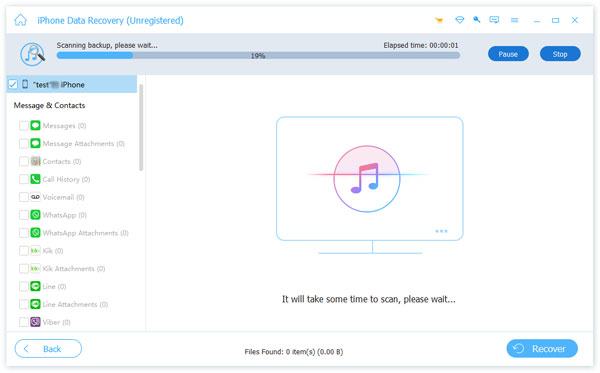
Step 2: Choose the Data
After scanning, it will show you all data in the backup which you made on iTunes. Select the data you want to recover.
Step 3: Recover Data
Then click Recover button on the right down corner to begin recovering. Before that, there is a pop-up window as the next picture. It will save the target data on your PC according to the path you set.
Click Recover button after you make sure the save path. And In a few seconds, it will be done.
Recover from iCloud Backup
Before you want to recover data from iCloud backup, you should check the backup. Although you have the iCloud account, it does not mean you have backup on iCloud. So, please check out the backup first.
Step 1: Log in to your iCloud
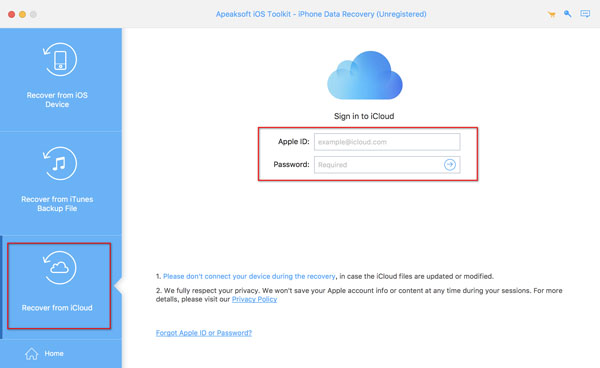
Launch the program and connect the iOS device. Enter iPhone Data Recovery and select the third part – Recover from iCloud in the left bar.
Input your Apple ID and the password.
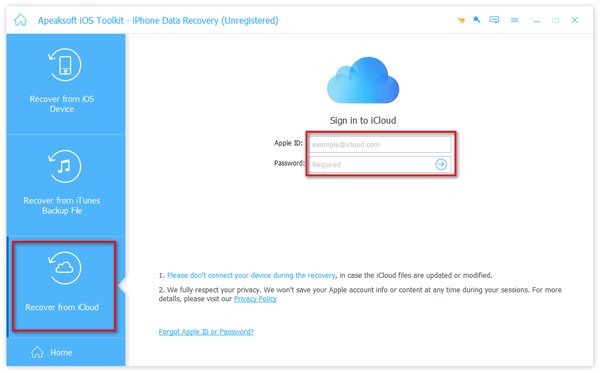
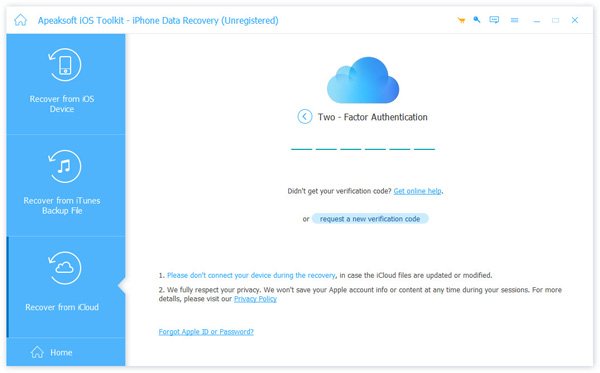
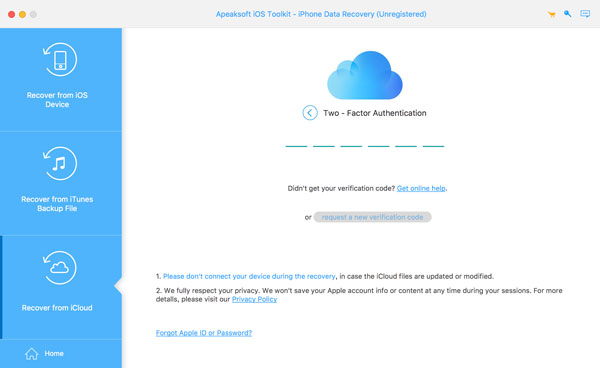
Note: If you have enabled two-factor authentication, you should tap Trust button on iPhone, and then Apple will send you the verification code to your iPhone. Enter the received verification code in this software.
Step 2: Select Data to Recover
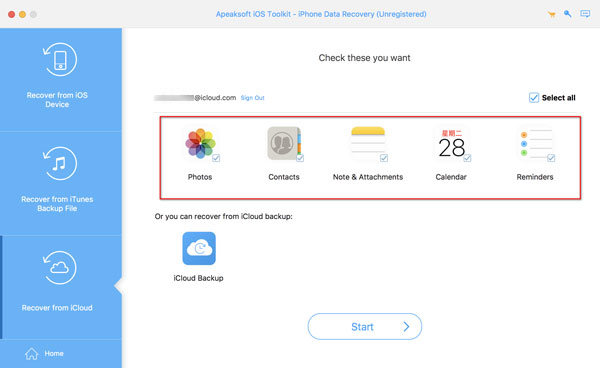
You can select the data type you want to recover from iCloud like Contacts, Notes, Reminders, Photos, etc. After that, click Start button to scan iCloud data.
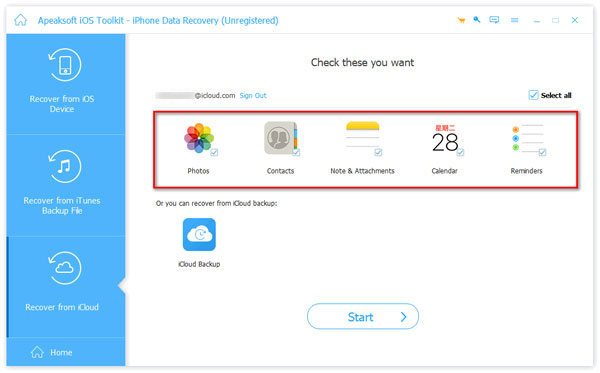
In a few seconds, you can see the data the program downloaded for you. Tap the data you want to restore and click Recover on the right bottom corner.
And as it shows on the next picture, there is a button named Restore to Device. It is only shown when you choose the contacts to restore.
By clicking this button, you can restore your contacts to your iDevice directly.

Then it will pop up a window to record the save path you set. It will save the target data on your PC according to this path.
Different Recovering Solutions
For your different recovering needs, we just list some specific solutions below. Click the one you need to check it. Hope it is useful for you!
Messages
Photos
Contacts
Music and Videos
Apps
Feeling Confused? A Video Makes It Easy!
User Guide
- Introduction
- Install and Launch
- Recover from iOS Devices
- Recover from iTunes Backup
- Recover from iCloud Backup
- Different Recovering Solutions
- iOS System Recovery Guide
- iOS Data Backup & Restore Guide
- WhatsApp Transfer Guide
Try It Now!
Introduction
Welcome to the using guide page of Apeaksoft iPhone Data Recovery for Mac.
Following the details in this page, you can recover deleted or lost iOS files including photos, messages, contacts, notes, call history, videos, calendar, videos, etc. and the chatting records, even an emoticon you sent, in APPs including WhatsApp, Facebook and Kik, etc.
With high recovering rate, Apeaksoft iPhone Data Recovery for Mac can help you select the wanted time-point backup and download it in iTunes or iCloud to recover data you have backed up. Furthermore, it is also OK for you to flexibly select the data to recover, or to recover all data in one click.
Install and Launch
Install
Step 1. Before you install the iPhone Data Recovery for Mac, here is the download link to download it to your Mac:
Step 2. Double click the downloaded file. Then it will install Apeaksoft iPhone Data Recovery for Mac automatically for you.
Register
When you first launch this software on Mac, the register window will pop up for you. Input your e-mail address and the registration code.
And you also can click the key button on the top right corner of the interface to open the register window.
It is the same to click menu button to find Register option.
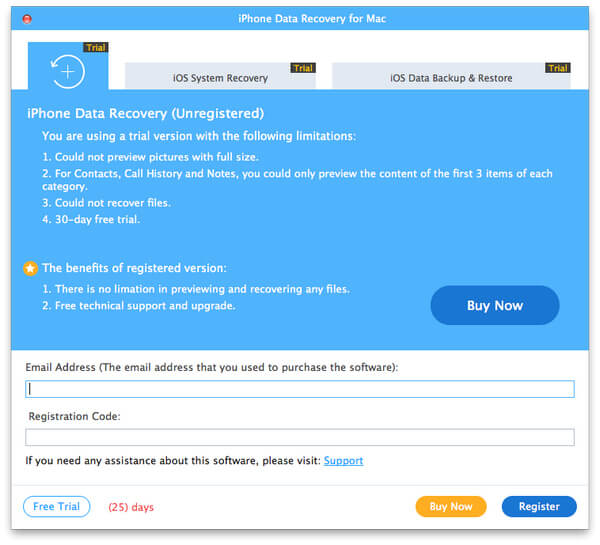
Note: After you purchased it successfully, the registration code will be sent to your email address that you filled in the order form.
Email Address: The email address that you fill in the order form.
Registration Code: A string of characters marked as Activation key, license code or KEYCODE(S) in the order confirmation letter you received after the successful purchase.
Recover from iOS Devices
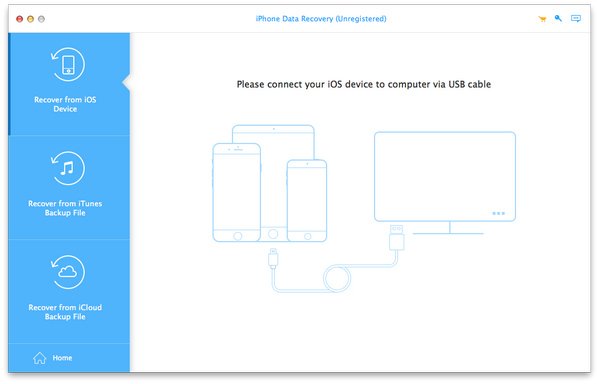
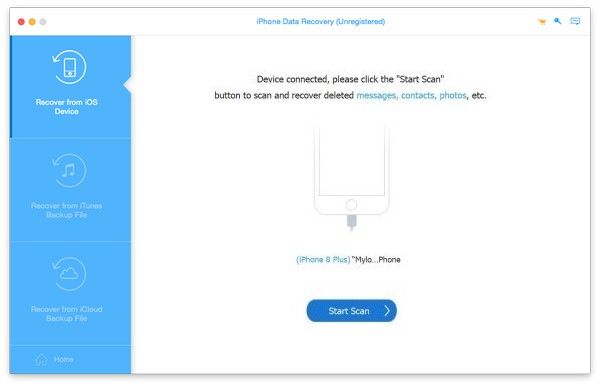
Step 1. Connect Devices
Double click the software button to run the program and select the iPhone Data Recovery part. Meanwhile, you need to connect your iOS devices via USB.
Do not forget to unlock your iOS devices, and hit Trust and input the screen password again to confirm the trust.
Step 2. Select Data
Click Start Scan, and this software will automatically scan your device and show the result to you in a few seconds.
Step 3. Recover Data
When the scanning process is done, look at the following picture. There is the scanned data on your device in the left bar. Whatever you have or don’t have, there are all types of data it can be recovered in this bar.
On the top, you can select the shown result – Show all or Show Deleted Only. You also can preview these data on the right bar, like contacts information.

After you have decided the data you want to recover, click Recover button on the right down corner to start. Then it will pop up a window as the next picture. Input the save path, and it will save the target data on your Mac by the path. It will be done In a few seconds,
And if you need to transfer the recovered data to your iPhone or other iDevice from Mac, you may need iPhone Transfer for Mac to do it. Click here to find the best solution.
Note: If you have iTunes password for backup files, the software will pop up a window for you to enter the iTunes password. You need to enter the password so that the program can continue to scan your data.
For iOS 13 or above users, you need to confirm if you want to scan Call History, FaceTime and Safari History data with encryption or not. If you want, please click the Encrypted Scan button. If not, click the Cancel button and you won’t see Call History,
Recover from iTunes Backup
To pay attention, when you want to recover data in iTunes backup, you should make sure that there is iTunes app on your Mac. So that you can use it to scan the backup.
Step 1: Download iTunes backup
Run the program and connect iOS device. Enter iPhone Data Recovery and select the second part – Recover from iTunes Backup File in the left bar.
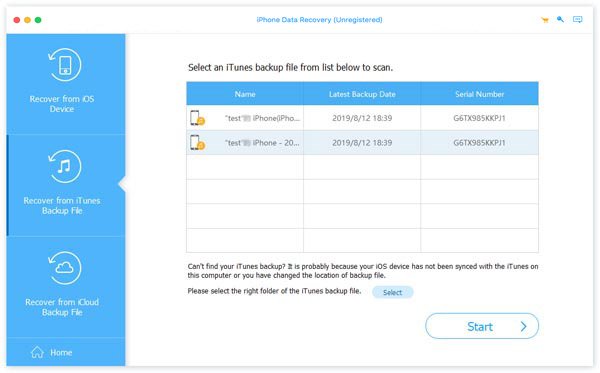
In the chart on the right, you can see each backup name and the time of it. This is why Apeaksoft iPhone Data Recovery is better than iTunes. It can show you every backup in different time points you made.
Select the target one and click Start.
Then it will scan the target iTunes backup quickly for you.

Step 2: Choose the Data
After scanning, it will show you all data in the backup which you made on iTunes. Select the data you want to recover.

Step 3: Recover Data
Then click Recover button on the right down corner to begin recovering. Before that, there is a pop-up window as the next picture. It will save the target data on your PC according to the path you set.
After setting the path, click Recover button after you make sure the save path. And In a few seconds, it will be done.
Recover from iCloud Backup
Before you want to recover data from iCloud backup, you should check the backup. Although you have the iCloud account, it does not mean you have iCloud backups. So, please check out the backup first.
Step 1: Log in to your iCloud
Launch the program and connect the iOS device. Enter iPhone Data Recovery and select the third part – Recover from iCloud in the left bar.
Input your Apple ID and the password.
Note: If you have enabled two-factor authentication, you should tap Trust button on iPhone, and then Apple will send you the verification code to your iPhone. Enter the received verification code in this software.
Step 2: Select Data to Recover
You can select the data type you want to recover from iCloud like Contacts, Notes, Reminders, Photos, etc. After that, click Start button to scan iCloud data.
In a few seconds, you can see the data the program downloaded for you. Tap the data you want to restore and click Recover on the right bottom corner.
And as it shows on the next picture, there is a button named Restore to Device. It is only shown when you choose the contacts to restore.
By clicking this button, you can restore your contacts to your iDevice directly.
Then it will pop up a window to record the save path you set. It will save the target data on your Mac according to this path.
Different Recovering Solutions
For your different recovering needs, we just list some specific solutions below. Click the one you need to check it. Hope it is useful for you!
Messages
Photos
Contacts
Music and Videos
Apps
