
Normally, mobile phone photography is relatively familiar to you, and in real life, you must has more or less experienced the loss of iPhone or iPad data loss, and some such kind of things. Therefore, often for security purposes or other reasons, you need to backup them. iTunes is powerful software that can safely store your photos and keep up-to-date on your various devices. So backup photos using iTunes is a good choice for you and you can be more convenient to access the content you want. But, what should you do to backup photos with iTunes? This article will offer the best way to backup photos using iTunes.
- Part 1. How to backup photos using iTunes
- Part 2. How to view photos from iTunes backup
- Part 3. A best way to backup iPhone photos to computer
Part 1: How to backup photos using iTunes
In order to backup photos with iTunes, here's what you need to do. Just follow the steps below to help you backup your photos with iTunes.
Step 1. Download and install iTunes on your PC
Download the latest version of the iTunes application from the App store and then install it on your computer. As long as it is iSO system, you can just run iTunes to help you backup your photos.
Step 2. Open and log in iTunes
And then, open iTunes and log in. A message will ask you to register and trust the computer if you are using it for the first time, and just follow the steps on the screen.
Step 3. Link your device to your computer
Connect your device to your computer with a USB cable, after that it will automatically recognize the device connected to the computer.
Step 4. Backup photos with iTunes
After successful connection, click the "Back up Now" button in the "Manual Backup and Restore" column in the "summary" interface, so that you can back up the photos data in iTunes.
Then you will find you have backed up all data on iPhone to computer with iTunes. Do not want to backup all data, but only photos, just learn here to backup iPhone photos to computer without iTunes.
Part 2: How to view photos from iTunes backup
Naturally, after backing up the photos with iTunes, in some cases, you may need to view and restore these photos to your iPhone. iPhone Data Recovery is powerful, effective software that was designed for iPhone users for data backup and recovery from iTunes. This software only supports the Apple version of mobile phone data recovery, and it can be the greatest degree of scanning each of the residual records through intelligent analysis, remove garbled, so that with more quality recovery. Now, to view photos from iTunes backup, just follow the instruction step by step, you will finish it easily. By the way, the software will ask for an iTunes backup password if you have set it.
Step 1. Choose Recovery from iTunes backup files
Above all, you need to open the iPhone Data Recovery to find out the second recovery mode – Recover from iTunes Backup File. It is located in the second column of the left side of the interface.
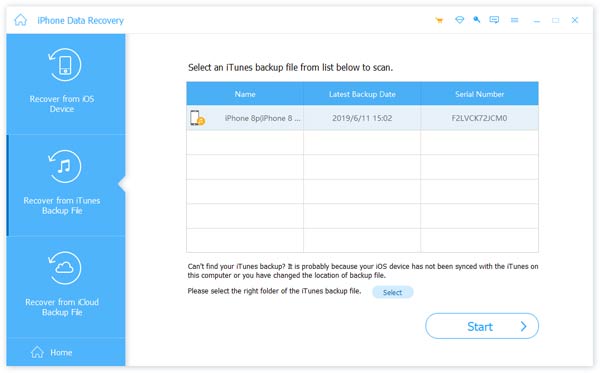
Step 2. Scan iTunes Backup photos
This application will automatically detect all of the iTunes backup photos that exist on your computer. Select your iPhone backup, and then click start scan. It should take only 2 minutes. And then all of the detailed information of backup photos will be shown on your PC: device name, backup date and serial number.
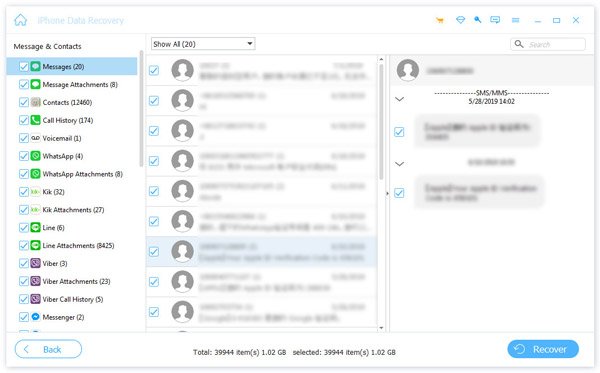
Step 3. View all photos from iTunes backup
After scanning, all iTunes backup photos will be displayed. You can view all the photos, including deleted photos in iTunes. What is more, you can also retrieve or backup the photos from iTunes backup to your computer.
Part 3: Best way to backup iPhone photos to computer
Regarding the best software to backup iPhone photos to computer. iOS Data Backup & Restore is the best choice. Compared to iTunes backup photos, iOS Data Backup & Restore is more convenient program to keep all the important photos data on iOS devices, for which the reason is that iOS Data Backup & Restore can only backup photos whereas iTunes must backup photos and other all files from your iPhone simultaneously. Next we will perform the steps of Backing up photos.
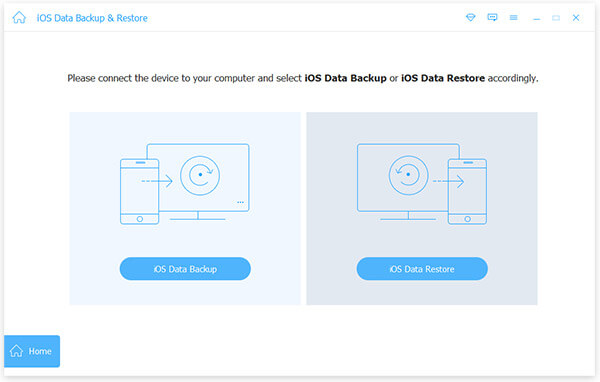
Step 1. Choose iOS Data Backup option
To begin with, you need to open the iOS Backup & Restore. And then click the "iOS Data Backup" button which on the left column of the interface.
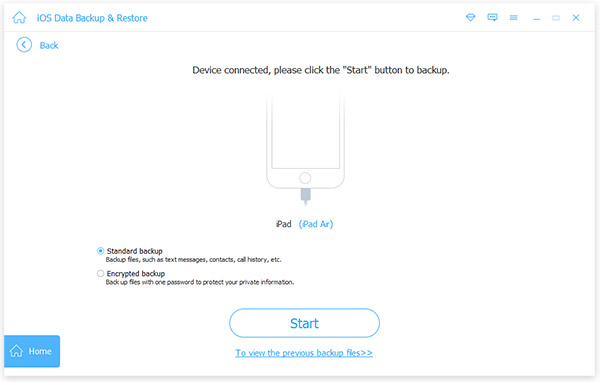
Step 2. Connect iPhone to the Computer
Then, link your iPhone to your personal computer with a USB cable. Under normal circumstances, iOS Date Backup & Restore will automatically detect your iPhone soon. And when your iPhone connection is successful, just click "Start" button.
Step 3. Choose photos to Backup from iPhone
Next, click on "photo" button under Media Options from the interface then click "App photos" on the interface.
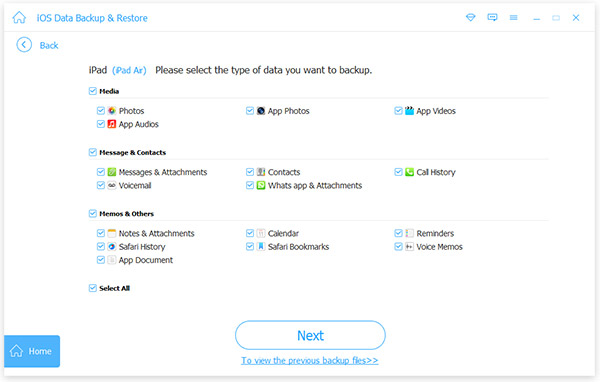
Step 4. Back up photos to your PC
Finally, click "Next". And there will be an interface where you can select the photos to save the location. The whole backup process will take a few minutes.
After the backup is completed, you can check all of the backup photos, and you can also choose one or more photos to print or export it to the computer.
Conclusion:
The way of backing up photos and recovering photos above is the best method we suggested. If you can download and launch iTunes, it is the most efficient way to backup photos using iTunes. What's more, although our iOS device can now use iCloud backup, but on the computer more than a backup is still very useful. And through iTunes, you can achieve computer pictures and iPhone photos between the synchronization, to further achieve the picture in the computer and mobile phone before the transfer, backup, recovery and other purposes. All in all, hope this article can help you to backup photos with iTunes when you need it.