10 Best Desktop Screen Recorders for Different Cases
A desktop screen recorder is a useful tool to capture everything on your desktop, such as online videos, gameplay, software operation, video conferences, presentations, and more. It is widely used for making e-learning, software guidance, vlogs, and so on. Having a proper tool can make things accomplished more easily with less effort. Therefore, we share the top 10 list according to our lab test, hundreds of users’ reports, and experts’ suggestions.
PAGE CONTENT:
- Part 1. Top Desktop Screen Recorder Overall
- Part 2. Top Free Desktop Screen Recorder: OBS
- Part 3. Best Desktop Screen Recorder on Mac: ScreenFlow
- Part 4. Best Basic Screen Recorder: Icecream Screen Recorder
- Part 5. Top Desktop Screen Recorder in Browser: Screencastify
- Part 6. Top Desktop Screen Recorder for Games: Bandicam
- Part 7. Best Desktop Screen Recorder Online: Apeaksoft Free Screen Recorder
- Part 8. Best Free Desktop Screen Recorder for Beginners: ShareX
- Part 9. How to Record Screen on Windows 10
- Part 10. How to Record Screen on Mac
Part 1. Top Desktop Screen Recorder Overall
What does the best desktop screen recording software look like? It should be available to both beginners and advanced users. It should be easy to use so that beginners can learn it quickly. Moreover, it should integrate everything you need for screen recording so that advanced users can produce the desired results. Apeaksoft Screen Recorder is just the right one.
Secure Download
Secure Download
- Record desktop screen with a single click.
- Capture audio, voice, and webcam while recording the screen.
- Optimize video quality of screen recordings with AI.
- Offer multiple modes and custom options.
- Preview screen recordings with a built-in media player.
- The output file may be large if you record the screen for hours.
How to Record Screen on Your Desktop
Step 1. Install Screen Recorder
Launch the best desktop screen recorder after installing it on your PC. There is another version for Mac. Pull down the option at the top left corner, and choose a proper mode, such as Screen Recorder.
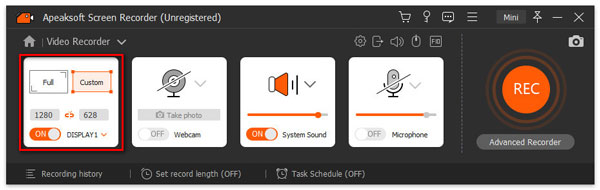
Step 2. Record screen
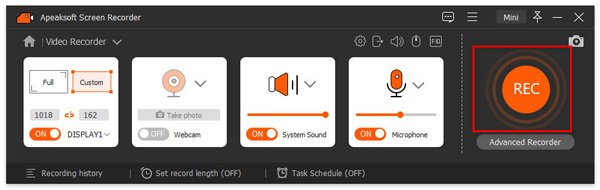
Turn on the Display option and set the recording area, like Full screen or Custom area. Toggle on System Sound and adjust the volume to record the screen with audio. To add your reactions and voice to the screen recording, enable Webcam and Microphone. Otherwise, keep them disabled. Click the REC button to initiate screen recording.
Step 3. Export screen recording
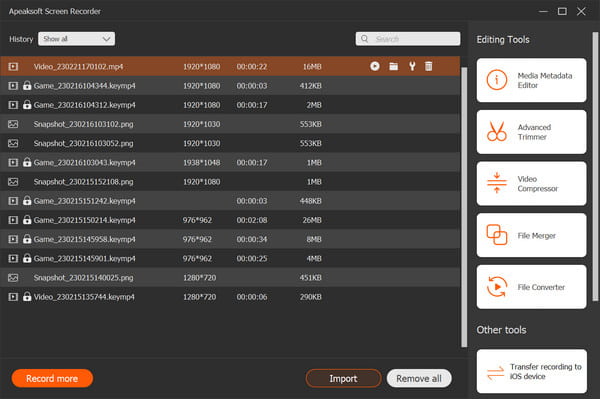
During screen recording, you can paint it by hitting to Toolbox button or take screenshots by clicking the Camera button. When you intend to stop it, click the Stop button. Then, preview the recording and remove unwanted parts with the Clip tool. Finally, click Export to save it.
Part 2. Top Free Desktop Screen Recorder: OBS

OBS screen recorder is the best free desktop screen recorder on Windows, macOS, and Linux since it is open source. Users can find lots of custom options for screen recording and live streaming. Many vloggers use OBS to create and stream visualization content.
- Completely free of charge and open source.
- Work on Windows, macOS, and Linux.
- Customize and use multiple scenes and sources.
- Live streaming to YouTube, Twitch, and Facebook.
- The interface and settings can be overwhelming for average people.
- It takes lots of sources when recording the screen.
How to Record Desktop Screen with Audio
Step 1. Open OBS when you need to screen record on a HP desktop or other brands.
Step 2. Click the + button on the Scenes pane and enter a name to add a new scene.

Step 3. Click the + button on the Sources pane and choose Display Capture. If you need to capture gameplay on your desktop, select Game Capture instead.

Step 4. Add a name and click OK. Set additional source options, like Capture Cursor. Click OK to confirm it.
Step 5. Then, adjust the recording area by dragging the borders.
Step 6. Click the Settings button to open the Settings dialog.

Step 7. Go to the Output tab, locate the Recording section, and set path, quality, and format.
Step 8. Hit OK to confirm the settings.

Step 9. Click the Start Recording button to begin screen recording on your desktop.
Part 3. Best Desktop Screen Recorder on Mac: ScreenFlow

ScreenFlow is the best screen recording software on Mac desktop with audio. It allows you to capture a Mac screen in real time and save it as a video file. Moreover, it comes with a full video editor with a timeline. It costs $169.99 for a lifetime.
- 1. Integrate a well-organized interface.
- 2. Record screen up to 2880 X 1800 resolution.
- 3. Publish recordings to Dropbox, Google Drive, or Facebook.
- 4. Offer customer support via phone, email, and remote access.
- 1. The free trial adds watermarks to your recordings.
- 2. The full version is expensive.
How to Record Screen on Mac with Audio
Step 1. Install the best desktop screen recorder on your Mac.
Step 2. Open ScreenFlow, go to the File menu, and choose New.
Step 3. Click New Recording on the sidebar.

Step 4. Click + to add a source and select your desktop.
Step 5. Hit + to add another source and select the internal or external microphone.
Tip: By default, macOS doesn’t allow users to record system sound. You can only record the sound through the built-in microphone.
Step 6. If you want to adjust the recording area, click the Area button with a rectangle icon.

Step 7. Finally, click the Record button to begin screen recording on macOS.
Part 4. Best Basic Screen Recorder: Icecream Screen Recorder

Icecream Screen Recorder is a simple desktop screen recorder on Windows and Mac for beginners. You can only find two options on the home interface for recording desktop and taking screenshots. The prices start at $29.95.
- 1. Equip an intuitive interface.
- 2. Record screen in videos and capture screenshots.
- 3. Convert recordings to GIFs.
- 4. Add logos and text on screen recordings.
- 1. When changing recording windows, the audio may lag.
- 2. It lacks advanced features.
How to Record Screen on Windows Desktop

Step 1. Open the desktop screen recorder after installing it.
Step 2. Click the Settings button to open the Settings window.
Step 3. Go to the Save to tab and set the destination.
Step 4. Switch to the Video tab and set format and other options.
Step 5. Enter the Audio tab and adjust the audio source.
Step 6. Click Save Settings.
Step 7. Next, press the Capture video button to begin recording your desktop.
Part 5. Top Desktop Screen Recorder in Browser: Screencastify

Screencastify is the best desktop screen recorder for browsers. Unlike other independent screen recorder software, it is an extension for major browsers. It provides a free version and two paid plans that cost $7 and $10 monthly.
- Pretty easy to use.
- Quickly set up as a browser extension.
- Integrate simple video editing tools.
- Record up to 10 minutes for free.
- Occasional issues with logging out unexpectedly.
- Video editing features could be more advanced.
How to Record Screen on Your Desktop Without Software

Step 1. Install the desktop screen recorder in your browser.
Step 2. Click the Screencastify button and log in with your account.
Step 3. Choose Desktop.
Step 4. Click the Settings button and set the basic custom options.
Step 5. Press Setup Microphone Access and set your audio source.
Step 6. Next, click the Record button to begin recording your screen on the desktop.
Part 6. Top Desktop Screen Recorder for Games: Bandicam

If you prefer to record gameplay on your desktop, Bandicam is the best desktop screen recorder on Windows. It is designed for gameplay recording. The prices are $36.95 per PC yearly and $49.95 for a lifetime.
- Include flexible recording options.
- Support scheduled recording.
- Capture gameplay up to 144 FPS.
- Compress the recording file size.
- It is only available for Windows.
- There is a watermark in the free version.
How to Record Screen on a Dell Desktop with Bandicam

Step 1. Install the desktop screen recorder on your PC and open it.
Step 2. Go to the Video tab and set the customs under Record.
Step 3. Adjust video quality and audio codec under Format.
Step 4. Choose the Home tab and select the recording area.
Step 5. Finally, click on the REC button to initiate recording the Dell desktop screen.
Part 7. Best Desktop Screen Recorder Online: Apeaksoft Free Screen Recorder

Apeaksoft Free Screen Recorder is the best desktop screen recorder online. It is completely free of charge. Moreover, it doesn’t require you to install anything on your desktop. It can meet your basic needs for desktop recording.
- Free to use.
- Record screen with audio.
- Capture webcam and microphone.
- Available to major browsers.
- Users need to download a launcher.
- There is no video editing tool.
How to Record Screen on Desktop Online
Step 1. Visit https://www.apeaksoft.com/free-online-screen-recorder/ in a browser.
Step 2. Click Start Recording and download the launcher.

Step 3. Then, set the recording sources, like display, system sound, webcam, and microphone.
Step 4. After setup, click the REC button to begin recording your screen.

Part 8. Best Free Desktop Screen Recorder for Beginners: ShareX

ShareX is an open-source and free desktop screen recorder on Windows. While the interface looks messy, it can meet your basic needs for desktop recording. Plus, it can capture scrolling web pages.
- Offer extensive capture options.
- Free and open source.
- Share screen recordings directly.
- Capture scrolling pages.
- It is exclusive to Windows. No ShareX for Mac.
- The interface can be overwhelming.
How to Record Screen on Windows Desktop for Free
Step 1. Run the free desktop screen recorder after installing it.

Step 2. Click Task settings on the sidebar, go to Capture, and set the options.
Step 3. Minimize the desktop screen recorder.
Step 4. Right-click the ShareX icon, choose Capture, and select Fullscreen or Region to set the recording area.

Step 5. Then, the screen recording will initiate.
Part 9. How to Record Screen on Windows 10
On Windows 11/10, the simplest way to record the screen on your desktop is Game Bar. It is the built-in screen recorder on PCs. The drawback is that the feature lacks bonus tools, such as video editing.

Step 1. Press the Win + G button on your keyboard to trigger Game Bar.
Step 2. When prompted, tick Yes, this is a game.
Step 3. Set the audio source and options on the Audio pane.
Step 4. Then, click the Record button to start recording what's on your desktop.
Part 10. How to Record Screen on Mac
QuickTime Player is the pre-installed media player on macOS. Plus, it comes with a screen recording feature. While it is simple, QuickTime Player is enough to record the screen on your Mac computer or laptop.

Step 1. Go to the File menu in QuickTime Player.
Step 2. Choose New Screen Recording to open the recorder window.
Step 3. Click the Arrow button, select a microphone, video quality, and more.
Step 4. Hit the Record button.
Step 5. Set the recording area, and screen recording will begin after the timer.
Conclusion
Now, you should learn at least the top 10 best desktop screen recorders for Windows, macOS, and Linux. You can pick an appropriate one based on your needs and our reviews. Apeaksoft Screen Recorder is a flexible option for beginners and tech-savvy users. Apeaksoft Free Screen Recorder enables you to record the screen without installation.
