How to Screen Record on Your Mac computers and laptops
Screen recording on Mac is indispensable if you need to make a visual guide of a specific application, create an e-learning, explain a software issue, and more. The good news is that macOS comes with features to complete the job quickly. Moreover, there are third-party tools for bonus and advanced screen recording features. This concrete tutorial explains the proven methods and demonstrates the workflow for each way on a Mac computer or laptop.
PAGE CONTENT:
Part 1. The Most Recommended Way to Record Screen on Mac
While the built-in screen recording features on Mac are a good starting point, they are too simple. Fortunately, Apeaksoft Screen Recorder can meet your needs. It packs everything you need to do a screen recording on Mac. Moreover, it comes with bonus features, like a screenshot editor. More importantly, it can produce super high-quality screen recordings.
One-stop Method to Record Screen on Mac Computers and Laptops
- Record screen on Mac with audio and/or your voice.
- Capture the entire screen or specific windows.
- Add captions, stickers, and paint while recording the Mac screen.
- Preview screen recordings with the built-in media player.
- Save Mac screen recordings in high-quality video files.
Secure Download
Secure Download

How to Record Screen on Mac with Audio
Step 1. Install Screen Recorder on Mac
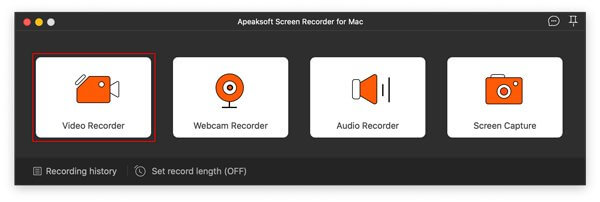
Launch the best screen recorder for Mac after you install it on your computer or laptop. There is another version for PCs. Choose the Video Recorder in the home interface. If you want to do a static screen recording on Mac, choose Screen Capture instead.
Step 2. Record screen on Mac
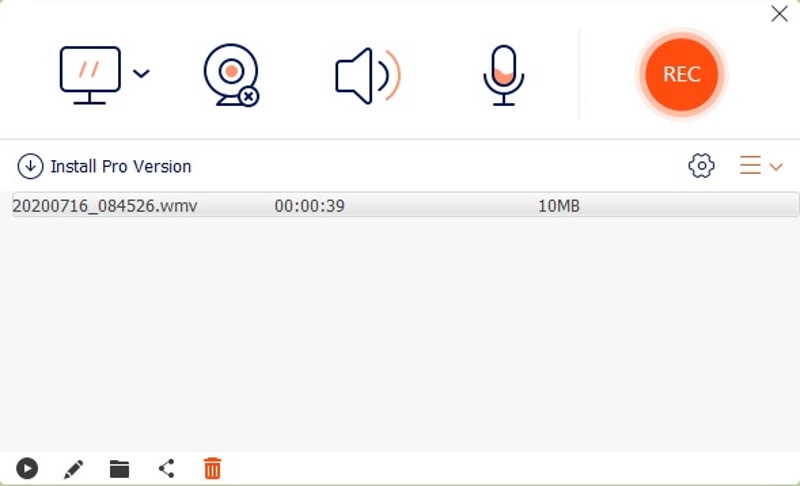
Turn on the Display option and set the recording area. To capture the whole screen, for example, choose Full. Otherwise, pick Custom and set it manually. Toggle on the System sound option and adjust the volume. It captures the sound from your computer. If you wish to add your face and reaction to the Mac screen recording, toggle on Camera and Microphone.
To get other custom options, click the Settings button to open the Preferences dialog. Once you are done setting up, click the REC button to begin recording your screen and audio on a Mac. During screen recording, you can take screenshots at important moments by hitting the Camera button on the toolbar. Plus, the paint and text tools allow you to add stickers, shapes, and text.

Step 3. Export screen recording
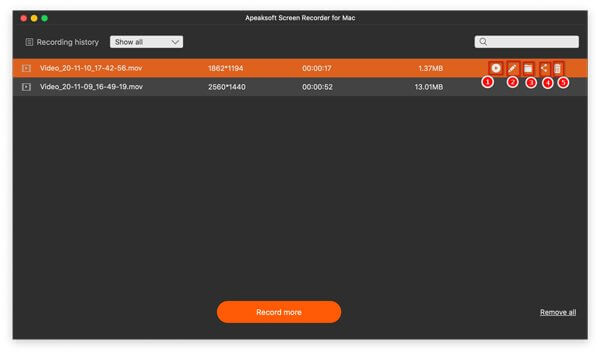
Click the Stop button when the screen recording is complete. Then, you can preview the result with the built-in media player. Furthermore, you can edit, share, or delete the recording on the Recording history window.
Part 2. How to Use Shortcut to Screen Record on Mac
Since macOS Mojave 10.14, Apple has added a Screenshot app. It allows you to record the Mac screen with a keyboard shortcut. Although it is a little simple, the Screenshot app is a good starting point. This app allows you to record the entire screen, a selected area, or a specific window on your screen. Moreover, it allows you to select the built-in or external microphone to capture audio while recording the Mac screen.
What We Like
1. Free to use.
2. Don’t require installation.
3. Record the entire screen, a specific area, or a window.
What We Dislike
1. It is only available on macOS Mojave 10.14 and later.
2. It lacks bonus options.

Step 1. Press the keyboard shortcut Command + Shift + 5 to bring up the Screenshot app.
Step 2. On the toolbar, you can get several options: Capture Entire Screen, Capture Selected Windows, Capture Selected Portion, Record Entire Screen, and Record Selected Portion.
Step 3. Choose one option according to your needs, like Record Entire Screen or Record Selected Portion.
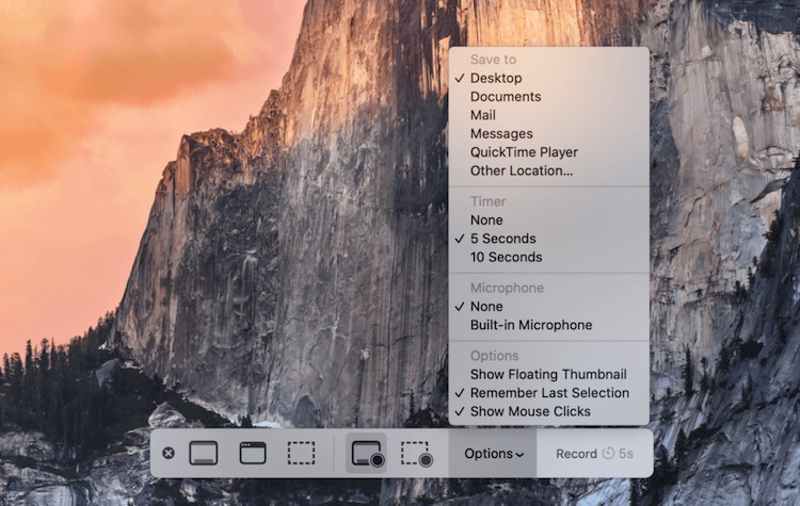
Step 4. Next, click the Options button to expand the context menu.
Step 5. Select the audio source under the Microphone section. If you don’t want to capture audio, choose None.
Step 6. Choose the destination under the Save to section.
Step 7. Plus, set the Timer and other options.
Step 8. Once you are ready, click the Record button to begin recording the screen on a Mac.
Step 9. To stop screen recording, click the Stop Recording button on the menu bar at the top of your screen. Alternatively, press Command + Control + Esc to stop the recording quickly.
Step 10. Once the screen recording is generated, a thumbnail will appear in the low right corner. Click the thumbnail to open the recording.
Step 11. Here, you can edit or delete it. By default, the recording will be automatically saved on your desktop.
Part 3. How to Screen Record on Mac with Built-in Screen Recording Tool
The built-in screen recording tool on Mac is QuickTime Player. It is the pre-installed media player on almost all Mac computers and laptops. Plus, it packs the screen recording feature. In fact, on macOS High Sierra or earlier, QuickTime is the only built-in way to record the Mac screen for free. Of course, it doesn’t come with advanced features. Since it can only capture audio through the internal or external microphone, the sound quality is not good.
What We Like
1. Pre-install on Mac.
2. Record screen on Mac for free.
3. Share screen recordings with other applications.
What We Dislike
1. It cannot record copyright-protected videos.
2. It cannot edit screen recordings.
3. QuickTime screen audio recording requires add-ons.
Step 1. Open the QuickTime Player app from the Applications folder. Or you can search for QuickTime from Spotlight and open it from the results.
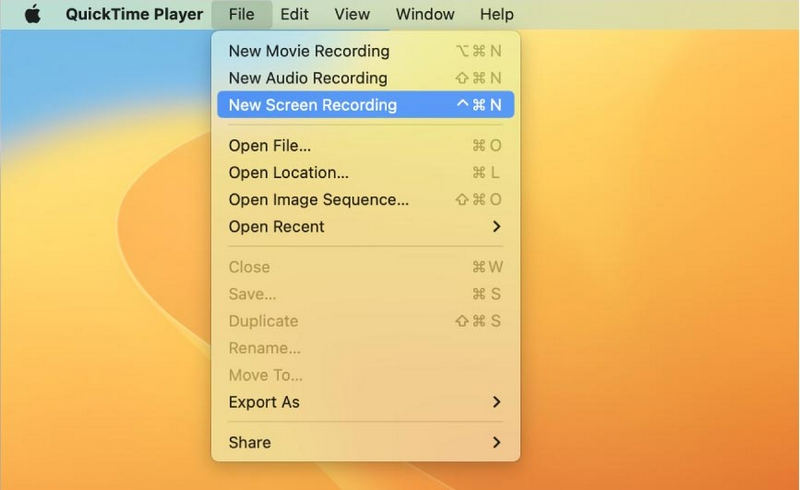
Step 2. Go to the File menu on the top menu bar and choose New Screen Recording. Alternatively, press Control + Command + N to access QuickTime’s Screen Recording window.
Step 3. If you want to record the Mac screen with audio, click the Downward Arrow next to the Record button. Then, select the audio source under the Microphone section, like Internal Microphone.
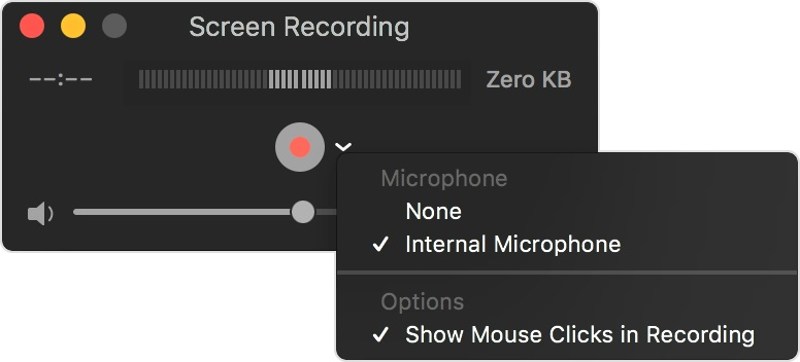
Step 4. Decide whether to show or hide mouse clicks during recording.
Step 5. As long as you are ready, click the Record button to start screen recording on Mac with QuickTime.
Step 6. Click anywhere on your screen to capture the entire screen. If you want to record a specific area, click and drag your cursor to cover the area.
Step 7. To stop the recording, press Command + Control + Esc, or click the Stop button at the top menu bar.
Step 8. The recording will open in QuickTime. Here you can play, edit, or share it directly.
Step 9. To save the recording, click the File menu, followed by Save. Or press the Command + S buttons together.
Note: QuickTime saves your screen recording in MOV format.
Part 4. How to Screen Record on Mac with OBS
OBS screen recorder is an open-source screen recorder for Mac. It is another option to record the screen on your Mac computer or laptop. Compared to the built-in tools, OBS offers more options. The downside is complicated for configuration. Here are the steps to record the screen on a Mac using OBS.
What We Like
1. Free of charge.
2. Provide a wide range of custom options.
3. Record and stream the Mac screen.
What We Dislike
1. It is complicated to set up.
2. Users need to install a virtual audio device to capture audio signals.
Step 1. Download OBS from https://obsproject.com/. It requires macOS 10.13 and above.
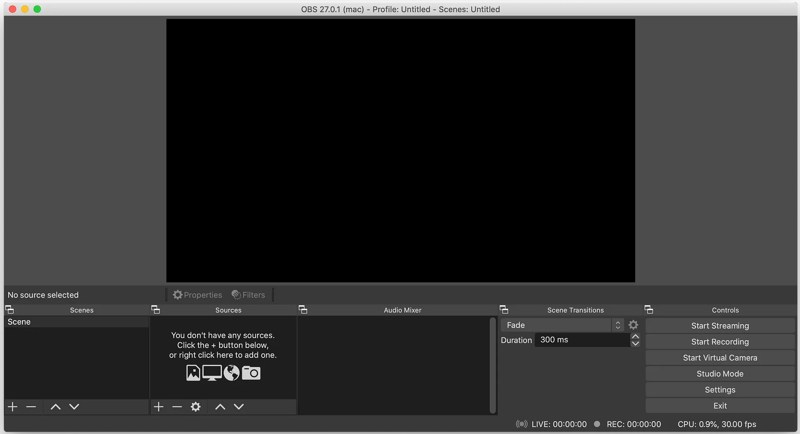
Step 2. Navigate to the Applications folder and open OBS.app.
Tips: By default, OBS is not able to record the screen on a Mac with audio from your machine.
If you wish to capture the screen and audio signal, you need to install a virtual audio device driver, like iShowU Audio Capture. Then, set up the virtual audio output device on your Mac.
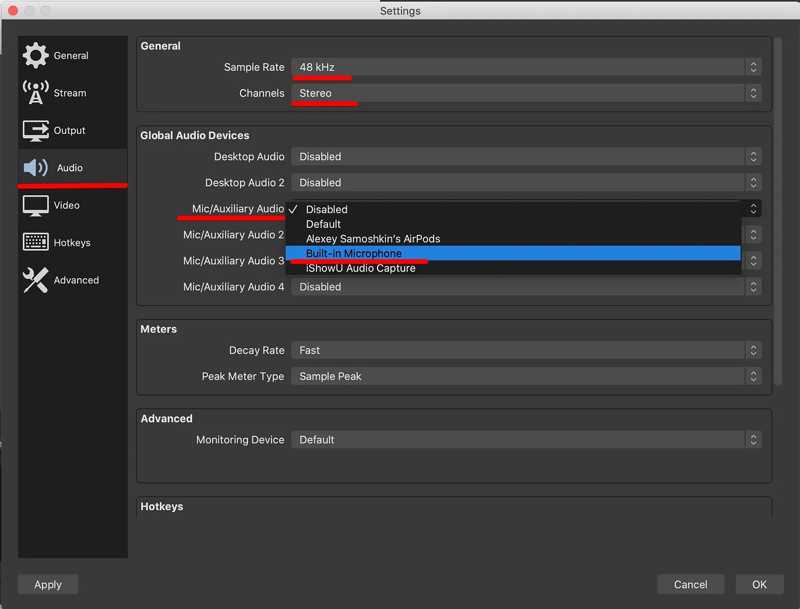
Step 3. Click the Settings button in OBS, go to the Audio tab on the sidebar, and choose the audio device from the Mic/Auxiliary Audio option.
Step 4. Close the Settings dialog and go back to the main interface. Click + under the Sources pane, and add Audio Output Capture source.
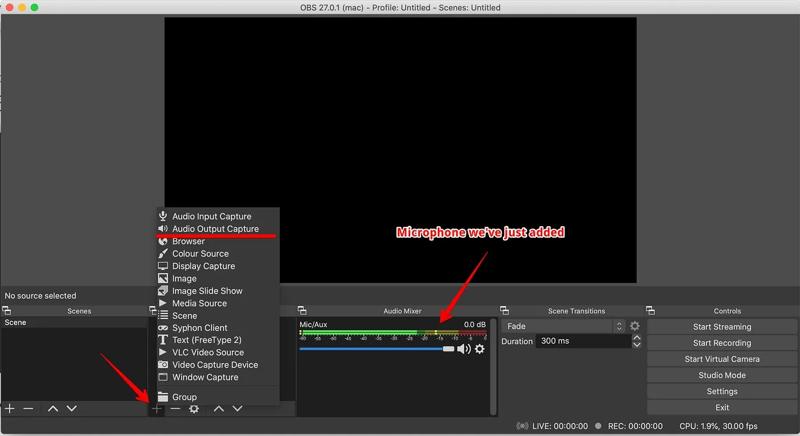
Step 5. On the pop-up dialog, pull down the Device option, choose the virtual audio device, and click OK to confirm it. Then, open an online video and check if OBS can detect the audio input and output signals.
Step 6. Next, click the Settings button to open the Settings dialog. Switch to the Video tab and configure the output resolution and FPS according to your condition.
Step 7. Go to the Output tab and configure recording quality, like format, path, quickly, encoder, etc.
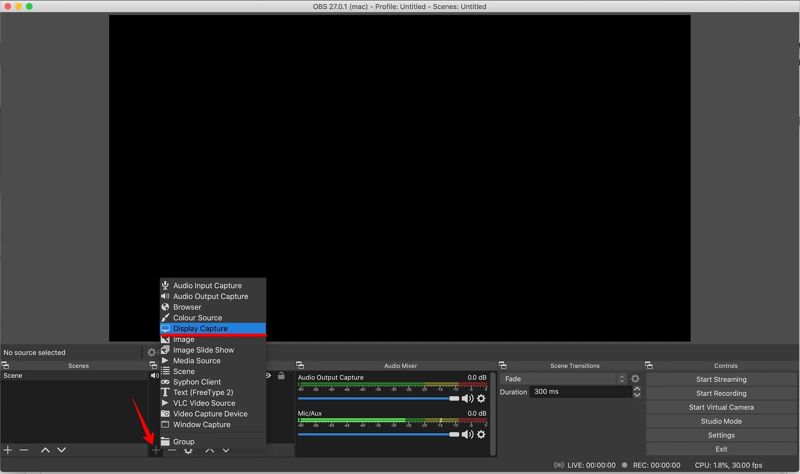
Step 8. Back to the main interface, click + on the Sources pane again and click Display Capture.
Step 9. Finally, click the Start Recording button to initiate screen recording on Mac using OBS.
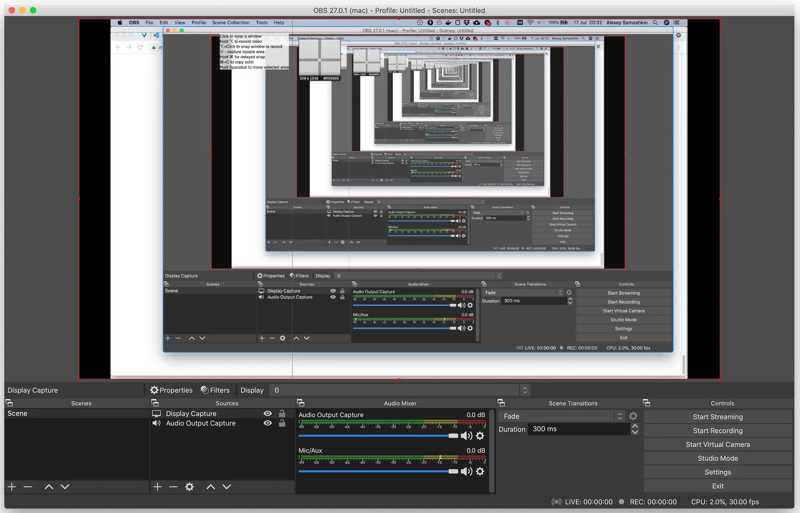
Step 10. When you want to stop screen recording, click the Stop Recording button on OBS. By default, OBS records the Mac screen in MKV. You can convert it from MKV to MP4.
Note: Remember that OBS requires lots of space when recording your screen. Moreover, the output file size is very large. If it keeps crashing on your MacBook, use other methods directly.
Part 5. How to Record Screen on Mac Using an Online Screen Recorder
Another option to record screen on Mac with audio is a web-based screen recorder tool, such as Apeaksoft Free Screen Recorder. It doesn’t ask you to install anything on your computer. It can meet your basic needs on screen recording with audio, such as supporting multiple input sources. Moreover, it is absolutely free to use. The drawback is the lack of advanced features and custom options.
What We Like
1. Don’t require installation.
2. Record screen on Mac for free.
3. No recording length limitation.
What We Dislike
1. It cannot edit screen recordings.
2. It requires a stable internet connection.
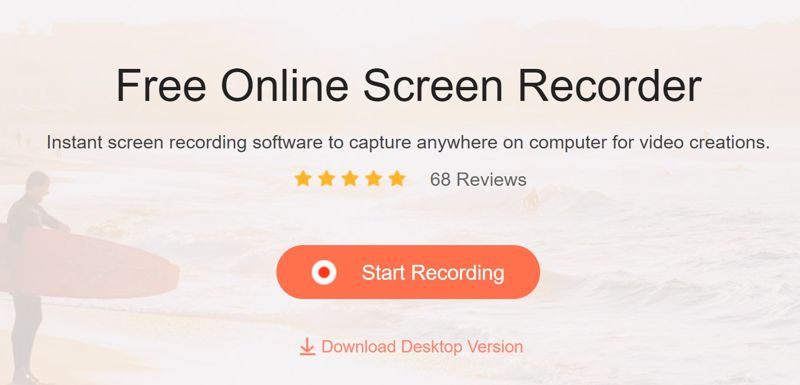
Step 1. Access https://www.apeaksoft.com/free-online-screen-recorder/ in a browser. Click the Start Recording button to download the launcher.
Step 2. Click the Display button and set the recording area. To add your face to the screen recording, click the Camera button and permit access.
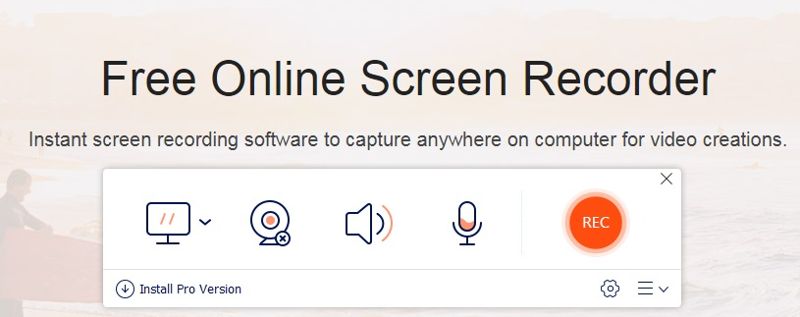
Step 3. Then, set the audio source, like System Sound and Microphone. Adjust the volume.
Tips: Click the Settings button if you want to access custom options, like output format, quality, output folder, and more. Click OK to confirm the settings.
Step 4. Click the REC button to begin recording the screen on your Mac.
Step 5. When it is done, click the Stop button to export the recording to the output folder.
Conclusion
This guide demonstrated five methods to screen record on a Mac. The built-in screen recording tools are able to capture the entire screen or a specific area. OBS for Mac offers a variety of custom options and bonus features. Apeaksoft Free Screen Recorder enables you to record the screen without installing any application. Apeaksoft Screen Recorder is the best option for average people..
