Recover Viber Photos With/Without Backups on Android/iPhone
Viber has already become one of the most popular social networks. Many people use it to communicate with family, friends and other people using text messages, images, and more. If you lose or delete important Viber pictures due to deletion, deactivating and other factors, even Viber support team cannot restore them.
In this post, we will tell you the best methods to recover lost Viber photos from your smartphone. What you need to do is to read our guide carefully and follow it to get back your chat history and photos from iPhone or Android phone.

Part 1: Recover Viber Pictures on Android
Recovering Viber pictures on Android is simple if you use the right tool based on your situation.
How to Restore Viber Photos on Android from Backup
It is truly that Viber users can email chat history and photos to your email manually and restore them at any time. Starting from version 6.1, the developer has introduced the backup feature into Viber app for Android and iOS. It allows you to restore Viber photos to any devices with the same phone number.
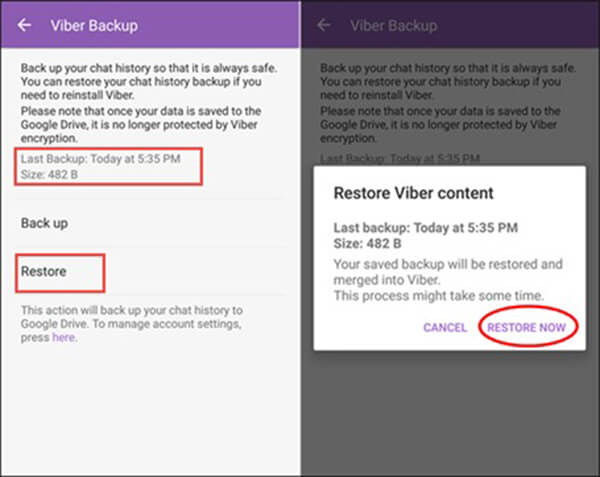
Step 1: Make sure that you have a Viber backup available. It can be set up in Settings -> Viber Backup -> Back up in Viber app.
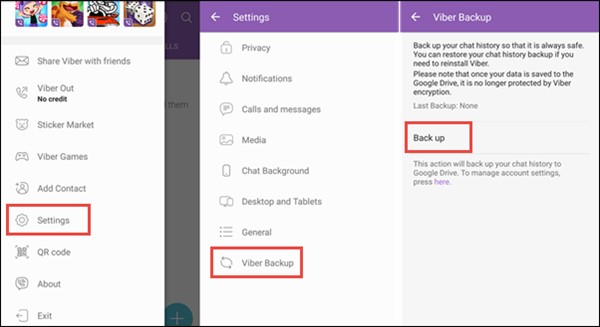
Step 2: When you need to recover Viber photos, open your Viber app, go to the Viber Backup tab in Settings.
Step 3: Check the available backup and tap Restore. If prompted, tap Restore Now to get back your Viber photos.
Note: This way is available to Viber app on both Android and iPhone.
More often than not, you deleted important Viber photos without backup. In such cases, chances are that your photos are still on your internal storage. Apeaksoft Android Data Recovery is able to display all lost Viber conversation history including photos.
 Recommendation
- Recover Viber photos and chat history in various situations.
- Support a wide range of data types including app photos.
- Let you preview lost Viber pictures before recovery.
- Compatible with Android devices from LG, Google, Samsung, etc.
All in all, Android Data Recovery is the best way to recover Viber photos without backup.
How to Recover Viber Photos from Android
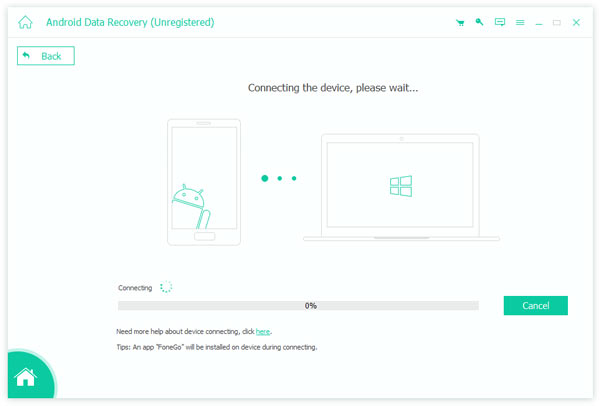
Step 1: Install the best Viber photo recovery tool
Download Android Data Recovery and install it on your PC. There is another version for Mac machines.
Connect your Android phone to your computer with a USB cable. Then your Android phone will show up on computer. (USB device cannot be recognized by computer?)
Then launch the Viber photo recovery tool and your device will be recognized. Follow the onscreen instructions to enable the USB Debugging mode on your Android device.
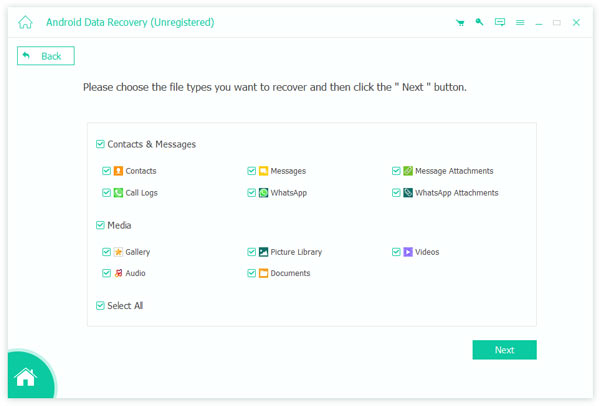
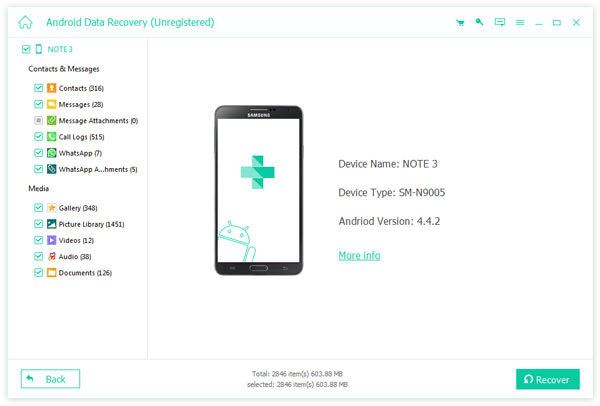
Step 2: Display lost Viber photos
Choose the desired data types on the data type window and click the Next button to look for lost Viber photos on Android. Then the preview window will appear. You can preview all lost Viber pictures with the thumbnails.
Step 3: Recover Viber photos from Android
Make sure to check all Viber photos you want to recover and click the Recover button at the bottom right side. Wait for a few seconds and then you can find the Viber photos on your hard drive.
Part 2: Recover Viber Pictures on iPhone
If you are using an iPhone, you are lucky since iCloud and iTunes are able to back up your data regularly. However, restoring data from backup has several downsides. Firstly, the only way to use iTunes or iCloud backup is to restore it to your iPhone. It means that existing data on iPhone will be overwritten. Moreover, the backup and restoring require a good Wi-Fi network. The process spends at least half an hour. That is why we recommend Apeaksoft iPhone Data Recovery.
Recommendation- Recover Viber pictures from iPhone without backup.
- Extract pictures from iCloud/iTunes backup simply.
- Not damage existing data on your iPhone during recovery.
- Available to all iPhone running iOS 27 Beta/26/18 and earlier.
In short, iPhone Data Recovery is the best option you can find on market to recover Viber pictures on iPhone.
How to Recover Viber Photos on iPhone
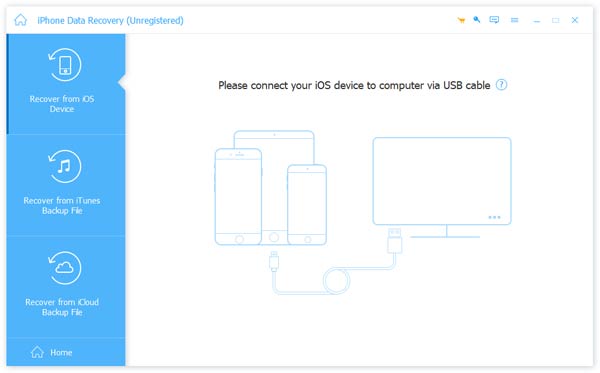
Step 1: Connect iPhone to Viber photo recovery
Run iPhone Data Recovery after you installed it on your computer from the official website.
Next, hook up your iPhone to your PC using a Lightning cable. We suggest you to use the cable came with your device. Then the application will detect your iPhone automatically.
Step 2: Preview lost Viber photos
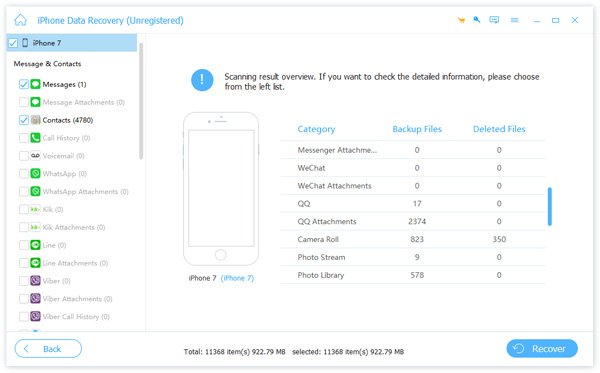
Select Recover from iOS Device tab and hit the Start Scan button to begin looking for deleted files on iPhone memory. Wait for it to finish and then you will be taken to the detail window. Select the desired data types on the left side and view all lost Viber photos in thumbnails.
Tip: If you have relevant iTunes or iCloud backup, select Recover from iTunes Backup File or Recover from iCloud Backup File tab, and then extract Viber photos from the backup. The current data on iPhone will not be interrupted.

Step 3: Retrieve Viber pictures from iPhone
After preview, check the boxes next to the Viber pictures that you wish to recover. Hit the Recover button at the bottom right side. On the popup window, enter a specific folder to store your Viber photos and click Recover again to trigger the process. According to our test, it only takes a few minutes to retrieve hundreds of pictures from iPhone.
Conclusion
As a popular social platform, Viber was designed for mobile devices. A recent survey indicated that Viber users are more likely to communicate using pictures and emojis. If you lose some photos due to various factors, you can recover Viber photos with the backup and restore feature. It is another story, if you do not setup the backup option. Apeaksoft Android Data Recovery and Apeaksoft iPhone Data Recovery allows you to get back Viber photos from smartphone without backup simply. If you have other questions related to Viber photo recovery, leave your messages below this post.