Google released Nexus phones continuously. Many people decide to root Android once they got their new Nexus phone. Maybe you have discovered that some popular rooting tools are not available to Google Nexus. We have tested most tools on market and in this tutorial we are going to share several Nexus root toolkits. They can help you to get rid of the root access restraints on Windows, Mac OS and Linux. If you are mobile first, don’t worry, you can find the best way to root Nexus 10/7/6/5/4 without a computer. All in all, we will tell you the efficient ways to root your phone quickly.

Clike here to read more: Root LG device.
- Part 1. How to Root Nexus 4/5/6/7/10 on PC/Mac
- Part 2. How to Root Nexus 6 with Nexus Root Toolkit
- Part 3. Best Method to Root Nexus 7 without computer
Part 1. How to Root Nexus 4/5/6/7/10 on PC/Mac
First of all, this way is available to Windows PC, Mac OS and Linux. And it requires:
1. Android SDK
2. ADB & Fastboot Drivers
3. And our step by step guide below
Step-by-step to root Nexus 4/5/6/7/10 on PC/Mac
Step 1: Visit developer.android.com and download the correct version of Android SDK based on your operating system.
To install it, run the exe file download and follow the instructions to finish it on Windows, and then open SDK Manager.
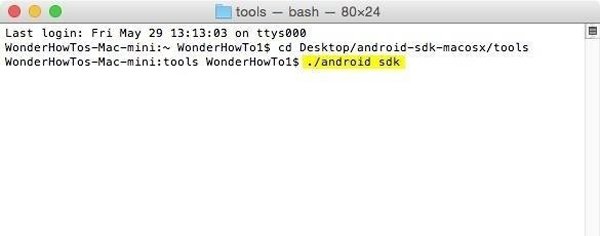
If you have a Mac or Linux, you have to extract the contents in the ZIP file to an accessible folder. Next, open a terminal window and change the directories to "/android-sdk-macosx/tools/” folder that you used to extract contents. Then execute "./android sdk" to run SDK Manager. Now, hit the "Install" button next to "Android SDK Platform-tools" to get tools package on your computer.
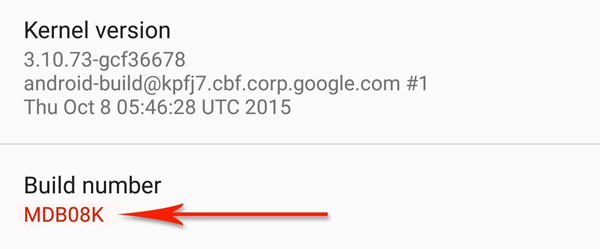
Step 2: Unlock your Nexus phone, go to "Settings" > "About phone" and write down the "Build number". Download and install the "ADB & Fastboot Drivers" on your computer. To root Nexus 5, for example, get corresponding "boot image", "TWRP recovery" and "SuperSU ZIP" files based on the build number.
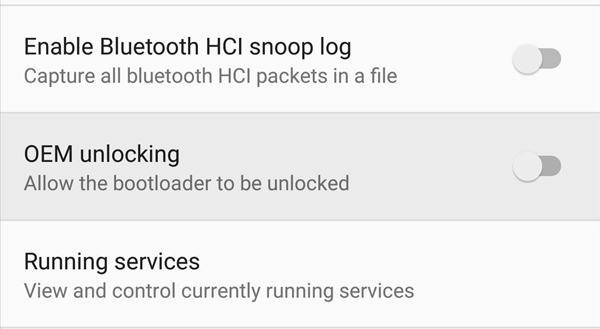
Step 3: Next, touch "Build number in Settings" > "About phone" for 7 times quickly to activate the Developer Options menu. Then toggle to enable "OEM unlocking" in Developer Options screen. Tap "Enable" when prompted to confirm it.
Step 4: Shut down your Nexus phone. After screen turns black, press and hold both "Volume Down" and "Power" buttons simultaneously until Android's bootloader menu pops up.Connect your phone to the computer via a USB cable.

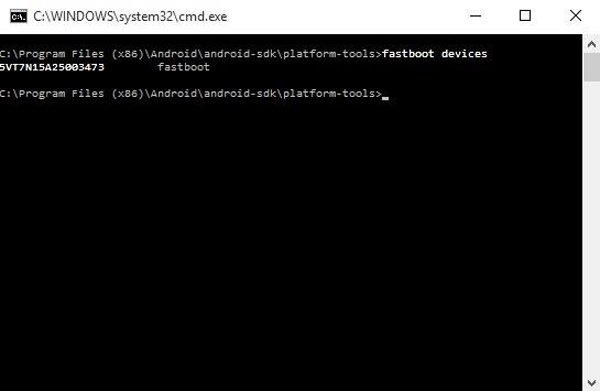
Step 5: Navigate to "/android-sdk/platform-tools/" folder and start a prompted command window, perform the commands below one by one:
"fastboot devices"
"fastboot flashing unlock."
Now, you should get a menu on your phone and ask if you want to unlock bootloader, select "Yes" and press "Power" button.
This will wipe all data on your phone when rooting Nexus 4/5/6/7/10.
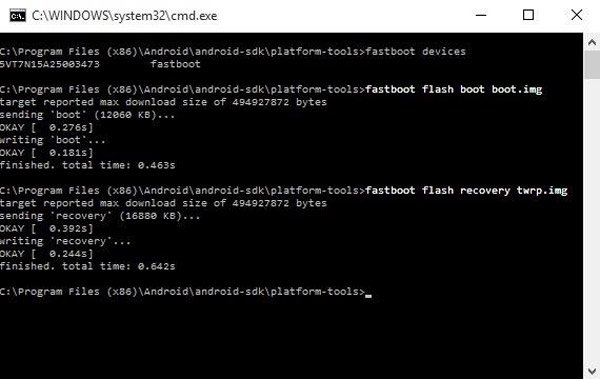
Step 6: Copy the boot image and TWRP recovery files to /android-sdk/platform-tools folder. Then execute the commands below successively in prompted command window:
"fastboot flash boot boot.img"
"fastboot flash recovery twrp.img"
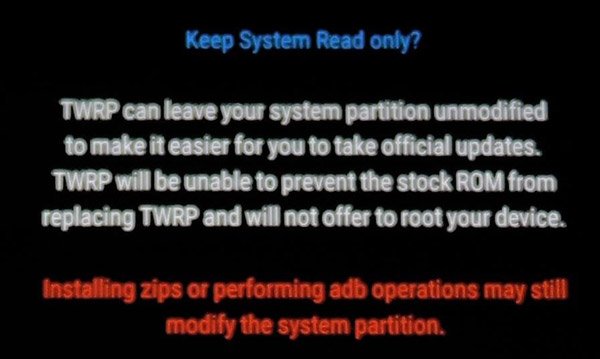
Step 7: Tap the "Volume Down" button to select Recovery mode on your phone screen and hit the "Power" button to boot into TWRP. When prompted if make TWRP permanent recovery, swipe the slider to modify it. When it is done, TWRP main menu will pop up, tap "Install" and then select "SuperSU-2.56.zip" in the file browser, and swipe the slider to confirm flash.
Step 8: Tap Reboot System, when prompted, hit Do not install. Then you can check the root status of your phone.
Reading more: Root with Root Genius.
Part 2. How to Root Nexus 6 with Nexus Root Toolkit
As you can see, the workflow of rooting Nexus 6 or other models is pretty complicated. Actually, there is an all-in-one solution, Nexus Root Toolkit. We use a Nexus 6 as the example to show you the process.
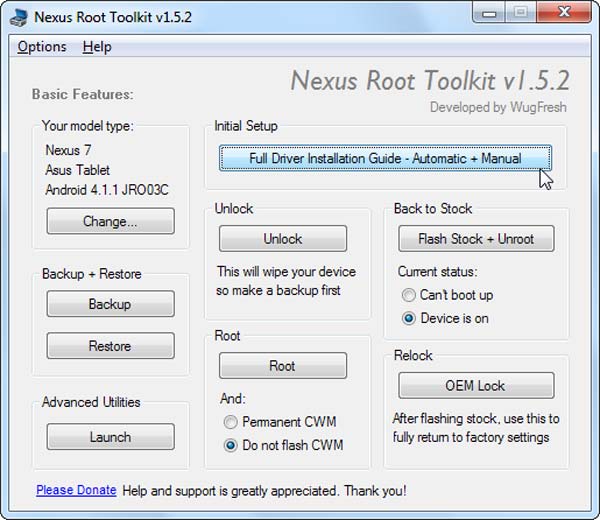
Step 1: Download and install Nexus Root Toolkit from Wugfresh website. When the program pops up, select your Nexus phone model from the dropdown list and hit "Apply" to confirm it.
Step 2: Next, hit the "Full Driver Installation Guide" button to trigger the root Nexus 6 process. Then click "Automatic Driver Configuration" button to move on.
Step 3: Enable "USB Debugging" mode on your phone and hook up it to the computer via a USB cord. Then click "OK" on the Driver Testing window.
If you want to back up your phone first, click "Backup" button on main window and complete it with onscreen instructions.
Step 4: Click on the "Unlock" button to start wiping your data and unlocking your phone. When it finishes, select "Do not flash CWM" under "Root" area and hit the "Root" button.
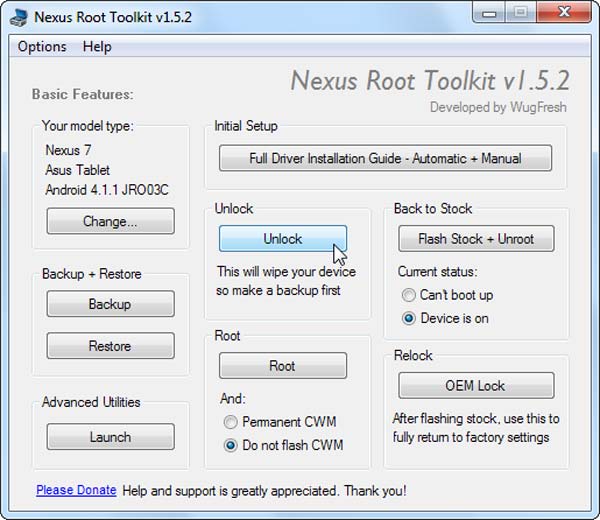
Step 5: After rooted, open the "SuperSU" app on your Nexus and tap "Continue" to update the SU binary. Finally, run the BusyBox app, give it root permissions, and hit "Install". Congratulations! Your Nexus 6 root is successful.
Part 3. Best Method to Root Nexus 7 without computer
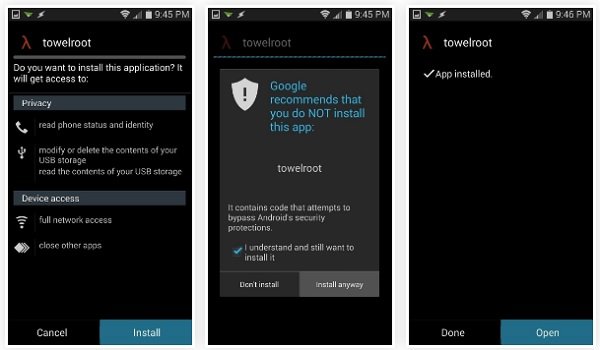
If you do not have a computer, there are chances to root Nexus 7 and other models with mobile rooting apps, like Towelroot.
Step 1: First of all, enable the "Unknown sources" in "Settings" > "Security" on your Nexus 7. Then download Towelroot APK in your mobile browser.
Step 2: You can run the APK file, after that tap "Install" to move on. If prompted, tick the box next to "I understand and still want to install it" and hit "Install anyway" to install it on your phone.
Step 3: After installed, open this Nexus root toolkit from your App Tray, tap "make it ra1n button". This will reboot your phone and start rooting Nexus 7 automatically.
Step 4: When it completes, your phone will restart and you can check the status with Root Checker and other apps.
Learn more: Root with iRoot.
Conclusion
In this tutorial, we have talked about how to root Nexus 10/7/6/5/4. First of all, tech savvy are more likely to root Google phones with the general methods, partly because it is customized. The downside is that it is complicated. Our step-by-step guide could help you to simplify the process. For non-tech savvy, Nexus Root Toolkit is a good option since it integrates all useful tools and allows you to root Nexus phone in a single click. Finally, we also shared a way to root Nexus 7 and other models without computer.