This guide will talk about how to turn off or on the firewall on Mac and Windows. Both the two most popular operating systems come with a firewall, which can protect your computer against attacks and unwanted access. It automatically blocks unauthorized access to your machine. Therefore, you have to turn it off when you install some third-party applications. This guide will demonstrate the workflow to do it on either Mac or Windows.

- Part 1: How to Turn off/on Firewall on Mac
- Part 2: How to Turn off/on Firewall on Windows
- Part 3: FAQs about Turn off Firewall
Part 1: How to Turn off/on Firewall on Mac
Unlike Windows, the built-in firewall is disabled on Mac by default. To protect your machine, you'd better turn it on manually since Mac does have many services that can be easily attacked by malware or viruses.
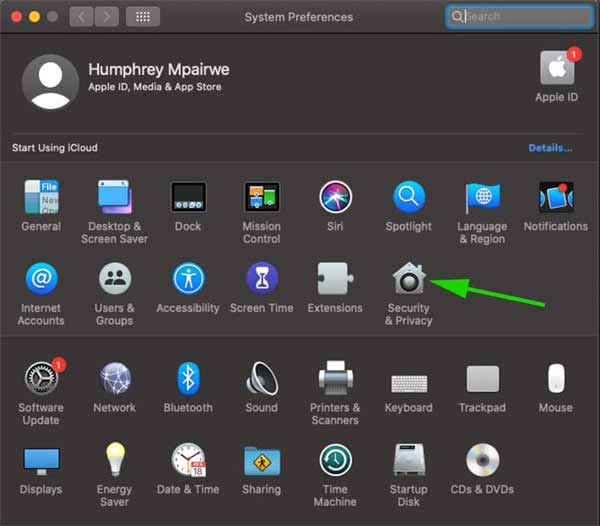
Step 1 Click the Apple menu when you intend to turn on/off the firewall on Mac.
Step 2 Choose the System Preferences item, and select Security & Privacy.
Step 3 Switch to the Firewall tab on the pop-up dialog. When prompted, enter your username and password, and click the Unlock button to unlock the options. Then click the Turn Off Firewall or Turn On Firewall button.
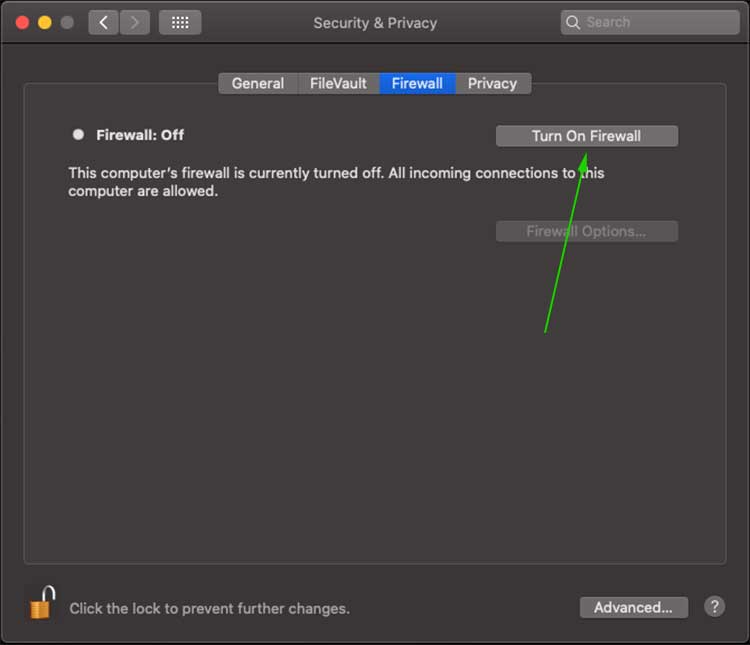
Step 4 To get additional settings, click the Firewall Options button. Then you will see all the apps that are allowed to send and receive network traffic. You can add or remove specific apps with the plus or minus button.
Note: Once the firewall is enabled on Mac, you can customize the configuration by hitting the Advanced button.
Part 2: How to Turn off/on Firewall on Windows
Microsoft has introduced a firewall on Windows for decades. As the system updates, it becomes complicated to turn it off. Therefore, we demonstrate the procedures according to the different versions.
How to Turn off/on Firewall on Windows 11
Step 1 Right-click the Windows button on the taskbar, and choose Settings on the context menu.
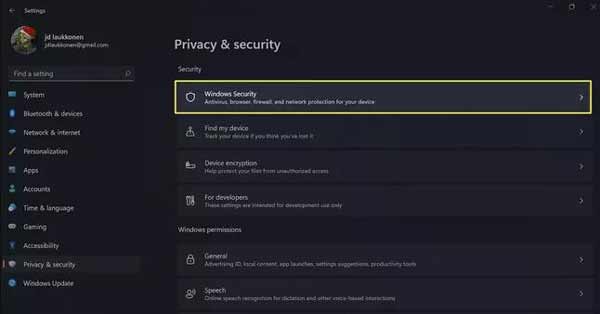
Step 2 Select the Privacy & security item on the left side, and click the Windows Security option on the right side.
Step 3 Click the Open Windows Security button, and choose Firewall & network protection.
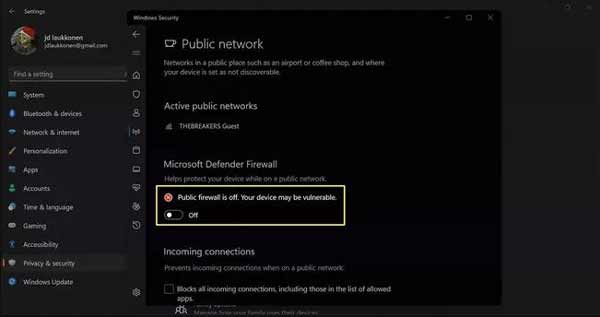
Step 4 Hit the Public network item, and toggle it off. Then you will get the message saying Public firewall is off, Your device may be vulnerable.
Step 5 To disable the firewall on Windows 11 for a specific app, click Allow an app through firewall under the Firewall & network protection section. Hit Change settings, click Allow another app, and press Browse to add it to the list.
Note: To turn on the firewall on Windows 11, you can toggle on Public network.
How to Disable/Enable Firewall on Windows 10/8/7
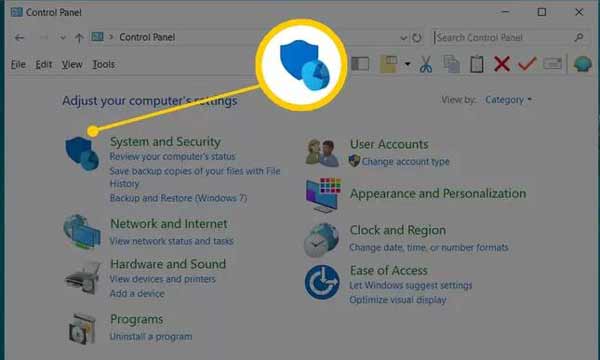
Step 1 Open the Control Panel from the Start menu at the bottom left corner.
Step 2 Click the System and Security link, and then choose Windows Firewall or Windows Defender Firewall.
Step 3 Hit the Turn Windows Firewall on or off option on the left sidebar, and then select Turn off Windows Defender Firewall to disable the firewall on Windows 10 or earlier.

Step 4 Finally, click the OK button to save the changes.
How to Turn off/on Firewall on Windows Vista
Step 1 To turn off the firewall on Windows Vista, also enter the Control Panel from the Start menu.
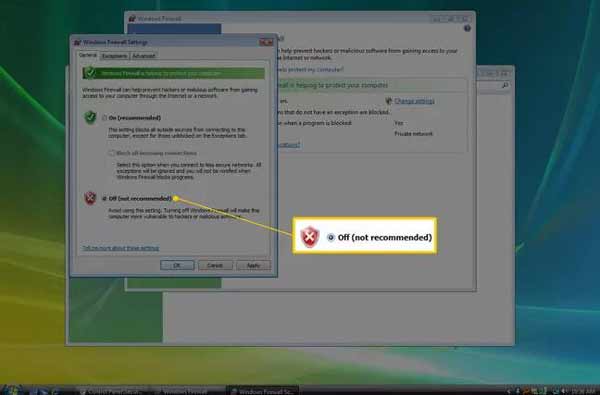
Step 2 Click the Security item on the category list, and then select Windows Firewall.
Step 3 Next, choose Turn Windows Firewall on or off on the left side. Then switch to the General tab, and select the Off option. Hit OK to confirm it.
Note: If you want to turn on the firewall on Windows Vista, select On in the General tab.
How to Turn off/on Firewall on Windows XP
Step 1 Enter the Control Panel from the Start menu. Select the Network and Internet Connections item.
Step 2 Find the Control Panel in Classic view, and choose Network Connections.
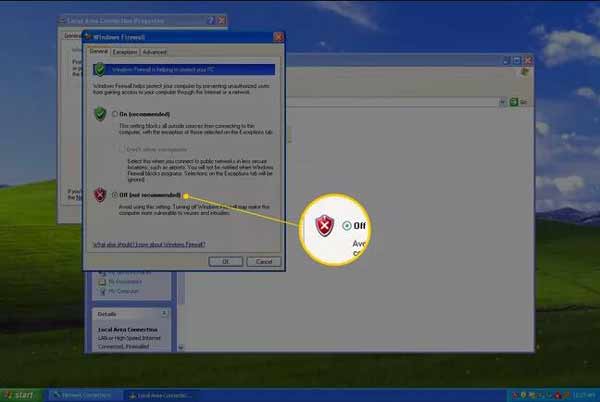
Step 3 Right-click on your network and choose the Properties option.
Step 4 Switch to the Advanced tab, and click the Settings button. Then select Off to disable the firewall on Windows XP. At last, click the OK button.
Recommend: Best Mac Malware Removal Tool
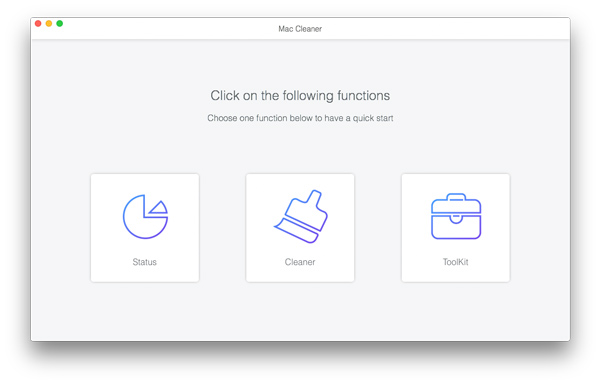
When you turn off the firewall on your Mac, your computer becomes vulnerable to viruses, malware, and other threats. The best way to protect your Mac is a powerful Mac malware removal tool, such as Apeaksoft Mac Cleaner. It can clean up malware, delete viruses, and other dangerous files on your Mac easily.

4,000,000+ Downloads
Scan your disk to look for malware and viruses.
Completely delete malware on Mac without technical skills.
Protect your privacy and internet actions with no firewall.
Available to a wide range of computers and laptops.
Part 3: FAQs about Turn off Firewall
How to disable the firewall with PowerShell?
Press the Windows + X keys to open the quick link menu, and press the A key to launch Windows PowerShell. Enter the command Set-NetFirewallProfile -Enabled False and hit the Enter key. Then execute Set-NetFirewallProfile -Profile Domain,Public,Private -Enabled False.
Why won't McAfee Firewall turn on MacOS Big Sur?
Open System Preferences from your Apple menu. Go to Security & Privacy, click on Allow for McAfee and check the issue status.
What is the difference between Domain Firewall, Private Firewall, and Public Firewall?
Domain firewall is applied when your computer is connected to a domain controller. Private firewall is applied when a connection to the network for your computer's account is not associated with it. Public firewall is applied when a connection to a domain is made through a public network.
Conclusion
This article told you how to turn off or on the built-in firewall on Windows 11/10/8/7/Vista/XP, and Mac OS X. The procedures are complex, but you can learn them respectively above clearly. Apeaksoft Mac Cleaner can help you protect your machine without enabling a firewall on Mac. More questions? Please, feel free to leave a message below this post.