When you purchase a new iOS device, Apple will ask you to create an account to sign up your device and download content from App Store. Also, Apple gives you 5GB free storage of iCloud to back up and transfer your data on iOS. Thank for iCloud Family Sharing feature, family members can each have a separate Apple ID but also share photos and storage with each other.
As a new feature, many iOS users do not understand how to set up it or use it. Therefore, we will tell you everything you should know about it.

- Part 1: What is iCloud Family Sharing?
- Part 2: How to Set up iCloud Family Sharing
- Part 3: How to Use iCloud Family Sharing
- Part 4: Best Alternative to iCloud Family Sharing: iPhone Transfer
Part 1: What is iCloud Family Sharing?
iCloud Family Sharing feature is the extension of the standard Family Sharing plan. It permits up to six family members to share the files downloaded from iTunes, iBooks, App Store, Apple Music and other subscription services.
Moreover, invited families are able to share photos and other documents via iCloud Family Sharing.
If you are paying for a larger amount of storage, invited family members are able to use the space as well. According to Apple, you can only share an iCloud storage plan of 200GB or higher. It means that iCloud Family Sharing costs at least $2.99.
Part 2: How to Set up iCloud Family Sharing
If you want to share your photos and other data via iCloud Family Sharing, you have to set it up on your iOS or MacOS.
How to Set up iCloud Family Sharing on iOS
Step 1. Update your iPhone to iOS 11 or later. The recipients can use older systems.
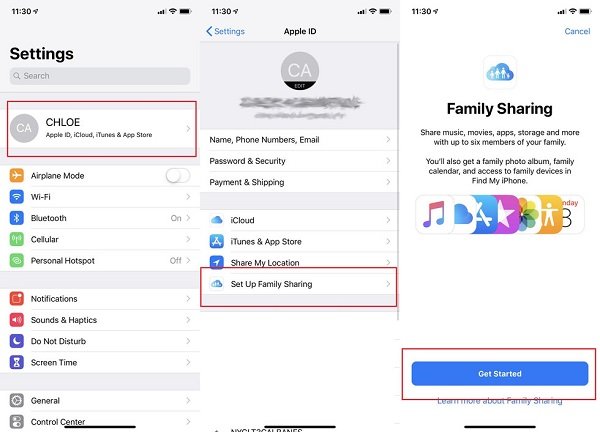
Step 2. Open the Settings app from your home screen, tap on your name (Sign into your iCloud account and password), go to Set Up Family Sharing, and tap Get Started button.
Step 3. Select the options you want to share with your families, such as iTunes & App Store Purchased, Apple Music, Location Sharing, etc.
Step 4. If you select iCloud Storage, you will be asked to upgrade your iCloud storage to 200GB or 2TB.
Step 5. Then tap Share With Family and hit Invite Family Member to create an iMessage. Select the contact of your family member and tap Send button.
Once your family accept and join iCloud Family Sharing Plan, you can start sharing contents via iCloud Family Sharing.
How to Set up iCloud Family Sharing on MacOS
Step 1. Make sure your Mac is updated to macOS High Sierra 10.13 or up. Then open iCloud in System Preferences.
Step 2. Click Manage on the bottom right corner and hit Change Storage Plan. Then you can upgrade your iCloud storage plan.
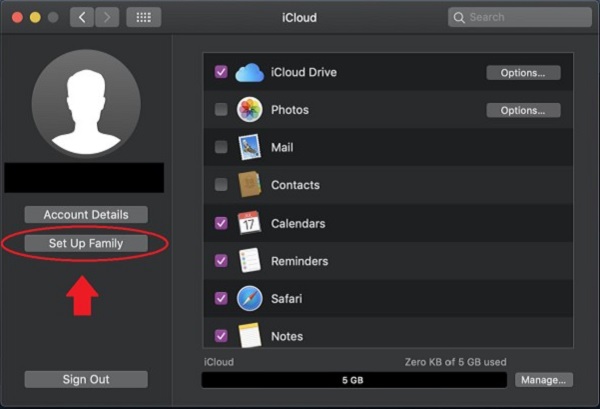
Step 3. Click the Set Up Family button in iCloud control panel, which is under your profile.
Step 4. Then follow the onscreen guide to set up your iCloud Family Sharing. It is similar to set up on iOS.
Part 3: How to Use iCloud Family Sharing
With iCloud Family Sharing, you can share everything from content purchased in App Store to Apple Music subscription, from photos to location.
Note: Files sharing on iCloud needs Wi-Fi connection. Plase make sure the Wi-Fi is enabled on iPhone. (Wi-Fi not working on iPhone? Fix it.)
How to Share Photos via iCloud Family Sharing
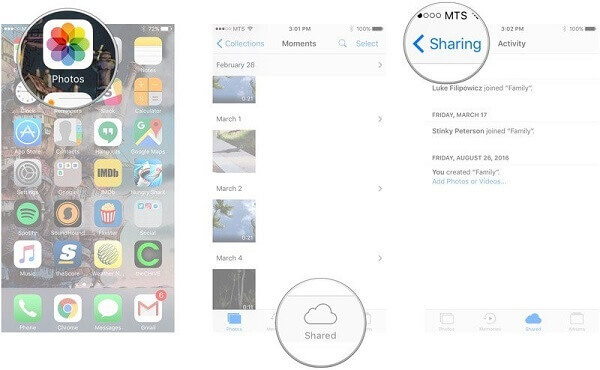
Step 1. Run your Photos app, go to Share > Family album, tap Share button at the upper left corner.
Step 2. Tap the Plus button and touch all photos and videos you want to share. Then tap Done in the upper right corner.
Step 3. Add a description if you like, and then tap Post to start sharing photos via iCloud Family Sharing.
How to Share Purchased Contents with iCloud Family Sharing
Step 1. Open iTunes Store, App Store or iBook, and go to the Purchased screen.
Step 2. Tap the name to see the content that your family member purchased.
Step 3. If you like an item, tap the Download button to get it for free.
How to Share Apple Music Subscription using iCloud Family Sharing
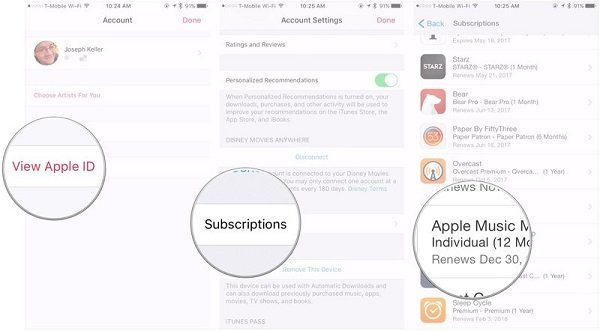
Step 1. Open Music, head to For You tab, tap your avatar and hit View Apple ID.
Step 2. Press Subscriptions, and select Apple Music Membership > Family. Tap Confirm to turn your Apple Music account to a family plan.
On the recipient’s device, go to Settings > Music and tap Join Apple Music. Log in the sender’s Apple ID and tap Start Using Apple Music.
Part 4: Best Alternative to iCloud Family Sharing: iPhone Transfer
If iCloud Family Sharing is not working on your iPhone, Apeaksoft iPhone Transfer could meet your need.
- Share any data between iPhone and PC or another iOS device.
- Support photos, videos, contacts, messages, call history and more.
- Rely on physical connection to share data with no requirement of the internet.
- Compatible with all iOS devices and iOS systems.
In short, iPhone Transfer is the best alternative to iCloud Family Sharing.
How to Share iOS Data with Families And Friends
Step 1. Get the best alternative to iCloud Family Sharing
Download and install iPhone Transfer on your computer.
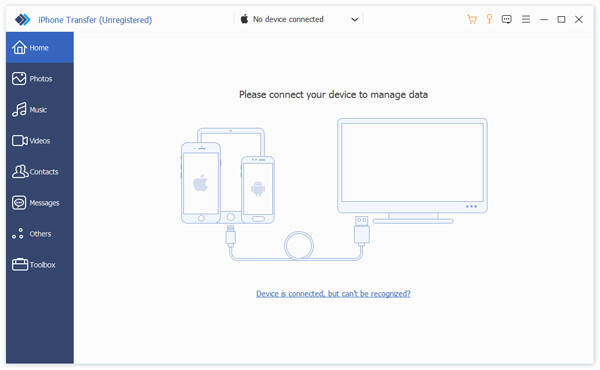
Connect both iOS devices to the computer via USB cables. Launch the program and it will detect your devices.
Step 2. Preview your data for sharing
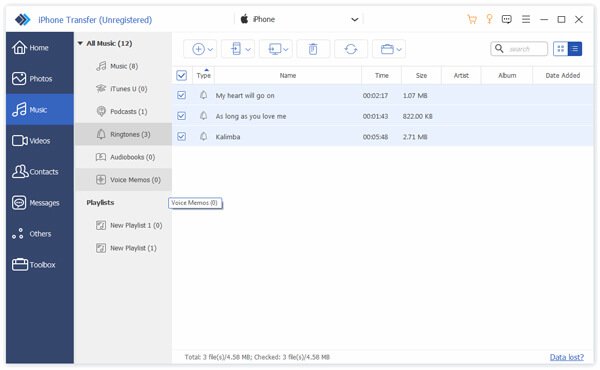
Unfold the dropdown tree on the top ribbon and select the source iPhone. Then you can look at all data stored on the source iPhone, such as music, photos, and more. To share your favorite songs, go to the Music tab from left side and check all music you want to share.
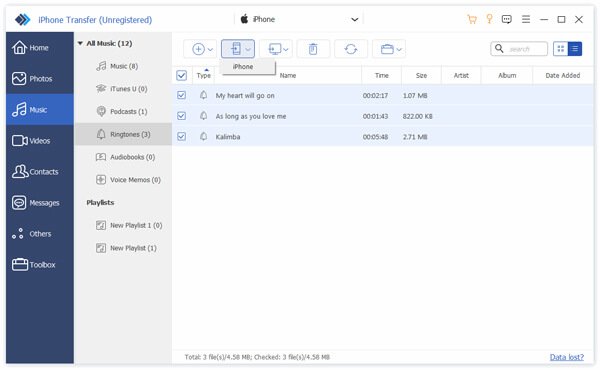
Step 3. Share data without iCloud Family Sharing
If you are ready, click the Export to Device button on the top of the window and select the target iOS device. When it is done, the music will go to the target device. The biggest advantage of iPhone Transfer is to protect current data on both iOS devices from damaging.
Conclusion
This tutorial told you how to set up and use iCloud Family Sharing feature. If your family members or friends are using iOS devices, you can share your data with them through this feature simply. On the other hand, Apeaksoft iPhone Transfer is the best way to share contents when iCloud Family Sharing not working.