How to Change Your Apple ID Without Losing Everything
Once you get an Apple device, you will be asked to activate it with an Apple ID account. If you already have one, you can log in with it quickly. If not, you have to create an account with your main email address and phone number. The ID is essential to access all Apple services, from App Store to Apple Music, from iMessage to FaceTime. If you stop using the email or phone number, follow our guide to change your Apple ID on your iPhone, iPad, or Mac.
PAGE CONTENT:
Part 1: What Is Apple ID
An Apple ID is a master key for accessing a wide range of Apple services and devices. It allows users to activate their Apple devices and access Apple services, like App Store, iCloud, Apple Music, iMessage, FaceTime, Find My, and more, making their Apple devices work together seamlessly.
An Apple ID consists of an email address and a password. When you set up the first Apple device, you are asked to create this account with your main email address.
Part 2: Before Changing Apple ID
Before you change your Apple ID, you need to keep some important points in mind to avoid data loss and ensure a seamless experience. Here is what you need to learn before performing the process:
- 1.Sign out of all Apple services and devices where you have logged in with your current account.
- 2.Make sure to update the new Apple ID on all your Apple devices.
- 3.If you use an iCloud email address as your Apple ID, change it online at appleid.apple.com.
- 4.You won’t lose access to your purchases and data after changing your Apple ID.
- 5.Your iCloud backups are still available to restore.
- 6.Back up your device before changing your account to avoid data loss.
- 7.You cannot use your current Apple ID email address to create a new account.
- 8.Once you change your Apple ID to an Apple email address, ending in @icloud.com, @me.com, or @mac.com, you cannot change it to a third-party email address later.
Part 3: How to Change Apple ID on iPhone/iPad
By default, you can sign in with an Apple ID on your iPhone or iPad and use it for the App Store. However, according to Apple, users can change their Apple ID on an iPhone or use a different account for the App Store.
How to Change Apple ID on iPhone/iPad
Step 1. Open the Settings app from your home screen.
Step 2. Tap on your profile at the top of the screen.
Step 3. Choose the Sign-In & Security option
Step 4. Tap the Edit button in the Email & Phone Numbers section.
Now, you have two options:
Option 1
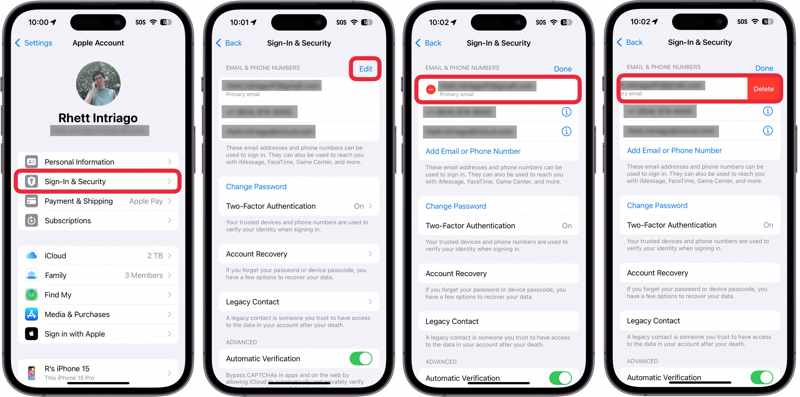
Step 5. Press the Delete button with a minus icon next to the Primary email.
Step 6. Next, tap the Delete button.
Step 7. When prompted, pick Choose Another Email.
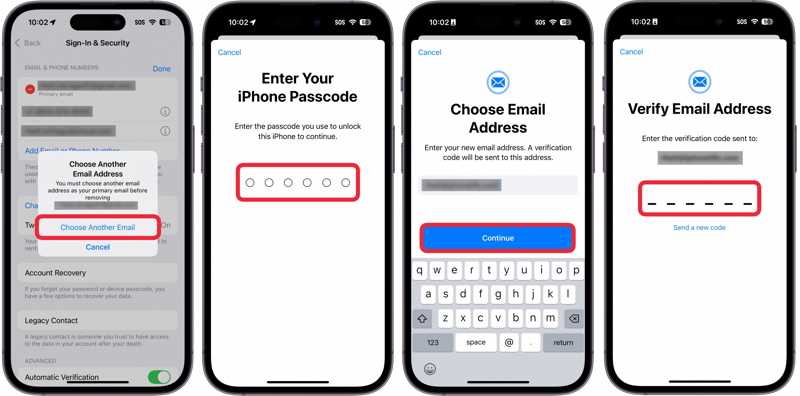
Step 8. Enter your iPhone passcode.
Step 9. Then, enter a new email address and tap Continue.
Step 10. Access the email address and receive the verification code.
Step 11. Enter the code to confirm changing your Apple ID on iPhone.
Option 2
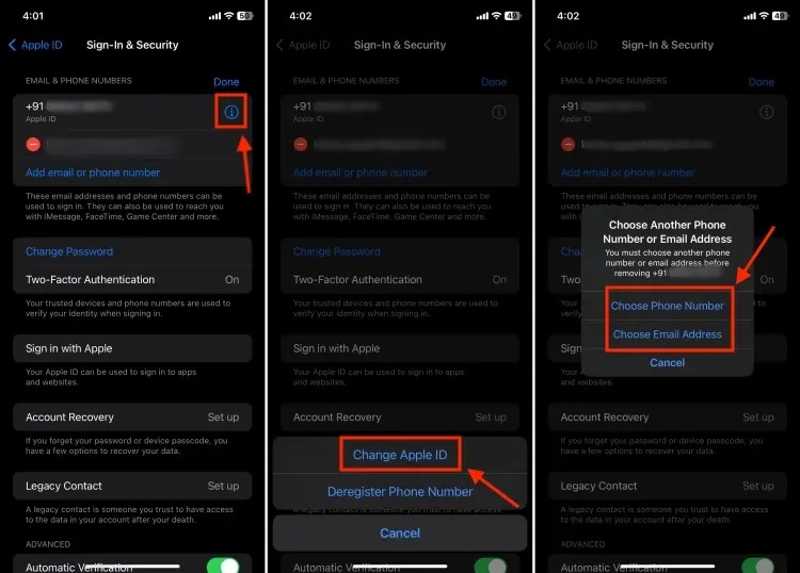
Step 5. Tap the Info button on your Apple ID.
Step 6. Choose Change Apple ID on the pop-up.
Step 7. Next, pick Choose Phone Number or Choose Email Address according to your need.
Step 8. Then, follow the onscreen instructions to change your Apple ID account on your iPhone.
How to Change Apple ID on iPhone/iPad for App Store
Step 1. Tap on your profile in the Settings app.
Step 2. Choose the Media & Purchase option.
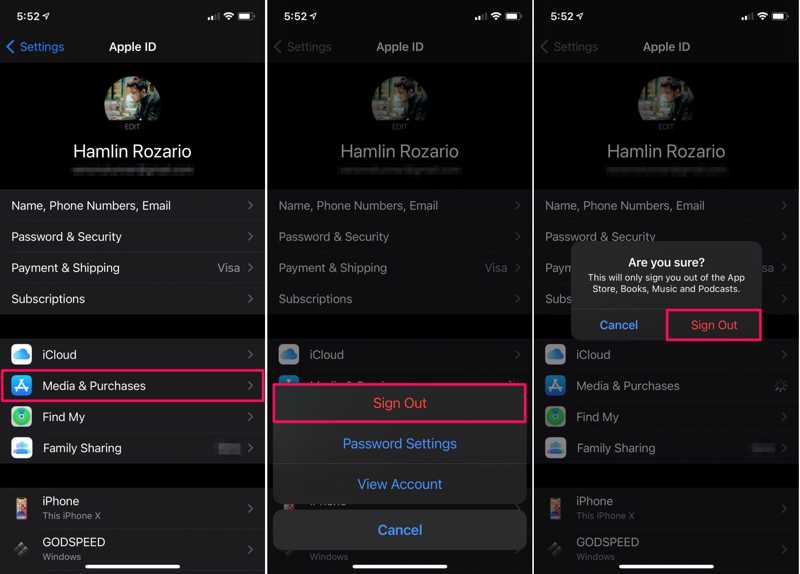
Step 3. Tap the Sign Out button on the pop-up dialog.
Step 4. If prompted, tap Sign Out again.
Step 5. Next, choose the Media & Purchase option again.
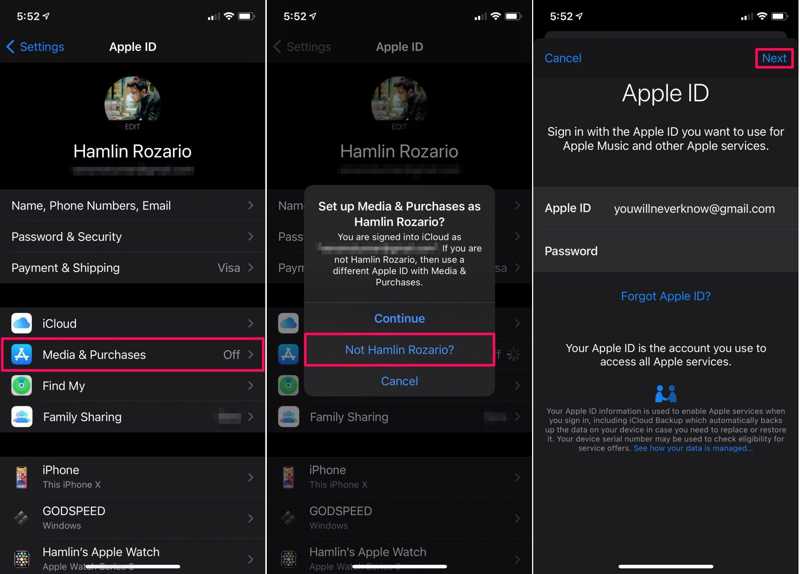
Step 6. Pick Not [your name] on the dialog if you want to change your Apple ID for App Store.
Step 7. Enter a new Apple ID and password.
Step 8. Tap the Next button to confirm it.
Part 4: How to Change Apple ID on the Web
Once you stop using the email address associated with your Apple ID, you should change it to protect your privacy and data. In addition to iOS devices, you can change your Apple ID account online.
Step 1. Go to https://account.apple.com/ in a browser.

Step 2. Click the Log In button and log in with your current Apple ID credentials.
Step 3. Choose the Sign-In and Security option on the sidebar.
Step 4. Then, click Apple ID to proceed.
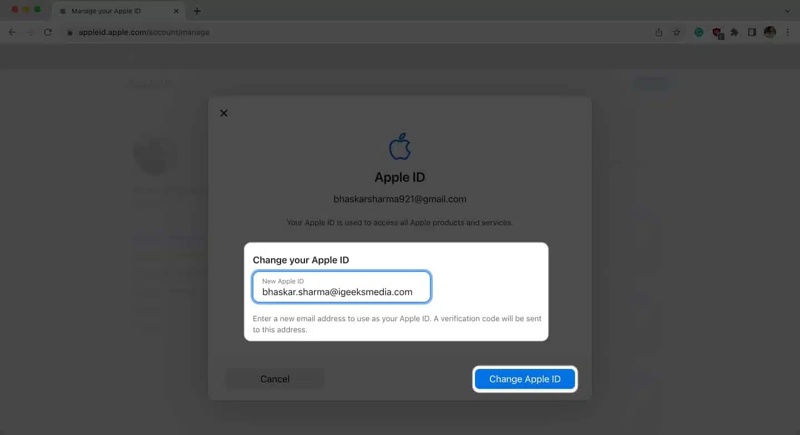
Step 5. Next, click the Delete button next to the primary email.
Step 6. Type in a new email address and click Change Apple ID.
Step 7. Enter your current Apple ID password and hit Continue.
Step 8. Receive the verification code in the new email address.
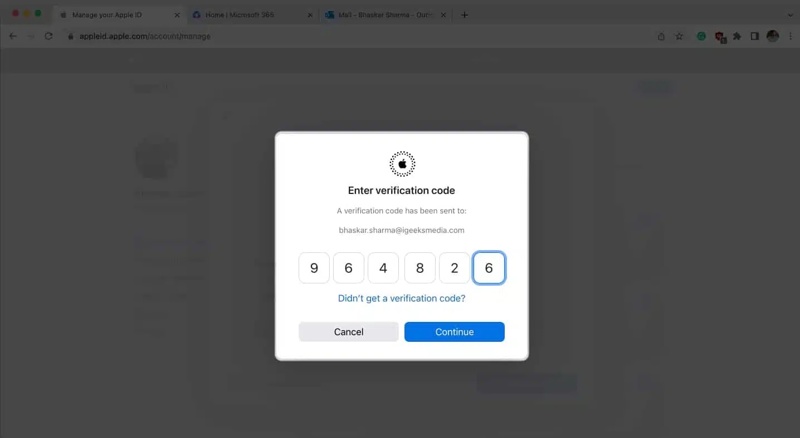
Step 9. Enter the verification code and click the Continue button.
Step 10. After changing your Apple ID, remember to update it on all your Apple devices.
Part 5: How to Change Apple ID Account on iPhone/iPad/Mac
If you want to change your entire Apple ID account, you can complete the job on your iPhone, iPad, or Mac quickly. The process requires your current Apple ID password. Here are the steps to change your Apple account:
Step 1. Open the Settings or System Settings app.
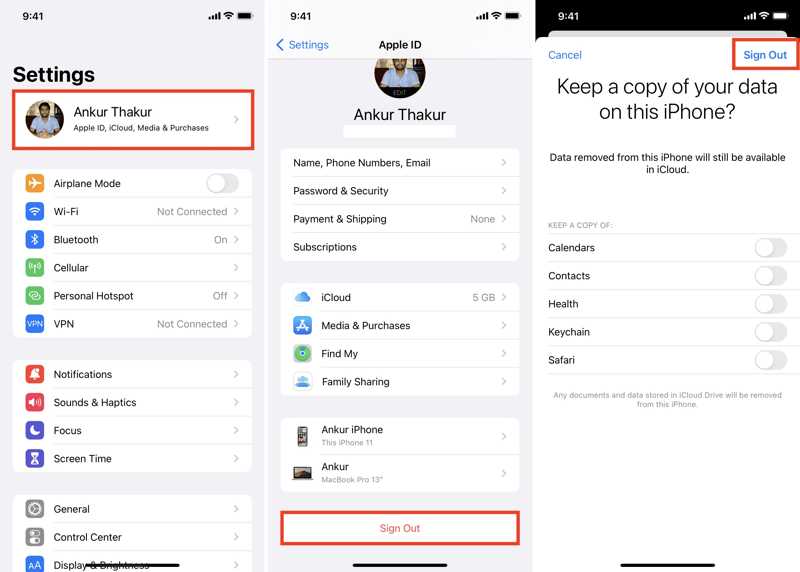
Step 2. Tap on your profile or click Apple ID.
Step 3. Scroll down and hit Sign Out.
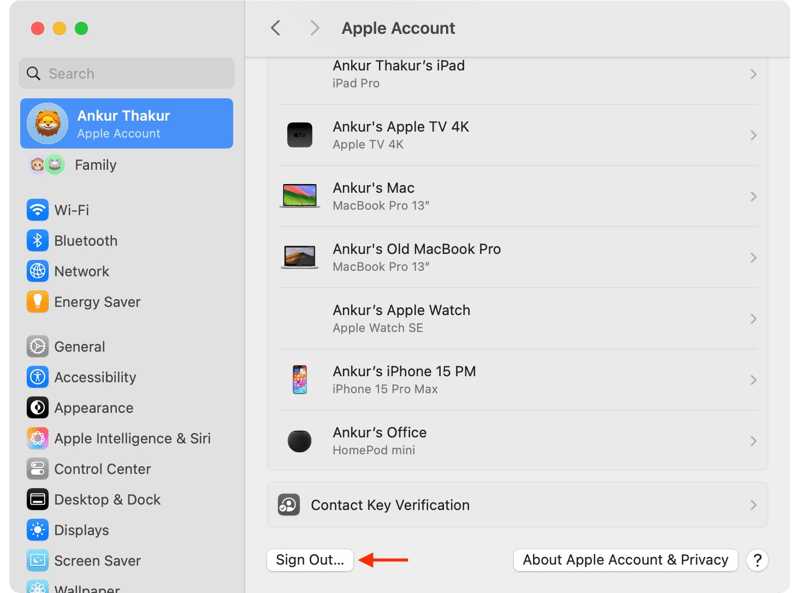
Step 4. Enter your Apple ID password to disable Find My and hit Turn Off.
Step 5. Select the data you want to keep and hit Sign Out again.
Step 6. Next, log in with the new Apple ID and password.
Further Reading
Part 6: How to Change Apple ID on iOS Without a Password
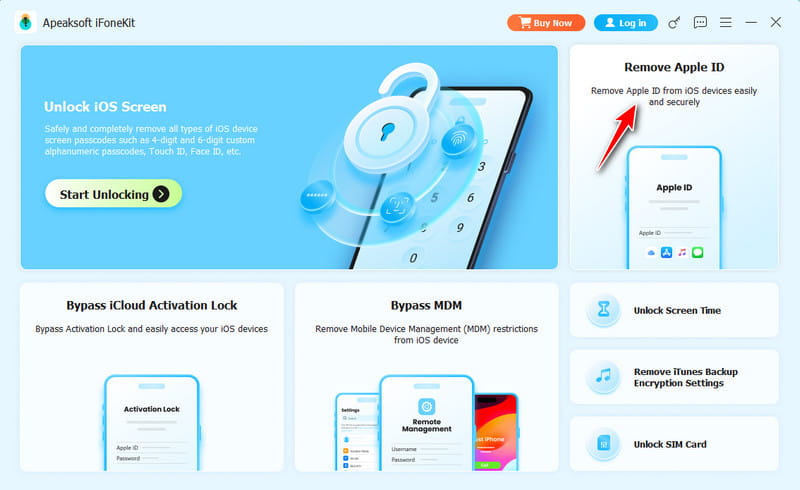
If you forgot your Apple ID password, you cannot directly change your Apple ID on your iPhone. Fortunately, Apeaksoft iFoneKit enables you to get rid of the old account without any restrictions. Furthermore, it is easy to use and doesn’t require technical skills.

Downloaded by over 1,000,000 users
- Remove old Apple ID from iOS device without a password.
- Work in various situations, including disabled iPhones.
- Offer bonus features, like MDM removal.
- Support a wide array of iPhones and iPad devices.
Secure Download
Secure Download

How to Change Apple ID on Your iPhone Without a Password
Step 1. Connect to your iPhone
Download and install the Apple ID removal software on your PC. There is another version for Mac. Launch it from your desktop and choose the Remove Apple ID mode. Connect your iPhone to your PC with a Lightning cable.
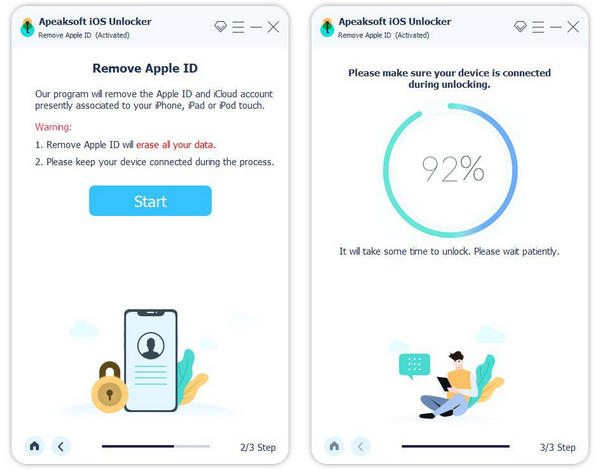
Step 2. Remove Apple ID
Once your iPhone is detected, click the Start Now button. If Find My iPhone is disabled, the software will automatically remove the current Apple ID from your device. If Find My iPhone is enabled, follow the onscreen instructions to reset all settings on your device. Then, the software will do its job.
Step 3. Change Apple ID on iPhone
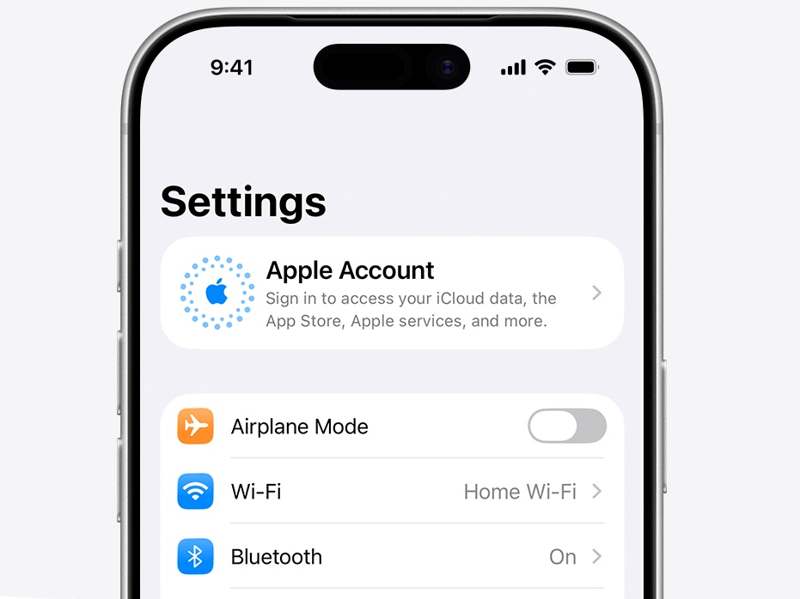
When it is done, your iPhone will restart. Go to the Settings app, tap Apple Account, and choose Sign in Manually. Then, enter a new Apple ID and password.
Conclusion
This guide explained how to change your Apple ID on your iPhone, iPad, and computer. You can switch your Apple ID email address to a new email or phone number on your iPhone or the web. You can also use a different Apple ID for the App Store. Apeaksoft iFoneKit is able to change your account on an iOS device without the password.
 Apeaksoft iFoneKit
 Unlock all types of iOS passwords from iPhone, iPad and iPod.
Secure Download
Secure Download
