PowerPoint is an important part of Microsoft Office suite. Now, it is still an essential way to show your ideas, business plans, products and more to your partner, colleague, boss and customers. However, presentation is a changeable file. If you do not want others to change your presentation, you have to record PowerPoint as video. Moreover, it is a good way to post your presentation as a video but not PowerPoint file. Anyway, you can learn three ways to do the job in various situations.

- Part 1: How to Record PowerPoint with Built-in Tool
- Part 2: Best Way to Record PowerPoint Presentation
- Part 3: How to Record PowerPoint Online
- Part 4: Comparison of Three Methods
- Part 5: FAQs of Recording a PowerPoint
Part 1: How to Record PowerPoint with Built-in Tool
The built-in recording function is the easiest way to record PowerPoint presentation with your narration.
Step 1 Open your presentation in MS PowerPoint. Go to the Slide Show tab and click Record Slide Show.
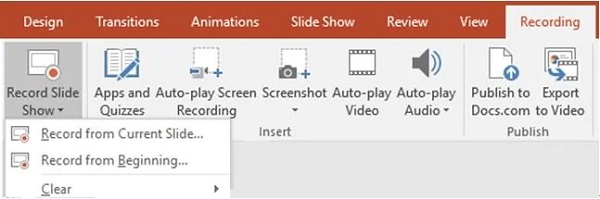
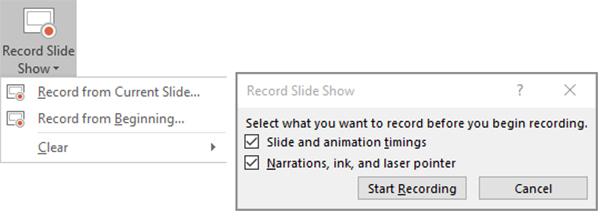
Step 2 Then you will get two options, Record from Current Slide and Record from Beginning. The former is for recording entire presentation and the latter is for recording specific slides.
Step 3 After selecting, the Record Slide Show dialog will pop up. Select what you want to record and click Start Recording button.
Step 4 Then you will see the Recording toolbar appearing at the top left corner with several buttons. The arrow button lets you go to the next slide and you can click the Pause or Re-record button at any time. To get the ink, eraser or laser pointer, right-click on the slide and select Pointer Options.
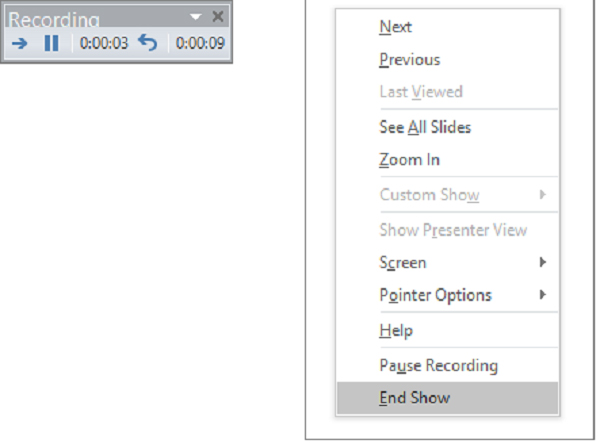
Step 5 To end your PowerPoint recording, right-click on the final slide and choose End Show on the context menu.
Step 6 Go to the File menu, and select Save As. Navigate where you'd like to save the recording and choose PowerPoint Show in Save as type. Click Save to save the recording.
If you do not want to record PowerPoint with audio, just remove audio from PowerPoint while recording it.
Part 2: Best Way to Record PowerPoint Presentation
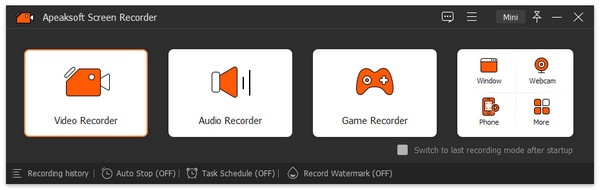
The built-in recording function is only a simple way to capture your narration along with slides. If you are looking for more functions, Apeaksoft Screen Recorder is worth to use.
4,000,000+ Downloads
Record PowerPoint presentation in HD videos.
Capture your face and voice along with presentation.
Offer video editing functions, like paint and trim.
Preview the presentation recordings with built-in media player.
In short, it is the best option to record your PowerPoint presentation with audio on Windows and Mac.
How to Record a PowerPoint Presentation
Step 1 Install PowerPoint recorder
Firstly, you need to install the best PowerPoint recorder on your PC. There is a specific version for Mac. Then choose Video Recorder to open the main interface. Open the desired presentation in MS PowerPoint.
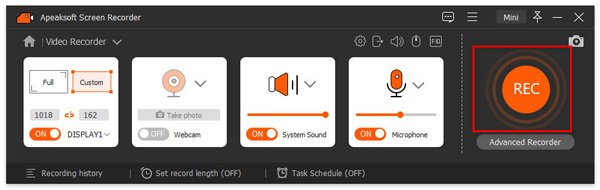
Step 2 Capture presentation
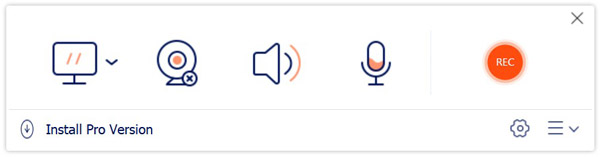
There are four options on the window, Display, Webcam, System Sound, and Microphone. The different combinations are used to perform various task.
If you only record the presentation with audio, turn on Display, choose Custom and then Select region/window, and click the PowerPoint window. Turn on System Sound while disable Webcam and Microphone. To capture your face and narration along with PowerPoint, enable the four options and set them based on your need.
Now, click the REC button and play your slides to start recording PowerPoint presentation immediately.
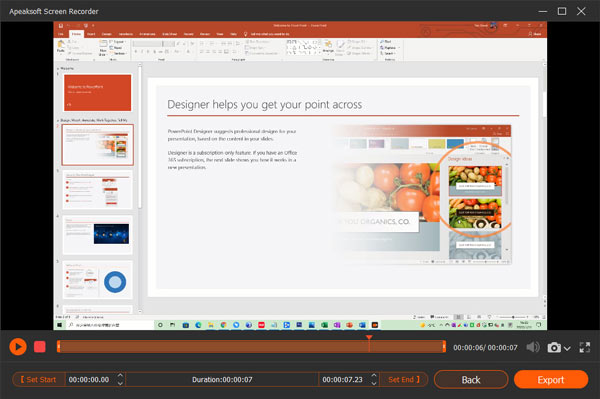
Step 3 Export presentation recording
During presentation recording, you can text or draw on it with the Edit tool. The Camera button is used to make a screenshot at important moment. When your presentation finishes, click the Stop button. Then you will be taken to the preview window. Check the video by hitting the Play button. If there are unneeded frames, use the Clip tool to remove them. Finally, click on the Save button to export the PowerPoint recording to your hard drive.
Part 3: How to Record PowerPoint Online
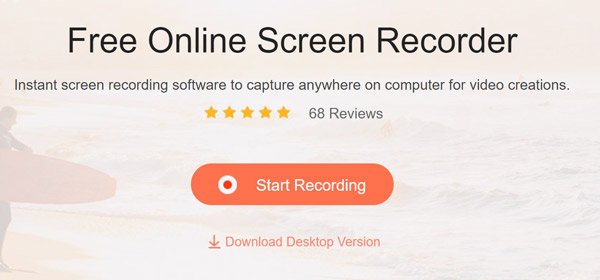
Sometimes, you just need to record a PowerPoint as a video but do not want to install any software on your machine. In such case, Apeaksoft Free Online Screen Recorder is pretty helpful since it works online completely.
 Recommendation
- Record PowerPoint presentation without installing.
- Add your reaction and narration to presentation video.
- Save PowerPoint presentations as HD MP4 files.
- Totally free to use with no watermark or length limit.
How to Record PowerPoint as Video Online
Step 1 Open the presentation that you wish to record in PowerPoint. Then visit https://www.apeaksoft.com/free-online-screen-recorder/ in any browser. Press the Start Recording button and download the launcher.
Step 2 Click the Monitor button and set the recording region based on the PowerPoint window. If you wish to capture your face, enable Webcam; otherwise, disable it. Then decide the audio source, like System audio and Microphone.
Step 3 Press the REC button and start recording your presentation on the desktop. Whenever you want to stop recording, click the Stop button. Next, download the MP4 file.

In this way, you can also free record Minecraft, YouTube, Skype, and more.
Part 4: Comparison of Three Methods
| Recording features | Built-in Recording in PowerPoint | Apeaksoft Screen Recorder | Apeaksoft Free Online Screen Recorder |
|---|---|---|---|
| Record PowerPoint with audio | Yes | Yes | Yes |
| Capture webcam | No | Yes | Yes |
| Edit recording | No | Yes | No |
| Output format | PowerPoint Show | MP4, WMV, MOV, AAC, M4A and more. | MP4 |
Part 5: FAQs of Recording a PowerPoint
Where do recorded PowerPoint presentations go?
You have to set the output destination manually after recording PowerPoint presentations. Once recording is complete, go to the File menu on the top of PowerPoint window and choose Save As. Then you will be present the save-as dialog. Then you can decide the output directory base on your preference.
How do I record myself in PowerPoint?
The answer depends on your situation. In PowerPoint 2019 and earlier, you cannot capture yourself when recording presentation. In PowerPoint 365, Microsoft re-design the recording function. So, you can add your face to recording by hitting the Camcorder button at the bottom right side during recording. For earlier versions, you have to use a third-party screen recorder to add your webcam along with presentation recording.
How do I convert PPT to MP4?
You have several ways to convert your presentations to MP4 video files. Firstly, the save as option in PowerPoint lets you export a presentation into MP4 format. Plus, you can use a third-party PPT to MP4 converter to do the task quickly. Another way to convert your PPT to MP4 is to record your PowerPoint as video. Bear in mind that the built-in recording function in PowerPoint only saves it as PowerPoint Show but not MP4.
Conclusion
This guide has talked about how to record a PowerPoint presentation as video with audio. It is a good idea to share and present your PPT as a video file with your narration. That can increase the engagement of your presentation. Apeaksoft Screen Recorder, for example, is able to produce high quality videos from your PPT. If you have more questions, please leave a message below.