Lifesize is a cloud-based video conference solution for modern business. Now, it has become a vital communication tool for both business. Lifesize meetings are where ideas come to life, problems are solved, information is shared and decisions are made. With the ability to join a meeting from virtually anywhere on any device, it ensures you to attend a meeting on time. Therefore, this article will show you three ways to record and share Lifesize meetings easily.

- Part 1: How to Record and Share Lifesize Conference
- Part 2: Best Way to Record Lifesize Video Meeting
- Part 3: How to Record Lifesize Conference Online
- Part 4: FAQs of Lifesize Record and Share
Part 1: How to Record and Share Lifesize Conference
The built-in Record and Share function in Lifesize makes it easy to capture and share important conferences, conversations, trainings, presentations and more.
Step 1 During a Lifesize meeting, click the circular Start recording button at the bottom. Then the recording button will appear.
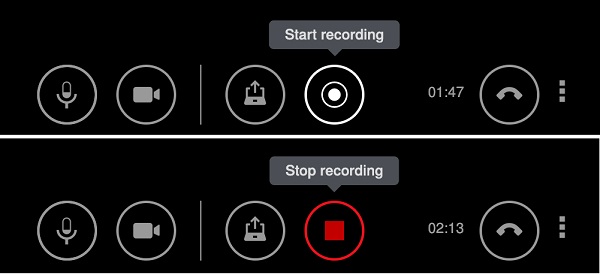
Step 2 To stop recording, hit the Stop recording button at the bottom. Then the Lifesize recording will be auto saved to your account.
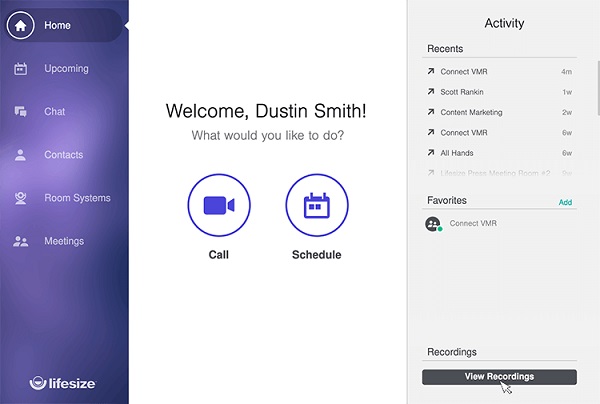
Step 3 Go to the dashboard in Lifesize and click View Recordings, head to the recordings page on the left side and choose the desired recording.
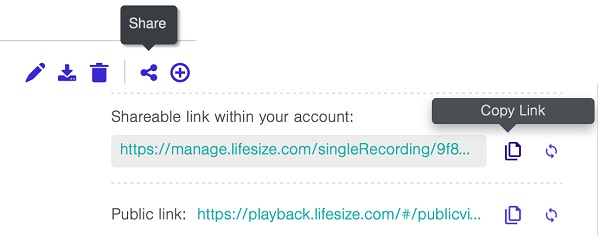
Step 4 Click the Share button at the bottom right side. Then you will be presented a link. Hit Copy Link and then share Lifesize and datasheet on social media or send it to other participants.
Part 2: Best Way to Record Lifesize Video Meeting
The built-in Record and Share function is just a simple way to do the task. If you are looking for a powerful Lifesize recorder, Apeaksoft Screen Recorder is a good choice.
4,000,000+ Downloads
Capture Lifesize meeting on Windows and Mac.
Optimize recording quality and save it as HD videos.
Add your reactions to the recording via webcam and microphone.
Provide extensive custom options for advanced users.
How to Record and Share Lifesize on PC
Step 1 Get the best Lifesize recorder
Start the best meeting recorder for Lifesize after you installed it to your PC. There is a specific version for Mac. Pick Video Recorder from the home interface.
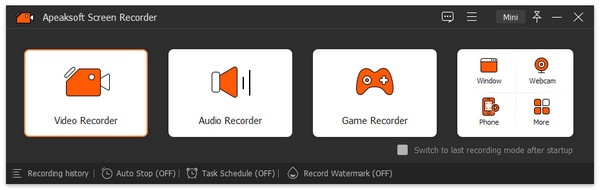
Step 2 Record Lifesize meeting
To only record a conference, turn on Display, choose Custom and Select region/window, and click the Lifesize app. If you attend a meeting in browser, draw on the recording area. Toggle on System Sound as well. The Webcam and Microphone are used to capture your face and voice. You can decide whether turn them on or not. Click the REC button when Lifesize meeting begins. Then you will see several buttons on the toolbar. The Edit button is used to add text and paintings on recording. The Camera button lets you make a still screenshot.
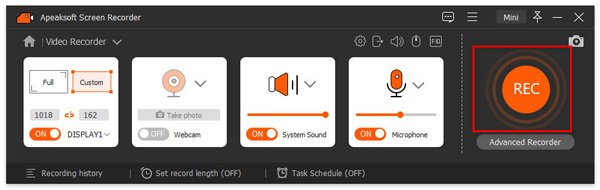
Step 3 Save Lifesize recording
When you want to stop Lifesize recording, click the Stop button. Then the preview window will pop up. Check the Lifesize meeting recording and remove redundant frames with the Clip tool. Finally, click on the Save button and export it to your hard disk. To share the recording, click the Share button and follow the onscreen instructions to do it easily.
Repeat the steps above and you can record Zoom meeting, WebEx, and other online conference with ease.
Part 3: How to Record Lifesize Conference Online
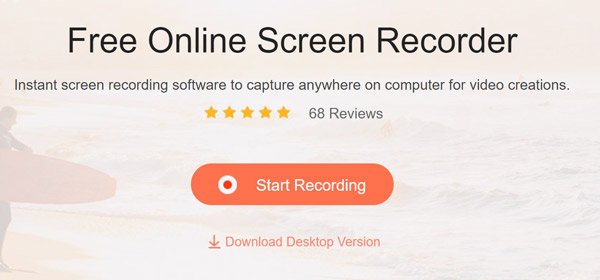
Apeaksoft Free Online Screen Recorder is the best option if you wish to record and share Lifesize conference but do not like to install software.
 Recommendation
- Record Lifesize meetings with no installation.
- Support webcam and microphone recording as well.
- Totally free of charge with no length limit.
- Save meeting recordings in HD MP4 files.
How to Record and Share Lifesize Online
Step 1 When you want to record a meeting on Lifesize, open a browser and visit https://www.apeaksoft.com/free-online-screen-recorder/. Hit the Start Recording button to download the launcher.
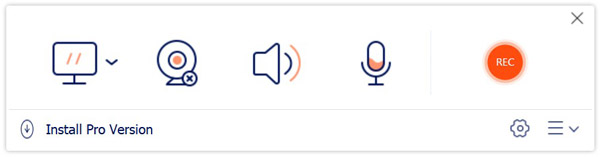
Step 2 Set the recording area by hitting the Monitor button. If you do not capture your face, disable Webcam button; otherwise, enable it. Then decide the sound sources, like System audio and Microphone.
Step 3 Press the REC button when your conference is ready. Wait for the conference to finish and click Stop button. Next, download the video to your computer or share it.
Superior to sharing screen online, this free online screen recorder allows you to playback the sharing unlimitedly.
Extended Reading:
Part 4: FAQs of Lifesize Record and Share
How to share screen my screen on Lifesize?
If you wish to share your screen or presentation on Lifesize, join a meeting in browser or desktop app, click the Present button and decide to present an app or entire screen.
What is Lifesize Cloud?
Lifesize Cloud is a blend of software, hardware, service and UX. It provides a connected experience to anyone using smartphone, tablet, laptop and PC. You can organize a conference with up to 40 participants. In short, Lifesize Cloud is a SaaS service.
How do you know if someone is recording your Lifesize meeting?
If someone uses the built-in recording function, you will get the notification. However, Lifesize cannot detect third-party screen recorders.
Conclusion
This guide has shared three methods to record and share your Lifesize conferences. The built-in record tool is easy to use but with limited function. That is why we shared Apeaksoft Screen Recorder. With it, you can get more options and capture online meetings securely. More questions? Please feel free to leave a message below.